Twin-Dispense Dryer Sheet & Lint Roller Caddy
A wall-mounted laundry caddy that feeds dryer sheets through a front slot and cradles a standard lint roller on a side arm, so both habits — grab a sheet, swipe your sweater — live on one screw…
Twin-Dispense Dryer Sheet & Lint Roller Caddy
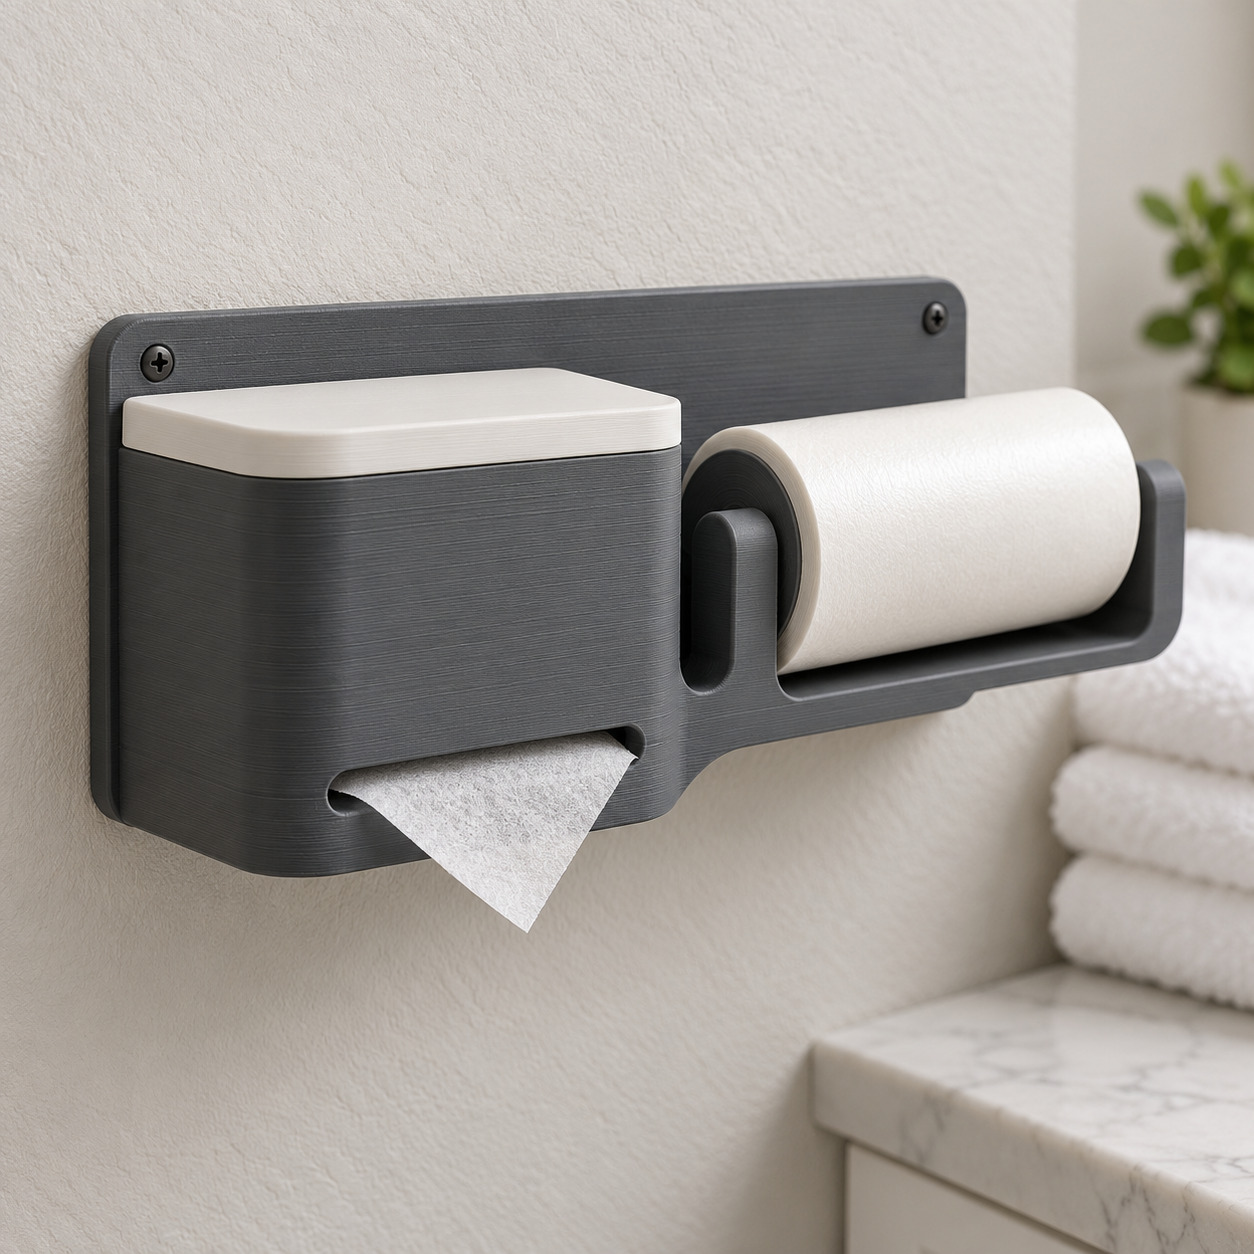
A wall-mounted laundry caddy that feeds dryer sheets through a front slot and cradles a standard lint roller on a side arm, so both habits — grab a sheet, swipe your sweater — live on one screw instead of two separate gadgets.
Date: 2026-10-17 Category: Household Modeling difficulty: Intermediate Estimated print: ~6 h total · ~150 g PETG (estimate) Suggested price: $18–$28 printed · $6 digital file (estimate) Status: Concept
Description
This is a flat backplate that screws to the wall beside a dryer or in a laundry closet. On the left, a shallow box holds a folded stack of fabric-softener sheets and releases them one at a time through a slot near the bottom, the way a tissue box does. On the right, a forked cradle holds a standard adhesive lint roller horizontally, head-up, so it's always sitting in the open where you'll actually use it instead of buried in a drawer.
The lid lifts off the dispenser box for refills, and the cradle arm slides onto the backplate on its own dovetail rail, so either half can be printed and swapped without touching the other. Nothing about it needs food-grade material or moving electronics — it's two plastic shapes and a magnet-free mechanical slot.
Why it sells
Dryer sheet dispensers are an established Etsy micro-category on their own: one listing sells a PLA box sized for a 160-sheet Bounce box [Dryer Sheet Dispenser Box], and another sells a dryer-shaped hanging dispenser in PLA and TPU for $25 [Dryer Sheet Organizer]. Lint roller holders are their own proven line too — a seller's wall-mount holder lists at 16 × 8 × 5.5 cm and is built to hold a standard roller [3D Printed Lint Roller Holder], and a separate STL-only listing covers the same niche as a $0.99 digital file [Lint Roller Holder STL File]. Broader market write-ups back up the category: desk and cable organizers are called out as reliable sellers with 60–65% margins because they're cheap to print and solve a real annoyance [Hyper3D: 15 Best Selling 3D Printed Items], and practical storage items are flagged as consistently in-demand across multiple seller guides [Trendlytic: 3D Printed Items to Sell].
Every listing we found sells the sheet dispenser or the lint roller holder, never both. That's the gap: one wall screw, one backplate, two chores covered.
Who buys it
Someone setting up or re-organizing a laundry closet, apartment dweller without space for a full shelf unit, or a renter who wants a laundry-room upgrade that doesn't need drilling more than two holes. It sells on Etsy next to the standalone dispensers and lint holders already proven there, and works as a small-batch item at craft fairs under a "laundry room fix" table.
Design overview
- Single backplate carries both halves, so it mounts with two screws instead of four
- Dispenser box holds roughly 80 folded sheets and releases them through a bottom slot, no lid-flipping required for daily use
- Lift-off lid only comes off for refills, keeping the front face clean
- Lint roller cradle is open at the front so the roller lifts straight out, no sliding past a lip
- Cradle attaches via its own dovetail rail, so a buyer who only wants the dispenser (or only the cradle) can print one half
- No embedded hardware beyond wall screws — nothing to lose or misplace
- Rounded corners throughout so it doesn't look like a utility box bolted to drywall
Dimensions
| Measurement | Value (mm) | Notes |
|---|---|---|
| Overall width (X) | 200 | backplate span |
| Overall depth (Y) | 90 | dispenser box projection |
| Overall height (Z) | 150 | backplate height |
| Wall thickness | 2.5 | dispenser box walls |
| Backplate thickness | 4 | flat mounting panel |
| Dispenser box (exterior) | 104 × 90 × 100 | W × D × H |
| Dispenser slot opening | 80 × 10 | W × H, front face |
| Cradle arm bounding box | 130 × 70 × 55 | L × D × H |
Parts list
| Part | Qty | Material | Size X×Y×Z (mm) | Print orientation | Supports |
|---|---|---|---|---|---|
| Dispenser body (backplate + box) | 1 | PETG | 200 × 90 × 150 | Flat, back face down | minimal (slot bridge, if printer cooling is weak) |
| Dispenser lid | 1 | PETG | 104 × 90 × 10 | Flat, top face down | none |
| Lint roller cradle | 1 | PETG | 130 × 70 × 55 | Flat, base down | none |
Hardware and non-printed parts
- 2 × #6 × 25 mm pan-head wood screw (user-supplied) — through the keyhole slots on the backplate
- 4 × 10 mm self-adhesive felt pad — on the backplate's lower rear edge, to keep the box from marking the wall
Fits and tolerances
| Mating parts | Fit type | Clearance per side |
|---|---|---|
| Dispenser lid ↔ dispenser body (top rim) | Snap | 0.25 mm |
| Lint roller cradle ↔ backplate dovetail rail | Sliding | 0.2 mm |
The lid uses a snap fit instead of a press fit because it comes off for every refill; a press fit that tight would wear out the rim after a few dozen cycles.
Modeling guide
Origin sits at the bottom-left-front corner of the backplate. +X runs right, +Y runs out from the wall, +Z runs up.
Dispenser body
- Sketch the backplate on the XZ plane: rectangle 200 × 150, corner radius 8. Extrude toward +Y by 4 to form the mounting panel.
- On the backplate's front face, sketch the dispenser box footprint: rectangle 104 × 90 (X × Y), corner radius 6, positioned with its left edge at X = 4, bottom at Z = 0.
- Extrude the box footprint by 100 in +Z.
- Shell the box inward by 2.5, leaving the top face open (this becomes the lid-mating rim).
- On the box's front face (Y = 90), cut a slot: 80 wide × 10 tall, centered in X on the box, bottom edge at Z = 20.
- On the top rim of the box, add a 1.2 mm tall × 1.2 mm wide snap bead running the inner perimeter, set back 2 mm from the outer edge, for the lid to catch on.
- On the backplate's right half, add a dovetail rail: trapezoidal cross-section 8 wide at the base tapering to 10 wide at the tip, 6 deep (in +Y), 60 long (in Z), centered at X = 150, bottom of rail at Z = 85.
- Cut two keyhole slots through the backplate: each a 9.5 mm diameter circle flowing into a 4.5 mm wide vertical slot extending 15 mm down, centered at (X = 30, Z = 130) and (X = 170, Z = 130).
- Fillet all external edges 2 mm.
Dispenser lid
- Sketch rectangle 104 × 90, corner radius 6, on the XY plane.
- Extrude 4 in +Z to form the flat cap.
- Add a downward skirt around the perimeter: offset the outer profile inward by 2.5, extrude down 6 to form walls that overlap the box's rim.
- Cut a matching 1.2 mm groove on the inner face of the skirt, aligned to the body's snap bead position.
- Fillet the lid's top outer edges 2 mm.
Lint roller cradle
- Sketch the base bar on the XY plane: rectangle 130 × 70, corner radius 4. Extrude 8 in +Z.
- On the back edge (Y = 0) of the base, cut a dovetail groove matching the backplate rail: 8 wide at base tapering to 10 at tip, 6 deep, 60 long, centered in X.
- From the base, extrude two uprights at Y = 15 (rear) and Y = 70 (front), each 15 wide (X) × 8 deep (Y), heights 35 and 55 respectively.
- On the front upright, cut a U-shaped notch: radius 35, depth 20 from the top, centered in X, opening upward — this cradles the roller head.
- On the rear upright, cut a narrower U-notch: radius 8, depth 15 from the top, centered in X — this cradles the roller's handle neck.
- Fillet all upright edges 3 mm.
Print settings
| Setting | Value |
|---|---|
| Material | PETG |
| Nozzle | 0.4 mm |
| Layer height | 0.2 mm |
| Walls / perimeters | 3 |
| Infill | 15% gyroid |
| Supports | none, except minimal bridging support under the 80 mm slot if part cooling is weak |
| Brim / adhesion | brim 5 mm on the dispenser body only |
| Notes | Print the dispenser body with the box opening up — the front slot bridges cleanly in PETG with good part cooling |
Assembly
- Press the lint roller cradle's dovetail groove onto the backplate's rail, sliding down from the top until it seats flush.
- Load the dispenser body with a folded stack of dryer sheets, leading sheet pulled partway through the front slot.
- Snap the lid onto the box's top rim until the snap bead clicks into the groove.
- Stick the felt pads to the backplate's lower rear corners.
- Mount to the wall using the two keyhole slots over wall screws set 140 mm apart.
- Rest a lint roller in the cradle, handle toward the wall, head resting in the front notch.
Variants and upsells
- Print just the dispenser body + lid for buyers who don't want the cradle, or just the cradle for buyers who already own a dispenser
- Scale the box width to fit a different sheet brand's fold size (parametric:
box_width) - Offer a second cradle sized for a mini travel lint roller as an add-on
- Color-match the lid to a buyer's laundry room palette as a build option
Selling and distribution
Etsy is the natural fit given how many comparable dryer-sheet and lint-roller listings already sell there — list the combo as the hero product and the dispenser-only / cradle-only prints as cheaper variants. MakerWorld and Printables suit the free or paid STL-only release aimed at the maker audience who'll print it themselves. Price the physical print at $18–28 (covers ~150 g PETG and assembly time at a healthy margin over the ~$2 material cost) and the file alone at $6, following the margin pattern seen in the broader organizer category. Sell the file under a CC BY-NC license since it's an original mechanical design, not a licensed character.
Listing keywords: laundry room organizer, dryer sheet dispenser, lint roller holder, wall mount laundry caddy, 3D printed laundry organizer, laundry closet storage, fabric softener sheet dispenser, lint roller wall mount.
Risks and IP notes
- The 80 mm bridge over the slot can sag on printers with weak part cooling — mitigate by noting a fan-speed minimum in the listing, or add a single support line
- Lid snap bead can wear with heavy daily use — mitigate by specifying PETG (more flex-fatigue resistant than PLA) for that part
- Market is proven but not unique — several sellers already cover each half separately, so the combo angle is the differentiator, not the mechanism itself
- No branded dryer sheet shapes or logos appear anywhere in the design or listing photos
Resource links
- Dryer Sheet Dispenser Box, Laundry Room Organizer — comparable standalone sheet dispenser listing
- Dryer Sheet Organizer - Hangable Dispenser — comparable dispenser at $25, PLA/TPU
- 3D Printed Lint Roller Holder — comparable lint roller holder with stated dimensions
- Lint Roller Holder STL File, Wall Mount — comparable digital-file-only listing
- Hyper3D: 15 Best Selling 3D Printed Items on Etsy (2026) — margin and demand data for organizer category
- Trendlytic: 12 3D Printed Items That Still Sell on Etsy in 2026 — practical storage items flagged as consistent sellers
- Creality: Top 22 Best Selling 3D Printed Items — general household/storage category evidence
More from 3D Print Designs