Camp-Rail Modular MOLLE Gear Hook Set
A screw-mount MOLLE-slot panel plus three snap-in accessory heads (hooks, a D-ring, a drain-holed cup) that turn a tailgate, trailer wall, or pegboard into a reconfigurable gear rack.
Camp-Rail Modular MOLLE Gear Hook Set
A screw-mount MOLLE-slot panel plus three snap-in accessory heads (hooks, a D-ring, a drain-holed cup) that turn a tailgate, trailer wall, or pegboard into a reconfigurable gear rack.
Date: 2026-10-03 Category: Outdoor and Garden Modeling difficulty: Intermediate Estimated print: ~7.4 h total · ~156 g ASA (estimate) Suggested price: $14–22 printed (full kit) · $6 digital file (estimate) Status: Concept
Description
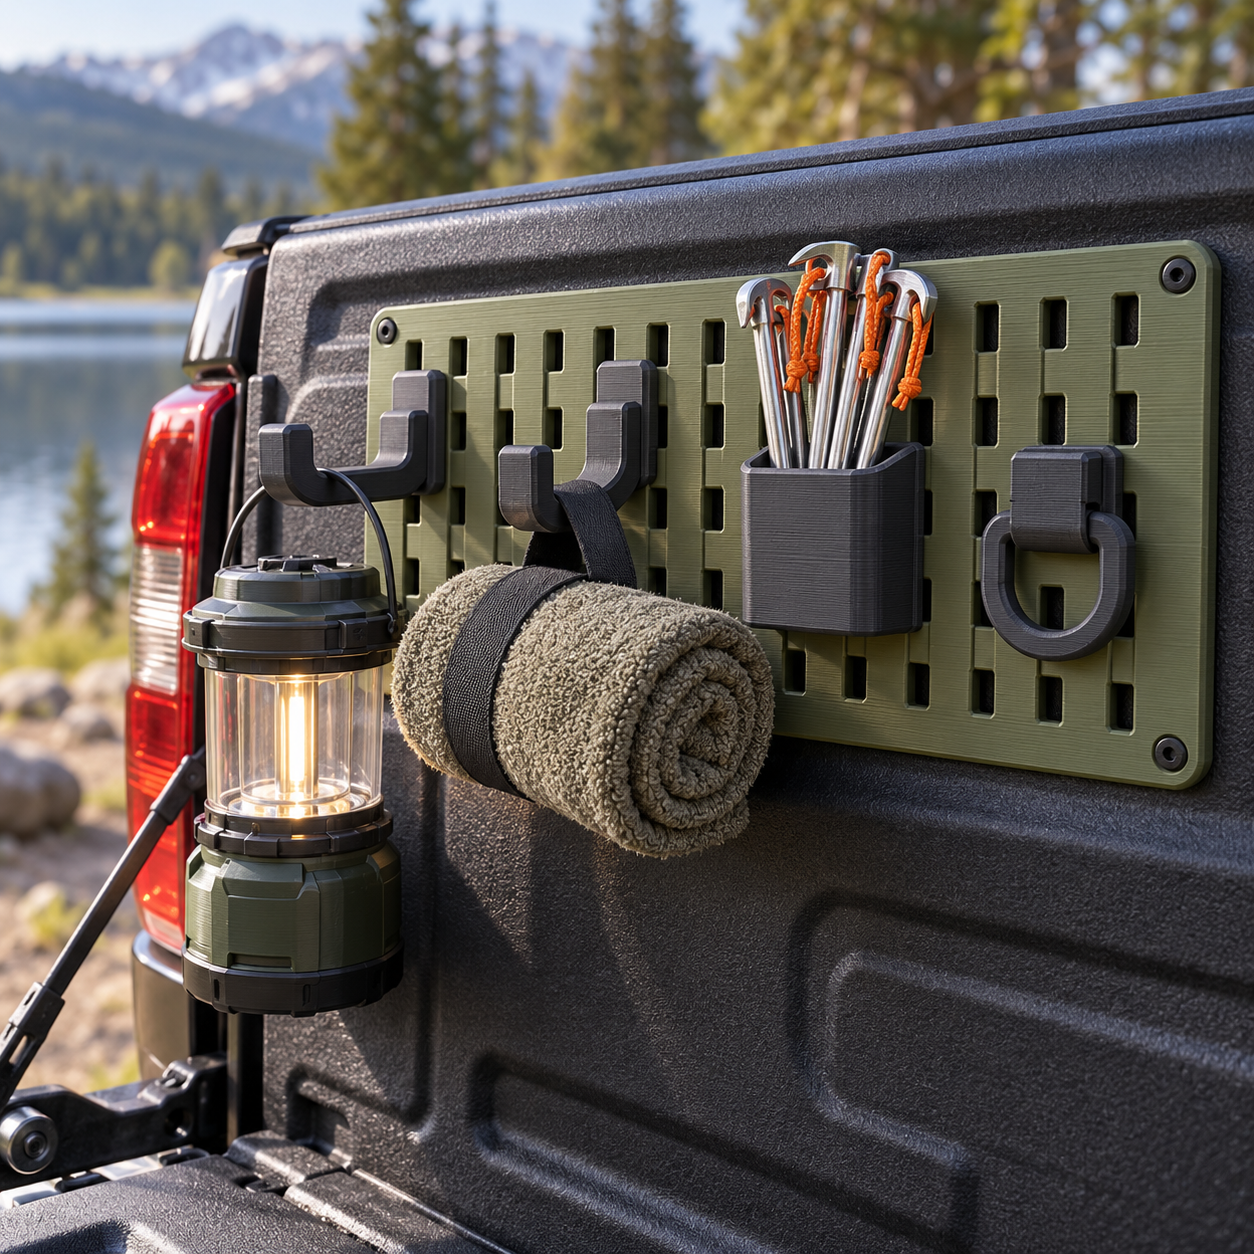
This is a two-part system: one MOLLE-slot panel that bolts down permanently, and a set of accessory heads that snap into it and come back out by hand. The panel is a 150 x 100 x 5mm rounded rectangle with a 5x2 grid of vertical slots cut straight through. It's the same 6 x 25mm webbing-style pattern used on tactical and overland gear, so it reads as "MOLLE" to anyone who's used that gear before. Four countersunk corner holes take M4 self-tapping screws into a tailgate, trailer wall, or garage pegboard.
The accessory heads do the work. Two J-hook heads (30 x 60 x 25mm, 20mm hook opening) hang a lantern or a rolled towel. One carabiner head (25 x 60 x 30mm) is a closed D-ring loop, 30mm outer diameter, for clipping on a carabiner or strap. One cup head (50 x 60 x 45mm) is an open 46mm-diameter cup, 40mm deep, for tent stakes or small tools. Four 4mm drain holes in the floor keep it from turning into a puddle after rain. Every head mounts the same way: a tab with spring barbs on both ends presses through two stacked slots and clicks behind the panel. Pull the tab and the head comes back out. Rearrange the kit for a camp kitchen setup one weekend, a tool rack the next.
Everything is printed in ASA, not PLA. This part lives outside, bolted to a tailgate or trailer wall in direct sun and rain, and ASA holds up to UV exposure and heat where PLA gets brittle and warps.
Why it sells
Printed MOLLE panels are already a live Etsy category: a listing for a lightweight printed panel is active and selling now (Etsy 4335443463), and the "molle panel truck bed" market page shows several sellers competing for the same truck-bed buyer (Etsy market: molle_panel_truck_bed). Hooks are the same story: a "molle gear hook" market page lists multiple sellers (Etsy market: molle_gear_hook), and Core77 profiled TreeHugger Systems' printed camping hooks, noting sales "in the hundreds" with reviews that are "all solid" (core77.com). A separate listing for a printed camping carabiner shows the clip-style accessory also sells on its own (Etsy 4322595912). And this isn't a niche hobby fringe: a CyberTruck owner forum thread has members freely sharing their own MOLLE panel hook STLs, which tells you truck owners are already modding their tailgates this way without being asked (cybertruckownersclub.com).
What none of those listings do is sell the panel and the accessory together as a kit with more than one head type. Buy the panel from one seller, the hook from another, and you're stuck with whatever single accessory each one happens to offer. This kit bundles one panel with three interchangeable heads (hook, D-ring, cup) so a buyer outfits a tailgate for hanging gear, clipping straps, and holding loose items from a single purchase. The drain holes in the cup head are a small but real fix: a plain utility cup mounted outdoors fills with rainwater, and this one doesn't.
Who buys it
Overlanders and truck or SUV tailgate campers, van-lifers organizing a sliding door or interior wall, and garage or shed pegboard users who want screw-mount slots instead of pegboard holes. Sold alongside existing MOLLE panel and hook listings on Etsy, and relevant to the overland forum crowd already trading their own panel designs.
Design overview
- One panel, three accessory types, snap-fit and field-swappable: no tools needed to rearrange, only to mount the panel itself
- Standard 6 x 25mm vertical MOLLE/PALS slot pattern, 5 columns x 2 rows, so the panel reads as compatible with the broader MOLLE accessory world rather than a proprietary slot shape
- Drain holes in the cup head solve the one complaint a plain utility cup gets outdoors: standing water
- ASA throughout, not PLA: this is a vehicle-mounted, weather-exposed part
- The gap this fills: comparable listings sell the panel or a single hook separately; this is one kit with three head types
Dimensions
| Measurement | Value (mm) | Notes |
|---|---|---|
| Panel footprint (X x Y) | 150 x 100 | overall panel size |
| Panel thickness (Z) | 5 | |
| Panel corner radius | 6 | |
| MOLLE slot size (X x Y) | 6 x 25 | one of 10 slots, cut full-depth |
| Slot grid | 5 columns x 2 rows | 10 slots total |
| Slot column centers (X) | 20, 47, 74, 101, 128 | |
| Slot row centers (Y) | 32, 63 | two stacked slots per column, 31mm apart |
| Mounting hole diameter | 4.5 | through-hole for M4 screw |
| Mounting hole inset from edge | 12 | at each of the 4 corners |
| Countersink diameter x depth | 8 x 2 | on panel front face |
| Hook-head bounding box (X x Y x Z) | 30 x 60 x 25 | |
| Hook mount tab (width x thickness x height) | 25 x 6 x 60 | matches two stacked slots |
| Hook rod diameter / extrusion | 6 / 25 | before bending into the J-curve |
| Hook inside radius / opening | 15 / 20 | 20mm is the usable hook opening |
| Carabiner-head bounding box (X x Y x Z) | 25 x 60 x 30 | |
| D-ring outer diameter / ring thickness | 30 / 5 | closed loop |
| Cup-head bounding box (X x Y x Z) | 50 x 60 x 45 | |
| Cup cylinder diameter / shell thickness | 46 / 2.5 | shell leaves the top open |
| Cup depth | 40 | |
| Drain holes | 4 x 4mm diameter | spaced evenly 12mm from cup center |
| Snap barb height / lead-in angle | 1.2 / 45° | on both ends of every accessory tab |
Parts list
| Part | Qty | Material | Size X×Y×Z (mm) | Print orientation | Supports |
|---|---|---|---|---|---|
| MOLLE-slot mounting panel | 1 | ASA | 150 x 100 x 5 | flat, front face up | none |
| J-hook accessory head | 2 | ASA | 30 x 60 x 25 | standing on mount tab's back face | minimal: under the J-curve overhang |
| D-ring accessory head | 1 | ASA | 25 x 60 x 30 | standing on mount tab's back face | none |
| Utility cup accessory head | 1 | ASA | 50 x 60 x 45 | standing on mount tab's back face | none |
Hardware and non-printed parts
- 4 x M4 x 16mm self-tapping panel-mount screw, through the panel's countersunk corner holes into the tailgate, trailer wall, or pegboard; customer-supplied, not included with the print
Fits and tolerances
- Accessory tab to panel slot pair: snap fit, 0.3mm clearance per side, for all three head types (hook, carabiner, cup)
- Every accessory tab is 25mm wide x 6mm thick, sized to span two vertically stacked slots 31mm apart plus the bridge between them
- The snap barb on each tab end is 1.2mm high with a 45° lead-in, enough to pass through a slot on insertion and catch behind the panel's back face on release
- To remove a head, flex the tab slightly and pull it back out through the slots. The barb geometry is designed for repeated insertion and removal by hand; no tool needed
Modeling guide
Origin at the panel's bottom-left corner on its front (gear-facing) face. +X runs right, +Y runs up, +Z runs out of the front face toward the gear side.
MOLLE-slot mounting panel
- Sketch on the XY plane at Z=0: a 150mm (X) x 100mm (Y) rectangle with a 6mm corner radius.
- Extrude +Z 5mm.
- On the front face (Z=5), lay out a 5x2 grid of vertical slots, each 6mm (X) wide x 25mm (Y) tall, centered at columns X=20, 47, 74, 101, 128 and rows Y=32 and Y=63.
- Cut each slot through the full 5mm panel thickness.
- At the four corners, 12mm inset from each edge, drill a 4.5mm diameter through-hole for the M4 panel-mount screws.
- Countersink each mounting hole 8mm diameter x 2mm deep on the front face.
- Fillet all front-face slot edges and the panel's outer top edge, radius 1mm.
J-hook accessory head
- Sketch the mount tab: a 25mm (width) x 6mm (thickness) x 60mm (height) rectangle, matching two vertically stacked panel slots 31mm apart plus the bridge between them.
- At the tab's two ends, mold an outward snap barb, 1.2mm high with a 45° lead-in, sized to pass through a panel slot and catch behind the panel's back face.
- From the tab's front face, extrude a 6mm diameter rod outward +Z 25mm, then bend it into a J-curve with a 15mm inside radius, for a 20mm hook opening.
- Fillet the hook tip, radius 3mm.
D-ring accessory head
- Sketch the mount tab: a 25mm (width) x 6mm (thickness) x 60mm (height) rectangle, matching two vertically stacked panel slots 31mm apart.
- At the tab's two ends, mold an outward snap barb, 1.2mm high with a 45° lead-in.
- From the tab's front face, extrude a D-ring loop: outer diameter 30mm, ring thickness 5mm, closed.
- Fillet the ring's inner edge, radius 1.5mm.
Utility cup accessory head
- Sketch the mount tab: a 25mm (width) x 6mm (thickness) x 60mm (height) rectangle, matching two vertically stacked panel slots 31mm apart.
- At the tab's two ends, mold an outward snap barb, 1.2mm high with a 45° lead-in.
- From the tab's front face, extrude a cylinder 46mm diameter, then shell inward 2.5mm leaving the top open, for a cup 40mm deep.
- In the cup floor, drill four 4mm diameter drain holes, spaced evenly 12mm from center.
- Fillet the cup's top rim, radius 2mm.
Print settings
| Setting | Value |
|---|---|
| Material | ASA |
| Nozzle | 0.4mm |
| Layer height | 0.2mm |
| Walls / perimeters | 4 |
| Infill | 25% gyroid |
| Supports | minimal (only under the hook-head's J-curve overhang) |
| Adhesion | brim 5mm |
| Notes | ASA warps and lifts at the corners more readily than PLA or PETG, especially on the flat 150 x 100mm panel. Print in an enclosed or draft-shielded chamber with a heated bed, and keep part cooling fans low or off to avoid corner lift. |
Assembly
- Screw the panel to the mounting surface using 4 M4 screws through the corner holes.
- Press each accessory head's mount tab through two vertically stacked slots from the front until both snap barbs click past the panel's back face.
- Hang gear on the hooks, clip a carabiner through the D-ring, and drop small items into the cup.
- To rearrange, flex the tab slightly and pull the head back out through the slots.
Variants and upsells
- Slot-row count is parametric (
slot_rows, default 2, range 1–3): a taller panel with a third row of slots fits more accessory heads for buyers mounting to a larger trailer wall or pegboard section - Hook opening is parametric (
hook_opening_mm, default 20, range 15–30): a wider hook variant for bulkier gear like coiled rope or larger lanterns - Multi-panel bundle for a full tailgate or trailer wall, sold at a per-panel discount over buying single panels
- Single accessory-head 3-packs (hooks, D-rings, or cups) as a lower-priced repeat-purchase add-on for buyers who already own a panel
- Color variants in common ASA shades (olive, black, grey) to match truck and trailer trim
Selling and distribution
List on Etsy under the existing MOLLE panel and gear hook categories, where the market pages already show active multi-seller competition (molle_panel_truck_bed, molle_gear_hook). That's proof buyers are searching these terms. Price the printed kit at $14–22, covering roughly 156g of ASA filament and about 7.4 hours of combined print time across the panel and three heads; price the digital STL file at $6 under a CC BY-NC license (personal use, no resale of the files themselves). Cross-list on MakerWorld and Printables to build visibility before pushing paid listings, and consider a post in overland/truck forums where owners already trade MOLLE panel designs, such as the CyberTruck owners' thread, without naming any specific vehicle brand in the product listing itself.
Listing keywords: MOLLE panel, truck bed organizer, tailgate gear mount, overland accessory mount, camping gear hooks, modular tool hooks, PALS panel, van life storage, trailer wall organizer, pegboard MOLLE panel, snap-in gear hook, truck accessory mount.
Risks and IP notes
- ASA is more prone to warping and corner lift during printing than PLA or PETG, particularly on the panel's flat 150 x 100mm face. An enclosure and a heated bed reduce this, but a first-time ASA printer should expect some tuning
- This is a generic utility mounting system for a MOLLE/PALS slot pattern; it is not branded or fitted to any specific vehicle make or model, and no vehicle brand names should appear in the listing or marketing copy
- The research source showing community demand (the CyberTruck owners' forum thread) reflects owners sharing their own free designs for a specific vehicle; this design is deliberately generic so it isn't tied to that one platform
- Snap barbs are a wear part under repeated insertion and removal: note in the listing that heavy daily reconfiguration will eventually round off the barb edges faster than occasional use
Resource links
- 3D Printed MOLLE Panel (lightweight) — Etsy listing 4335443463 — active listing for a printed MOLLE panel, direct market comparable for the mounting panel
- Design Entrepreneurs, Take Note: Smart, Low-Cost 3D-Printed Objects to Make Camping Easier — core77.com — profiles TreeHugger Systems' printed camping gear hooks, with sales "in the hundreds" and solid reviews
- Strong 3D Printed Carabiner STL File — Etsy listing 4322595912 — printed camping carabiner/clip listing, evidence for the D-ring accessory head
- Molle Panel Truck Bed — Etsy market page — shows multiple sellers of truck-bed MOLLE panels, a demand signal
- Molle Gear Hook — Etsy market page — shows multiple sellers of printed MOLLE gear hooks
- Free STL - CyberTruck MOLLE panel Bag Hook — cybertruckownersclub.com forum — overland/truck owner community sharing MOLLE panel hook designs
More from 3D Print Designs