Slot-Fold Quiet Dice Tower & Tray
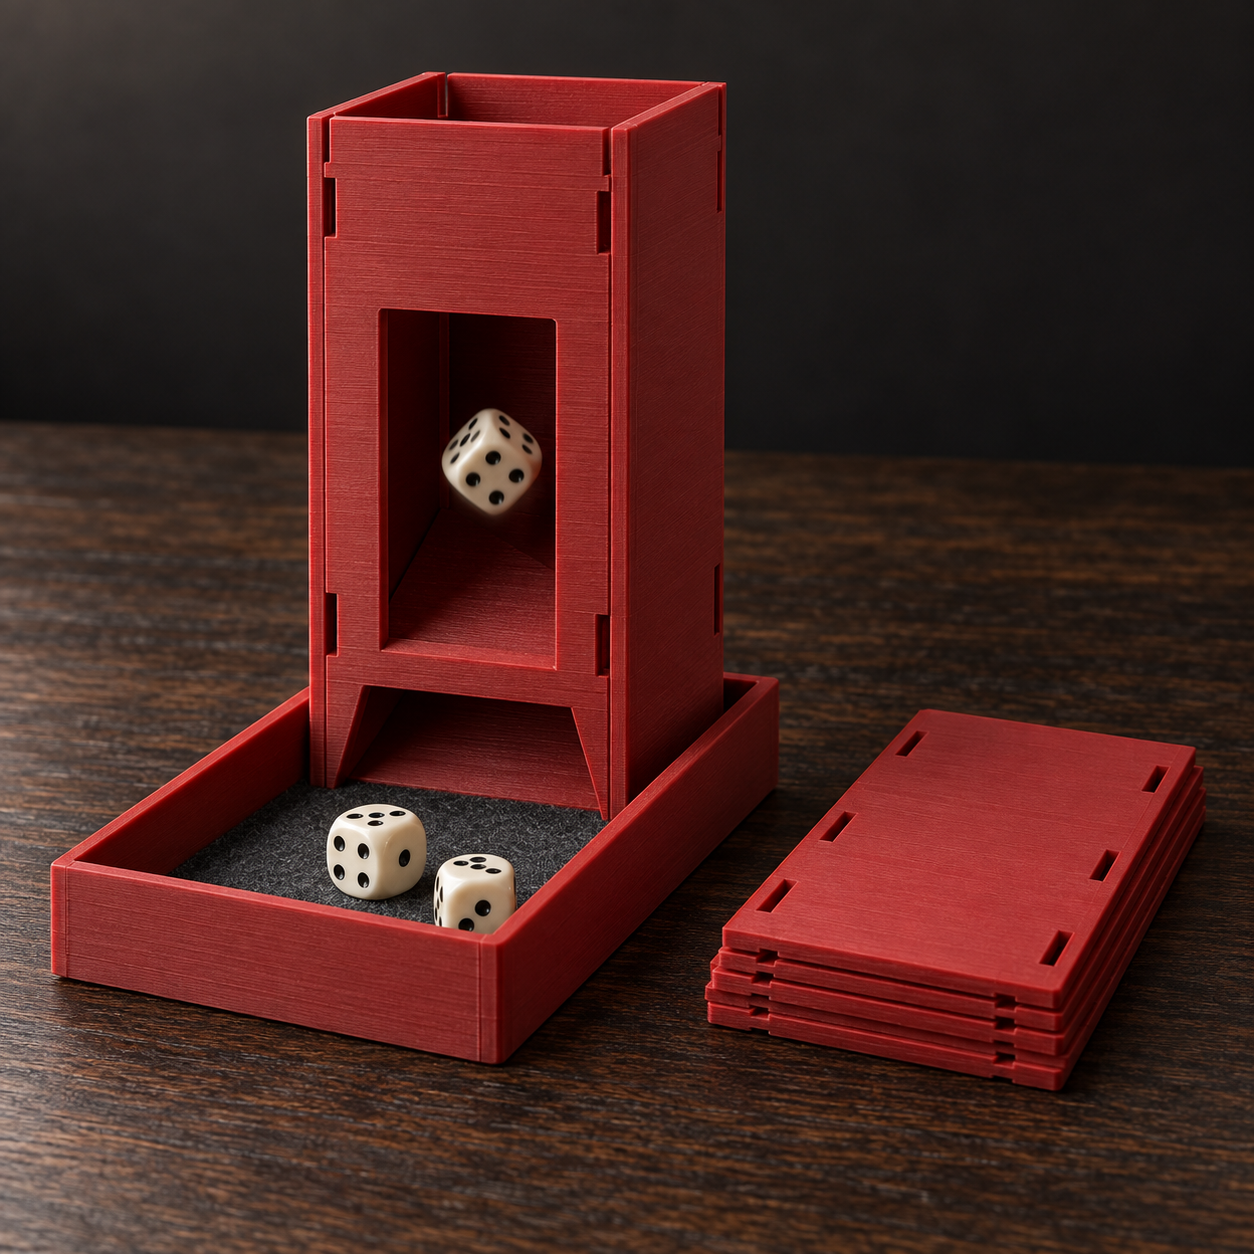
A six-piece dice tower that knocks down into flat panels with no magnets and no glue — tab-and-slot joinery holds it together, and it flat-packs thin enough to travel in a game box.
Slot-Fold Quiet Dice Tower & Tray
A six-piece dice tower that knocks down into flat panels with no magnets and no glue — tab-and-slot joinery holds it together, and it flat-packs thin enough to travel in a game box.
Date: 2026-09-28 Category: Puzzles and Games Modeling difficulty: Intermediate Estimated print: ~5 h total · ~170 g PLA (estimate) Suggested price: $18–$28 printed · $6 digital file (estimate) Status: Concept
Description
This is a tabletop dice tower: a tube of four wall panels standing in a landing tray, with two internal ramps that zigzag a dropped die so it tumbles instead of clattering straight down. It knocks down into six flat pieces — two side panels, a back panel, a front panel with a viewing window, two ramps, and the tray — held together entirely by printed tabs and slots.
That's the point of it. Most collapsible dice towers on the market fold on printed hinges or lock with small embedded magnets, and the magnet builds in particular ask a lot of the printer and the builder: pausing the print several times to hand-place magnets, then gluing each one in the right polarity. This one skips both. The panels box-joint together at the corners, the ramps slide into rails, and the whole assembly presses apart again by hand for storage — flat enough, at about 4 mm per panel, to slide under a board game's lid instead of taking up a dedicated bag.
Why it sells
Dice towers are one of the steadiest tabletop-gaming print categories: Etsy's dice tower market runs to dozens of active sellers and STL bundles, and physical listings like the Epic 3D Printed Castle Dice Tower sell as finished objects, not just files. Two specific complaints show up across the free-file side of the market: bulk, and assembly hassle. Collapsible designs on Printables and Thingiverse solve bulk with folding or magnet-locked panels, but the Collapsible Magnetic Dice Tower and the Collapsible/Folding Dice Tower on Thingiverse both require the builder to hand-place and glue several small magnets in alternating polarity before the tower works at all. Noise is the other recurring theme — the Quiet Dice Tower with noise-reducing lining and the Quiet Dice Roll Box "clusterfocht", which claims roughly 10 decibels of noise reduction from an elastomer liner, both sell specifically on being quieter than a bare plastic tube.
This design's gap is the combination: fully flat-packable like the Dice Tower - Folding (Flat-Pack), but with no magnets or hinge wear points to fail, and a felt-ready tray and ramp faces for the same noise-dampening approach the quiet-tower listings are selling on.
Who buys it
A tabletop gamer or dungeon master who already owns a stack of board games and doesn't want to add a bulky accessory to the shelf — someone who values "packs flat in the box" as much as "rolls dice well." It's also a natural convention or game-night giveaway: cheap enough to print in batches, distinctive enough to remember.
Design overview
- Four wall panels (two sides, a back, a front with a viewing window) that box-joint together at the corners — no glue, no fasteners
- Two internal zigzag ramps that slide into angled rail grooves on the side panels, slowing and quieting the dice as they fall
- A landing tray that the whole tower's panels tab into, with a recessed floor ready for an optional adhesive felt liner
- Knocks down to a flat stack roughly 4 mm per panel thick — no embedded magnets to place, glue, or eventually lose their grip
- Every one of the six pieces prints flat with no supports
- PLA throughout, since there are no moving hinge parts that need PETG's extra toughness
Dimensions
| Measurement | Value (mm) | Notes |
|---|---|---|
| Assembled overall width (X) | 130 | tray footprint |
| Assembled overall depth (Y) | 120 | tray footprint |
| Assembled overall height (Z) | 152 | tray floor to top of side panels |
| Panel thickness | 4 | all four wall panels |
| Side/back/front panel size | 80 × 150 | width × height, each |
| Tower interior cross-section | 72 × 72 | inside the 4-panel tube |
| Front panel viewing window | 55 × 90 | centered, bottom edge 45 mm above panel bottom |
| Ramp size | 71 × 85 × 3 | width × depth × thickness |
| Tray footprint | 130 × 120 | outer |
| Tray height | 24 | 8 mm floor + 16 mm wall |
| Corner box-joint tab | 15 × 4 × 4 | height × thickness × protrusion |
| Bottom tab (panel into tray) | 10 × 4 × 6 | width × thickness × protrusion |
| Ramp rail tab | 6 × 3 × 8 | width × thickness × protrusion |
Parts list
| Part | Qty | Material | Size X×Y×Z (mm) | Print orientation | Supports |
|---|---|---|---|---|---|
| Side panel (left) | 1 | PLA | 80 × 150 × 4 | flat | none |
| Side panel (right) | 1 | PLA | 80 × 150 × 4 | flat | none |
| Back panel | 1 | PLA | 80 × 150 × 4 | flat | none |
| Front/window panel | 1 | PLA | 80 × 150 × 4 | flat | none |
| Ramp A | 1 | PLA | 71 × 85 × 3 | flat | none |
| Ramp B | 1 | PLA | 71 × 85 × 3 | flat | none |
| Tray | 1 | PLA | 130 × 120 × 24 | cavity facing up | none |
Hardware and non-printed parts
- 1 × self-adhesive felt sheet, 124 × 114 × 2 mm — optional, trimmed to line the tray floor and cut down landing noise
- 2 × self-adhesive felt strips, 70 × 20 mm — optional, applied to each ramp face for a quieter roll, the same approach the felt- and elastomer-lined dice towers on Etsy sell on
Fits and tolerances
- Corner box-joint (side panel tab → back/front panel slot, press fit): tab 15 × 4 mm into a 15.2 × 4.2 mm slot, 0.1 mm clearance per side. Snug enough that the tower holds its shape under normal handling without glue.
- Bottom tab → tray slot (press fit): tab 10 × 4 mm, 6 mm deep, into a 10.2 × 4.2 mm pocket, 0.1 mm clearance per side, 6.2 mm deep.
- Ramp tab → side panel rail groove (sliding fit): tab 6 × 3 mm into a 6.4 × 3.4 mm groove, 0.2 mm clearance per side, so a ramp can be slid out for cleaning or angle adjustment without force.
Modeling guide
Origin: the tray's center, at the top of its floor. +X is tray width, +Y is tray depth (front of tray toward the viewer is −Y), +Z is up.
Side panel (left and right — mirror the left panel across X=0 for the right)
- Sketch on a vertical plane: rectangle 80 mm wide × 150 mm tall.
- On the panel's front edge (the edge that meets the Front panel) and back edge (meets the Back panel), add 2 box-joint tabs each: 15 mm tall × 4 mm protrusion, positioned at z = 20–35 mm and z = 115–130 mm from the panel bottom.
- On the interior face, cut two rail grooves for the ramps: Groove A at z = 100–115 mm, tilted 30° from horizontal sloping toward the front; Groove B at z = 50–65 mm, tilted 30° sloping toward the back. Each groove is 6.4 mm wide × 3.4 mm deep.
- On the bottom edge, add one bottom tab, 10 mm wide × 6 mm protrusion, centered.
- Extrude the whole profile 4 mm thick.
Back panel
- Sketch the same 80 × 150 mm rectangle.
- On both side edges, cut 2 box-joint slots each: 15.2 mm tall × 4.2 mm deep, at the same z = 20–35 mm and z = 115–130 mm positions, to receive the side panels' tabs.
- Add one bottom tab, 10 mm wide × 6 mm protrusion, centered on the bottom edge.
- Extrude 4 mm thick.
Front/window panel
- Follow the Back panel steps 1–4.
- Cut a window: rectangle 55 mm wide × 90 mm tall, centered horizontally, bottom edge 45 mm above the panel's bottom edge.
Ramp (A and B — identical parts, mounted in different grooves)
- Sketch a rectangle 71 mm wide × 85 mm deep, 3 mm thick.
- On each of the two 71 mm edges, add a rail tab: 6 mm wide × 3 mm thick × 8 mm protrusion, to slide into the side panels' grooves.
Tray
- Sketch a rectangle 130 × 120 mm, corner fillet radius 8 mm, on the XY plane.
- Extrude down 8 mm to form the floor.
- From the floor's top face, extrude a wall upward 16 mm around the full perimeter, wall thickness 3 mm.
- Recess the interior floor 2 mm deep, inset 3 mm from the interior walls, to seat the optional felt liner.
- Position 4 bottom-tab pockets (10.2 × 4.2 mm, 6.2 mm deep) in the floor, arranged in an 80 × 80 mm square centered left-right and set toward the back third of the tray, matching the 4 wall panels' bottom tabs. Leave the front two-thirds of the tray open as the dice landing zone.
Print settings
| Setting | Value |
|---|---|
| Material | PLA |
| Nozzle | 0.4 mm |
| Layer height | 0.2 mm |
| Walls / perimeters | 3 |
| Infill | 15% grid |
| Supports | none |
| Brim / adhesion | none |
| Notes | 2 build plates: Plate 1 = tray + both ramps; Plate 2 = the 4 wall panels. No pauses needed — nothing is embedded mid-print. |
Assembly
- Press the two side panels' bottom tabs into their tray slots.
- Press the back panel into place, box-jointing its side slots onto the side panels' tabs, then seat its bottom tab in the tray.
- Repeat for the front/window panel.
- Slide Ramp A into the upper grooves and Ramp B into the lower grooves.
- Optionally, press the felt liner into the tray's recessed floor and the felt strips onto the ramp faces.
- To flat-pack, reverse the steps — no tools required.
Variants and upsells
- A taller "campaign" version (panel height scaled to 200 mm) for players who want a louder tumble and a more dramatic drop.
- A dice-storage lid that presses onto the tray's open front, turning the tray into a closed travel case for the whole knocked-down set.
- Color-matched panel sets (a "faction" palette) sold as a bundle alongside the base tower.
Selling and distribution
Printables and MakerWorld fit the STL file, matching where the comparable collapsible and flat-pack dice towers already draw traffic; list the assembled printed set on Etsy alongside the existing dice-tower sellers, leading with "flat-packs, no magnets" in the title since that's the stated pain point on the free-file competitors. Price the printed set at $18–$28 — this category is heavily contested by free files, so keep the physical print priced for convenience rather than novelty, covering roughly $3 of PLA and 5 hours of machine time plus margin. Price the digital file at $6, below most of the fantasy-themed premium towers, since the sell here is the joinery system, not ornamentation. License as commercial-use-restricted (personal printing and resale of physical prints allowed, file redistribution not allowed).
Listing keywords: flat pack dice tower, collapsible dice tower no magnets, quiet dice tower, tabletop RPG dice roller, dice tower and tray, travel dice tower, D&D dice accessory, board game dice tower, portable dice tower, 3D printed dice tower.
Risks and IP notes
- Overhang risk: none of the six pieces need supports; the only fit to watch in testing is the box-joint tab tolerance, since PLA shrinkage varies slightly by printer.
- Market risk: the dice tower category is flooded with free STL files, including several existing magnet-free flat-pack designs; the "no magnets, no glue" joinery and the felt-ready tray need to lead the listing photos, not just the description.
- Durability risk: repeated flat-pack/reassembly cycles wear press-fit tabs over time; PLA's stiffness holds tolerance better than a more flexible material here, but heavy users may eventually need to reprint a panel.
- IP check: dice towers and box-joint (finger-joint) construction are generic, centuries-old techniques with no design patents found in the sources reviewed; keep the panel silhouette and window shape original rather than matching any specific seller's castle or fantasy theming.
Resource links
- Dice Tower 3D Printed — Etsy market — shows the scale of the active seller category
- Epic 3D Printed Castle Dice Tower — a finished-print bestseller in the category
- Collapsible Magnetic Dice Tower — Printables — shows the magnet-and-glue assembly this design avoids
- Collapsible / Folding Dice Tower — Thingiverse — a second magnet-based comparable
- Dice Tower - Folding (Flat-Pack) — Printables — evidence flat-pack-to-box-lid is a real, sought design goal
- Quiet Dice Tower with noise-reducing lining — Etsy — evidence buyers pay for quieter dice towers
- Quiet Dice Roll Box "clusterfocht" — Etsy — cites roughly 10 dB of noise reduction from an elastomer liner
More from 3D Print Designs