Hand-Scan Tactile Chess Set with Pegged Two-Half Board
A full chess set that a blind or low-vision player can read with their hands: raised dark squares, pegged pieces that stay put under a scanning hand, and six silhouettes that feel different, on a…
Hand-Scan Tactile Chess Set with Pegged Two-Half Board
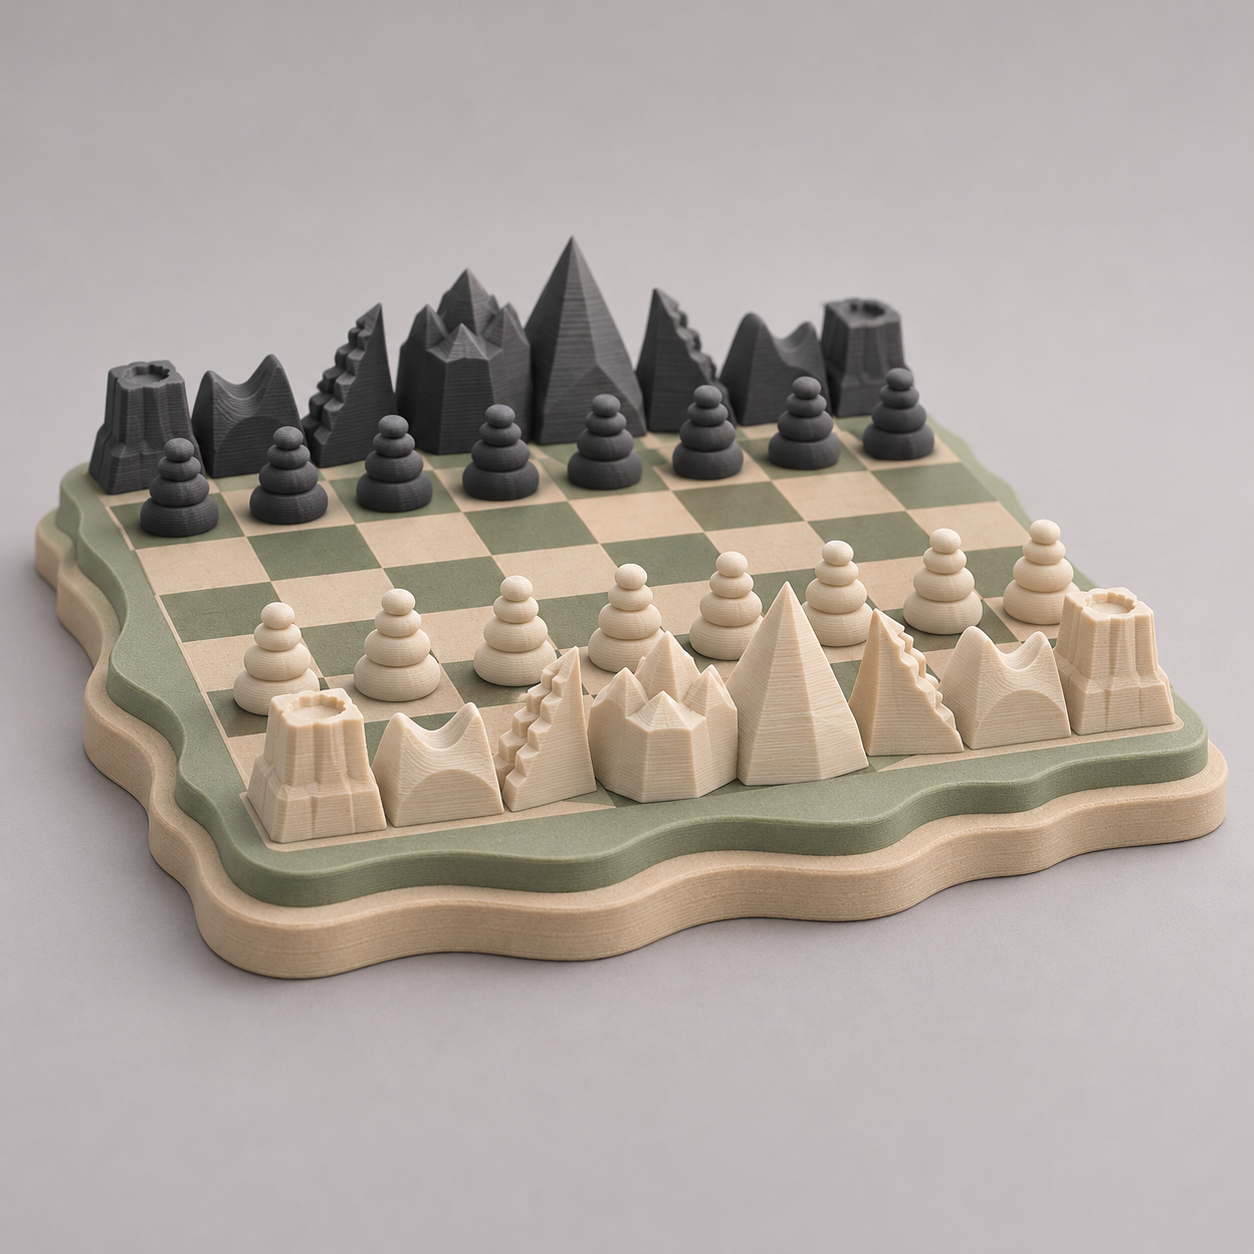
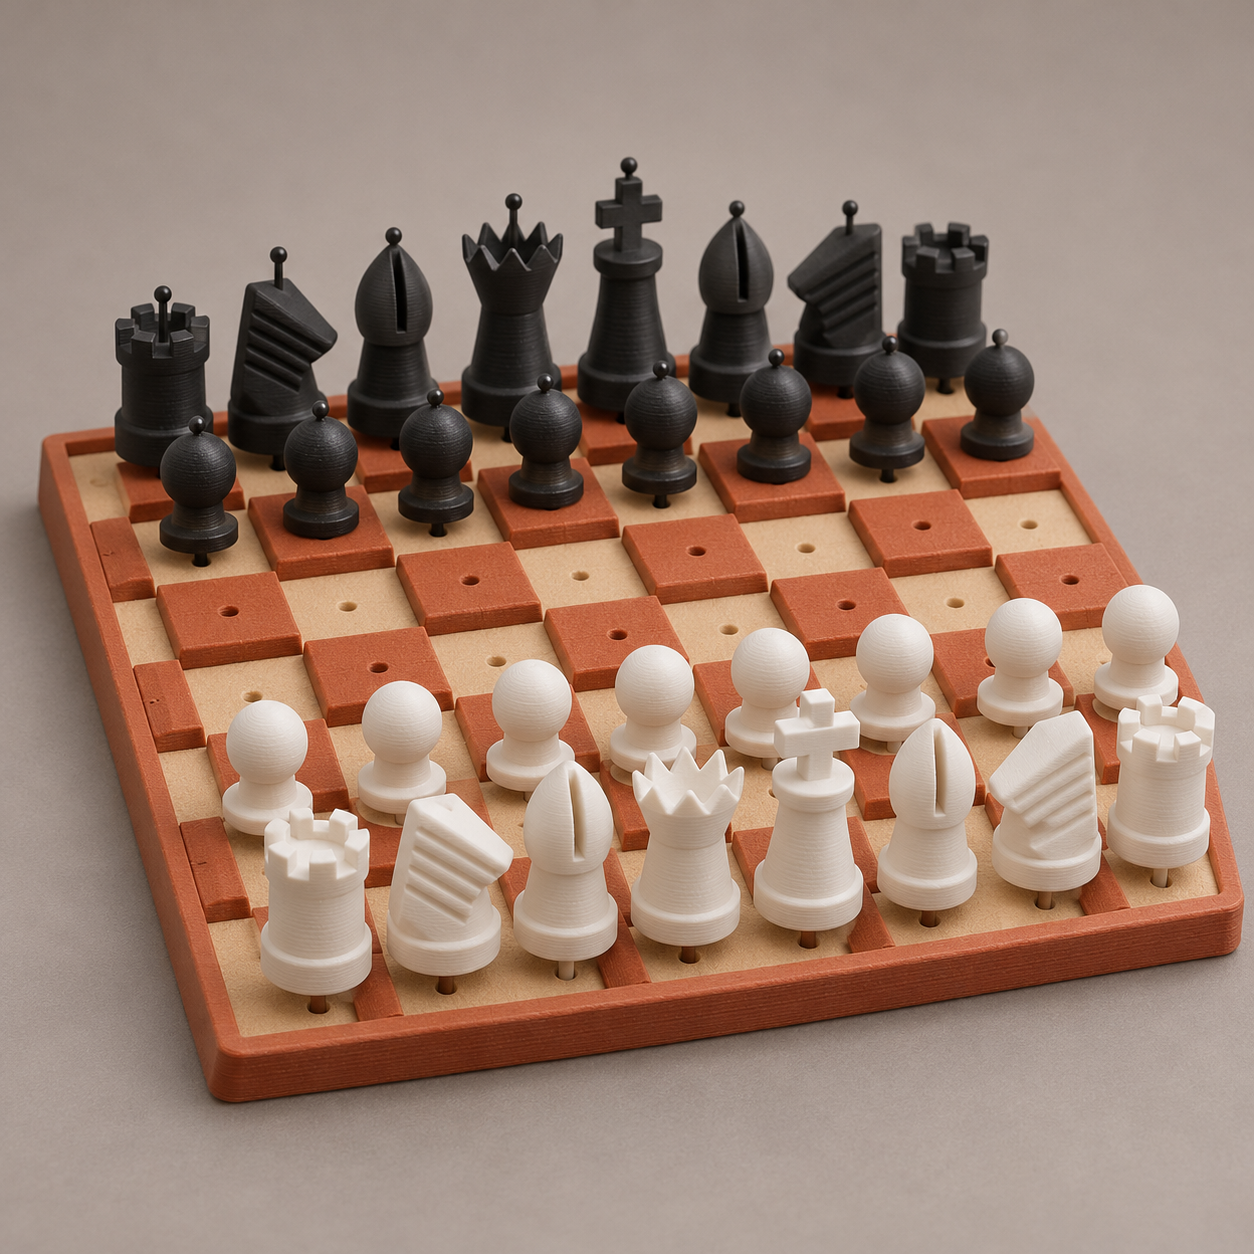
A full chess set that a blind or low-vision player can read with their hands: raised dark squares, pegged pieces that stay put under a scanning hand, and six silhouettes that feel different, on a board that prints in two halves.
Date: 2026-11-12 Category: Puzzles and Games Modeling difficulty: Intermediate Estimated print: ~47 h total · ~356 g PLA (estimate) Suggested price: $70–$130 printed · $9 digital file (estimate) Status: Concept
Description
This is a complete 32-piece set built for touch first. The board is 218 × 218 mm with 26 mm squares. The dark squares stand 3 mm proud of the light ones, every square has a small hole, and every piece has a peg that seats in it. A hand can sweep across the board without knocking anything over, which is the whole point of the peg-and-hole arrangement used on commercial sets for blind players.
Each piece type has its own shape that you can tell apart by feel: a ball on the pawn, a notched crown on the rook, a slit mitre on the bishop, a wedge head with a mane of grooves on the knight, eight teeth on the queen and a cross on the king. Black pieces carry a 3 mm pin on top, so the two sides are told apart by touch as well as by colour. Proportions follow the FIDE handbook rule that a piece's base is 40 to 50 percent of its height; the set is smaller than a tournament set (a king here is 52 mm, against 95 mm in the handbook).
The board prints as two identical halves, each 218 × 109 mm. They join with two printed pins and four small magnets, and one half simply rotates 180 degrees to make the other, because the colour pattern is symmetric under that turn.
Why it sells
Tactile sets are an established product. Vendors such as the BCA shop, MaxiAids and Chess House sell them to blind and low-vision players. A web search for these sets reports the same features across sources: black squares raised about 3 to 4 mm, a hole in each square, pegged pieces, and a pin or dot marking the black pieces. I did not find sales volumes for any of them, so I make no claim about size of demand.
Printable versions exist too: a magnetic tactile set on Thingiverse, the travel set Chess Voyage with a braille board whose dark squares sit 4 mm higher, and an Instructables build. The ones I found lean on magnets or travel size. This design uses the peg-and-hole seating of the sold wooden sets, follows the FIDE base-to-height ratio, and splits the board so a 220 mm bed can print it.
Who buys it
Blind and low-vision players and the family members, clubs and schools who buy for them; gift buyers looking for an inclusive set; people who just like playing by touch with the lights off. Sold as a finished printed set on Etsy, to clubs directly, and as a file on Printables and MakerWorld.
Design overview
- 32 pieces, six distinct shapes, 16 per side: 1 king, 1 queen, 2 rooks, 2 bishops, 2 knights, 8 pawns.
- Sides are told apart by touch: black pieces carry a Ø3 × 5 mm pin on top. White and black filament adds colour contrast.
- Board 218 × 218 × 13 mm with 26 mm squares and a 5 mm border lip on three sides of each half. Dark squares are raised 3 mm.
- A Ø6.4 mm hole on every square takes a Ø6.0 mm peg, so pieces hold their place under a sweeping hand.
- The board is two identical halves, so one file prints twice. Two join pins and four 6 × 2 mm magnets align and hold them.
- Piece proportions follow the FIDE rule: base 40 to 50 percent of height. The one thing that sets it apart: peg-seated pieces like the sold sets, in a design that prints on a 220 mm bed.
Dimensions
| Measurement | Value (mm) | Notes |
|---|---|---|
| Board width (X) | 218 | 8 squares of 26 plus a 5 border each side |
| Board depth (Y), assembled | 218 | two halves of 109 |
| Board half depth (Y) | 109 | 4 ranks × 26 + 5 border |
| Board height (Z) | 13 | lip top; light squares 9, dark squares 12 |
| Square size | 26 | 8 × 8 |
| Dark square raise | 3 | above the light squares |
| Border lip width | 5 | left, right and outer edge of each half |
| Peg hole | 6.4 | Ø, 5 deep |
| Peg | 6.0 | Ø board end, 4 long; Ø6.2 piece end, 4 long |
| Join pin hole | 6.4 | Ø, 8.2 deep, at x = 54 and 164 |
| Magnet pocket | 6.1 | Ø, 2.1 deep, at x = 24 and 194 |
| Piece base Ø (K/Q/R/B/N/P) | 22 / 21 / 19 / 19 / 19 / 16 | 40–50 % of height |
| Piece height (K/Q/B/N/R/P) | 52 / 48 / 44 / 40 / 38 / 34 | black pieces add a 5 mm pin |
| Base plinth height | 3 | all pieces |
| Knight head thickness | 10 | X |
Parts list
| Part | Qty | Material | Size X×Y×Z (mm) | Print orientation | Supports |
|---|---|---|---|---|---|
| Board half (4 ranks × 8 files) | 2 | PLA | 218 × 109 × 13 | underside (z = 0) face down | none (join-face holes are teardrop; magnet pockets bridge 6 mm) |
| Board join pin | 2 | PLA | 6 × 6 × 16 | standing on end | none |
| Piece peg | 32 | PLA | 6.2 × 6.2 × 8 | standing on the Ø6.0 end | none |
| King (white) | 1 | PLA | 22 × 22 × 52 | base face down | none |
| King (black) | 1 | PLA | 22 × 22 × 57 | base face down | none |
| Queen (white) | 1 | PLA | 21 × 21 × 48 | base face down | none |
| Queen (black) | 1 | PLA | 21 × 21 × 53 | base face down | none |
| Rook (white) | 2 | PLA | 19 × 19 × 38 | base face down | none |
| Rook (black) | 2 | PLA | 19 × 19 × 43 | base face down | none |
| Bishop (white) | 2 | PLA | 19 × 19 × 44 | base face down | none |
| Bishop (black) | 2 | PLA | 19 × 19 × 49 | base face down | none |
| Knight (white) | 2 | PLA | 19 × 19 × 40 | base face down | none |
| Knight (black) | 2 | PLA | 19 × 19 × 45 | base face down | none |
| Pawn (white) | 8 | PLA | 16 × 16 × 34 | base face down | none |
| Pawn (black) | 8 | PLA | 16 × 16 × 39 | base face down | none |
Hardware and non-printed parts
- 6 × 2 mm N35 disc magnet ×4: Two per half in the Ø6.1 × 2.1 pockets at x = 24 and 194 on the join face. Install N-out at x = 24 and S-out at x = 194 in both halves; the halves are identical and meet rotated 180°, so the poles then attract.
Fits and tolerances
- Peg to board hole: sliding, Ø6.0 in Ø6.4, 0.2 mm per side. The peg is 4 mm long in a 5 mm deep hole, so it never bottoms out.
- Peg to piece socket: press, Ø6.2 in Ø6.0 socket, 0.1 mm interference per side on a 4 mm engagement. A drop of CA glue is allowed if a printer runs tight.
- Join pin to board hole: sliding, Ø6.0 in Ø6.4, 0.2 mm per side, 8.0 mm of pin in each half.
- Magnets: press into Ø6.1 pockets for a 6.0 mm magnet, 0.05 mm per side, then a drop of CA glue. Pockets are 2.1 deep for a 2.0 mm magnet.
Modeling guide
Origin for the board half: front-left bottom corner, +X right, +Y toward the join edge, +Z up. For pieces: origin at the centre of the base underside, +Z up.
Board half (4 ranks × 8 files) (x2, id board-half)
- Sketch on XY, origin at the front-left corner: rectangle 218 × 109. Extrude 9. This is the light-square level (z = 9).
- Border lip: sketch the outline 218 × 109 minus the rectangle x 5 to 213, y 5 to 109 (the lip runs along the left, right and front edges only; the join edge y = 109 is open). Extrude from z = 9 to z = 13.
- Dark squares: for file i = 0…7 and rank j = 0…3 where (i + j) is even, sketch a 26 × 26 square with its lower-left corner at (5 + 26i, 5 + 26j). Extrude from z = 9 to z = 12. This is 16 squares.
- Peg holes: on all 32 squares cut a hole Ø6.4 centred at (18 + 26i, 18 + 26j), 5 deep from the local top (floor at z = 4 on light squares, z = 7 on dark).
- Join face (y = 109): cut two pin holes Ø6.4, 8.2 deep along Y, centred at x = 54 and x = 164, z = 4.5; model the top of each as a 45° teardrop so it prints without support.
- Join face: cut two magnet pockets Ø6.1, 2.1 deep along Y, centred at x = 24 and x = 194, z = 4.5.
- Chamfer the top edges of the dark squares 0.8. Fillet the outer vertical corners (the two front corners) R3 and the lip top edge 1.0.
Board join pin (x2, id join-pin)
- Sketch a circle Ø6.0, extrude 16.
- Chamfer both ends 0.5.
Piece peg (x32, id piece-peg)
- Sketch a circle Ø6.0 on XY, extrude 4 (board end).
- On its top face sketch a circle Ø6.2, extrude 4 (piece end).
- Chamfer both free ends 0.4.
King (white) (x1, id king-white)
- Revolve about Z, profile (r,z): (0,0) (11,0) (11,3) (7.5,3) (5,26) (9,30) (9,31.5) (10.5,42) (0,42), closed on the axis.
- Sketch the cross on the XZ plane as a closed polygon, points (x,z): (-2.5,42) (2.5,42) (2.5,44) (7.5,49) (7.5,51) (2.5,51) (2.5,52) (-2.5,52) (-2.5,51) (-7.5,51) (-7.5,49) (-2.5,44). The arm undersides are 45°.
- Extrude the cross 5 symmetric about the XZ plane (±2.5 in Y); union with the column.
- Fillet the base outer edge 0.8 and the cross edges 0.5.
- Cut a blind socket from the base face: circle Ø6.0 centred on the axis, depth 4.2.
King (black) (x1): Identical to king-white (all steps), then: Black pieces only: add a pin Ø3.0, rising 5.0 above the highest point of the piece, with a 1.5 radius round on the tip, centred on the top.
Queen (white) (x1, id queen-white)
- Revolve about Z, profile (r,z): (0,0) (10.5,0) (10.5,3) (7,3) (4.5,24) (8,27.5) (8,29) (10,40) (0,40), closed on the axis.
- Add eight crown teeth: cones with base Ø4.4, tip radius 0.8, height 8 (z = 40 to 48), centred on a circle of radius 7 at 0°, 45°, 90° … 315°.
- Fillet the base outer edge 0.8.
- Cut a blind socket from the base face: circle Ø6.0 centred on the axis, depth 4.2.
Queen (black) (x1): Identical to queen-white (all steps), then: Black pieces only: add a pin Ø3.0, rising 5.0 above the highest point of the piece, with a 1.5 radius round on the tip, centred on the top.
Rook (white) (x2, id rook-white)
- Revolve about Z, profile (r,z): (0,0) (9.5,0) (9.5,3) (7.5,3) (7,26) (9.5,28.5) (9.5,38) (0,38), closed on the axis.
- Cut a slot 4 wide, 5 deep from the top, running along X through the full diameter.
- Cut a second identical slot along Y, crossing the first. Four merlons remain.
- Fillet the base outer edge 0.8.
- Cut a blind socket from the base face: circle Ø6.0 centred on the axis, depth 4.2.
Rook (black) (x2): Identical to rook-white (all steps), then: Black pieces only: add a pin Ø3.0, rising 5.0 above the highest point of the piece, with a 1.5 radius round on the tip, centred on the top.
Bishop (white) (x2, id bishop-white)
- Revolve about Z, profile (r,z): (0,0) (9.5,0) (9.5,3) (6.5,3) (4.5,22) (7,24) (7,26) (6,32) (3,40) (0,44), closed on the axis. Round the top to a Ø4 dome.
- Cut a diagonal slit: sketch on the YZ plane a rectangle 2.5 wide × 14 long, rotate 40° from vertical, centre at y = 0, z = 36; cut through the full width in X.
- Fillet the base outer edge 0.8.
- Cut a blind socket from the base face: circle Ø6.0 centred on the axis, depth 4.2.
Bishop (black) (x2): Identical to bishop-white (all steps), then: Black pieces only: add a pin Ø3.0, rising 5.0 above the highest point of the piece, with a 1.5 radius round on the tip, centred on the top.
Knight (white) (x2, id knight-white)
- Revolve about Z, profile (r,z): (0,0) (9.5,0) (9.5,3) (6.5,3) (6,20) (0,20), closed on the axis.
- Sketch the head on the YZ plane as a closed polygon, points (y,z): (-6,18) (-6,32) (-4,38) (-2,40) (3,40) (5,38) (12,30) (12,26) (4,18). The nose underside from (12,26) to (4,18) is 45°, so it prints without support.
- Extrude the head 10 symmetric about the YZ plane (±5 in X); union with the column.
- Cut three mane grooves on the back edge (y = -6): 1.5 wide, 2 deep, running through the full 10 in X, at z = 24, 29 and 34.
- Fillet the head edges 1.0 and the base outer edge 0.8.
- Cut a blind socket from the base face: circle Ø6.0 centred on the axis, depth 4.2.
Knight (black) (x2): Identical to knight-white (all steps), then: Black pieces only: add a pin Ø3.0, rising 5.0 above the highest point of the piece, with a 1.5 radius round on the tip, centred on the top.
Pawn (white) (x8, id pawn-white)
- Revolve about Z, profile (r,z) in mm: (0,0) (8,0) (8,3) (6.5,3) (4,18) (5.5,20) (5.5,21) (0,21), closed on the axis.
- Add a sphere Ø13 centred on the axis at z = 27.5 (spans 21 to 34); union with the revolve.
- Fillet the base outer edge 0.8.
- Cut a blind socket from the base face: circle Ø6.0 centred on the axis, depth 4.2.
Pawn (black) (x8): Identical to pawn-white (all steps), then: Black pieces only: add a pin Ø3.0, rising 5.0 above the highest point of the piece, with a 1.5 radius round on the tip, centred on the top.
Print settings
| Setting | Value |
|---|---|
| Material | PLA, matte. Board: two colours (light sand, terracotta or any mid-tone pair). Pieces: white and matte black. |
| Nozzle | 0.4 mm |
| Layer height | 0.2 mm (0.12 mm for pieces if the crown and cross need cleaner tips) |
| Walls / perimeters | 3 (board and pieces) |
| Infill | 15% gyroid (board), 25% gyroid (pieces) |
| Supports | None |
| Brim / adhesion | None for the board; 3 mm brim for the pawn, bishop and king |
| Notes | Board half: one filament change at z = 9.0 (dark squares and lip in the second colour). Print pegs in a batch of 32 on one plate. Add an ironing pass on the dark square tops if the printer supports it. |
Assembly
- Print and clean all parts. Dry-fit one peg in a board hole and one piece socket.
- Press a piece peg into every piece socket, Ø6.2 end first. Press them home with a vise or a flat surface; wiggle test.
- Glue the four magnets into the join-face pockets: at x = 24 north-out, at x = 194 south-out, on both halves.
- Place the two board halves with their join faces together, one rotated 180° against the other. Slide the two join pins into the Ø6.4 holes at x = 54 and 164.
- Set up: white on the side nearest a1, with a dark square at the player's left. Seat each piece by feeling for its square hole.
Variants and upsells
A large-print version at 27 mm squares fits a 220 mm bed only without a border, so it needs a lighter lip. A high-contrast edition in white pieces on a charcoal board with yellow black-side pieces for low-vision players. A bundle with a rules card in braille as a separate embossed print. A cheaper travel variant that drops to 20 mm squares and uses 4 mm pegs.
Selling and distribution
Etsy and direct sales to clubs and schools suit it best, since the buyer is often a family or an institution. Sell the printed set and the file. Price from material (about 350 g, an estimate) plus roughly 47 print hours at a machine-time rate plus a margin. Offer the file under a personal licence and sell the printed set at a premium, or add a commercial licence for small print shops. Keywords: tactile chess set, chess for the blind, low vision chess, accessible chess, pegged chess board, raised square chess, 3D printed chess, braille chess, chess gift, inclusive game.
Risks and IP notes
- Small peg hole fits vary by printer. Mitigation: ship a 3-peg test strip at 6.2 / 6.3 / 6.4 and publish the parametric
peg_hole_diameter. - Players who rely on the set want it to be right, not just plausible. Mitigation: have a blind player test the prototype before selling, and do not claim endorsement from any association.
- Market: wooden sets exist and the Thingiverse and Printables listings are free. Mitigation: sell the finished, tested set rather than only the file.
- Magnet polarity mistakes make halves repel. Mitigation: mark the pole rule in the instructions (x = 24 north-out, x = 194 south-out).
- This is a game accessory, not a medical device; the listing should not make assistive-device claims beyond "designed for touch".
Resource links
- BCA shop: tactile chess sets — Vendor listing of tactile sets for visually impaired players; raised black squares and pegged pieces
- MaxiAids: tactile chess large pieces — Retail listing of a large-piece tactile set
- Chess House: wooden chess set for the blind — Retail listing with a 3.75 in king
- Tactile Chess Set (Magnetic), stlfinder mirror — Printable magnetic tactile set; the magnet-based approach this design avoids
- Chess Voyage (Fabbaloo) — Printable travel set with a braille board, dark squares 4 mm raised
- Accessible chess set (Instructables) — A DIY accessible set build
- FIDE Handbook: Standards of chess equipment — Base diameter is 40-50% of height; king 9.5 cm; squares 5-6 cm
More from 3D Print Designs