Mount Fuji Portrait Stepped Relief Wall Map
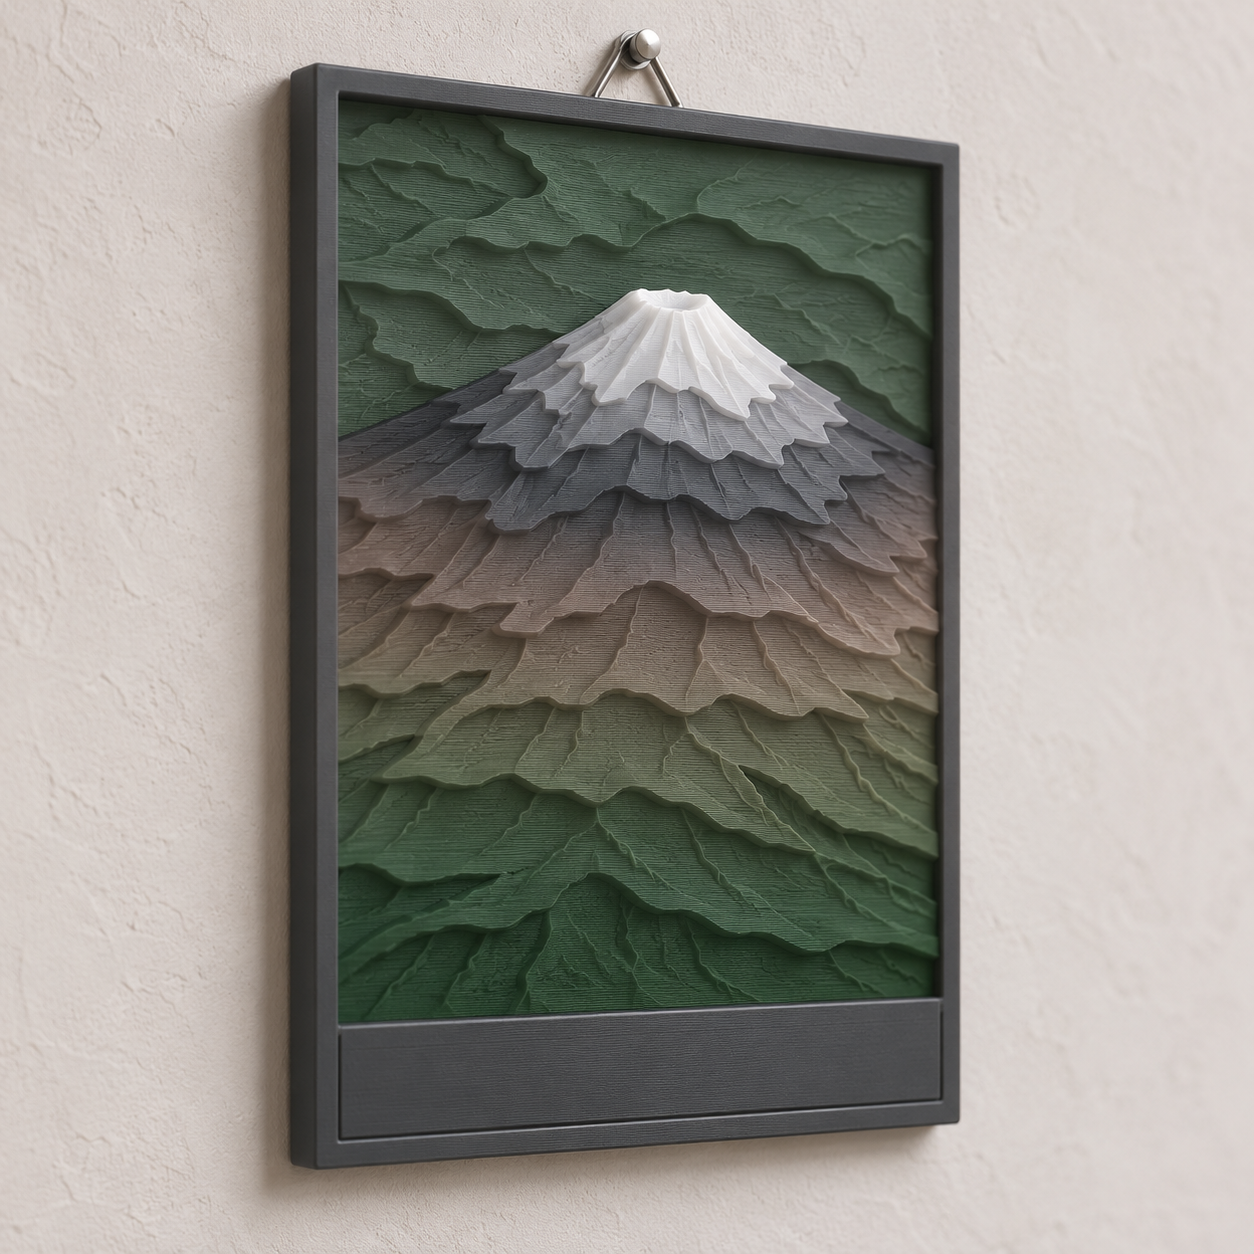
A 150 × 210 mm portrait wall map of Mount Fuji's cone, cut into ten colour bands from Copernicus elevation data, with a swap-in title plate.
Mount Fuji Portrait Stepped Relief Wall Map
A 150 × 210 mm portrait wall map of Mount Fuji's cone, cut into ten colour bands from Copernicus elevation data, with a swap-in title plate.
Date: 2026-11-11 Category: Art and Decor Modeling difficulty: Intermediate Estimated print: ~11.5 h total · ~136 g PLA (estimate) Suggested price: $45–$85 printed · $9 digital file (estimate) Status: Concept
Description
A tall frame, 150 mm wide and 210 mm high, 22 mm deep. Inside a 10 mm rim sits a 130 × 170 mm window of terrain in ten steps, each 1.6 mm taller than the last. The window covers about 26 × 34 km around the summit, so the cone shows as near-concentric rings with the Fuji Five Lakes area as a flat patch to the north.
Three filament changes turn the rings into a gradient: dark forest green on the lower slopes, warm grey-brown, charcoal scree, and white on the top bands. A 110 × 14 mm plate presses into a pocket under the window. Two keyholes on the back hang it on wall screws.
The terrain is not drawn or traced. It comes from the Copernicus DEM GLO-30 dataset, and the modeling guide gives the window, scale and banding so anyone can rebuild it. The cover is a mood image only; the geometry comes from the data. I have not run the elevation download myself, so the real min and max elevations inside the window need checking at step 5 of the guide.
Why it sells
This is an art piece chosen on taste, so there is no sales evidence here and I did not look for any. The data side is sourced: the Copernicus Data Space page says GLO-30 is available worldwide under a free licence at 30 m, and the licence text sets the credit wording. The gap: the library's maps so far are US terrain from USGS, plus square, round and landscape formats. This one is the first built from Copernicus data and the first portrait frame, which suits a cone.
Who buys it
Hikers and climbers who have done the mountain, travellers from Japan, and gift buyers for them. The finished print suits Etsy or a craft market; the file with the DEM recipe suits owners of a multicolour printer. It hangs beside the library's other relief maps.
Design overview
- 150 × 210 mm frame, 22 mm deep, 10 mm rim at sides and top, 30 mm at the bottom for the plate.
- 130 × 170 mm terrain window at 1 mm = 200 m, ten bands at 1.6 mm over a 5 mm floor.
- Colour changes at z = 8.2, 13.0 and 17.8 mm, all on 0.2 mm layer boundaries, so a plain pause-and-swap works.
- Press-fit title plate, 110 × 14 mm, 0.15 mm clearance per side, so the frame can be reused for other peaks.
- Two back keyholes 80 mm apart for flat hanging.
- Elevation source: Copernicus DEM GLO-30. Credit line for adapted data: "Produced using Copernicus WorldDEM-30 © DLR e.V. 2010-2014 and © Airbus Defence and Space GmbH 2014-2018 provided under COPERNICUS by the European Union and ESA; all rights reserved." Put it on the back and in the listing.
- The one feature that sets it apart: a portrait format that gives the cone full height.
Dimensions
| Measurement | Value (mm) | Notes |
|---|---|---|
| Overall width (X) | 150 | Frame |
| Overall depth (Y) | 210 | Frame height on the wall |
| Overall height (Z) | 23 | Frame 22 plus 1 mm raised plate text |
| Wall thickness | 10 | Minimum rim (sides and top) |
| Terrain window | 130 × 170 | X 10 to 140, Y 30 to 200 |
| Floor height | 5 | Terrain floor, z |
| Band step | 1.6 | Ten bands, top at z = 21.0 |
| Title pocket | 110.3 × 14.3 | X 19.85 to 130.15, Y 8 to 22.3, 3 deep |
| Keyhole head diameter | 9 | At (35, 150) and (115, 150), 3.5 deep |
| Keyhole slot | 4.5 × 8 | Toward +Y, 3.5 deep |
Parts list
| Part | Qty | Material | Size X×Y×Z (mm) | Print orientation | Supports |
|---|---|---|---|---|---|
| Relief frame with terrain | 1 | PLA | 150 × 210 × 22 | Back face down | none (keyhole recesses bridge 9 mm) |
| Title plate | 1 | PLA | 110 × 14 × 4 | Flat, text up | none |
Hardware and non-printed parts
2 × wall screws, pan head, 4 mm shank, 8 mm head. The heads sit in the dia 9 keyhole recesses.
Fits and tolerances
- Title plate in pocket: press fit, 0.15 mm per side, in the 0.1–0.15 mm press range. The pocket is only 3 mm deep, so add a dot of glue before shipping.
- Keyholes: 4.5 mm slot for a 4 mm shank, 0.25 mm per side, sliding.
Modeling guide
Origin: lower-left corner of the back face. +X right, +Y up the wall (north), +Z toward the viewer.
Relief frame
- Sketch on XY: rectangle 150 × 210 from the origin. Extrude +Z 22.
- On the top face (z = 22) sketch a rectangle X 10 to 140, Y 30 to 200. Cut down 17 to z = 5.
- On the top face sketch a rectangle X 19.85 to 130.15, Y 8 to 22.3. Cut down 3 to z = 19.
- Get the DEM: download the Copernicus DEM GLO-30 tile covering N35 E138 from the Copernicus Data Space Ecosystem (registration needed) or through Google Earth Engine. The window runs lat 35.2076 to 35.5136 N and lon 138.584 to 138.870 E, centred on the summit near 35.361 N, 138.727 E. Tile edges and exact pixel alignment depend on the product, so check them.
- Heights are EGM2008 metres and include trees and buildings (it is a surface model), so apply one 3 × 3 median filter after resampling to a 0.2 mm grid (1 mm = 200 m). Read min and max inside the window and quantise: band = min(9, floor(10 × (elevation − min) ÷ (max − min))).
- Band b has top height z = 5 + 1.6 × (b + 1). Extrude each band's region from z = 5 to that height. Simplify outlines at 0.4 mm tolerance and delete islands under 1.2 × 1.2 mm.
- Check vertical exaggeration: 16 ÷ ((max − min) ÷ 200). Expect roughly 0.8 to 1.2 for this window; if it is above 1.5 widen the window.
- On the back face cut two keyholes at (35, 150) and (115, 150): dia 9 recess 3.5 deep, then a 4.5 wide slot 8 long toward +Y, 3.5 deep.
- Fillet the outer top edge 0.8 and chamfer the bottom outer edge 0.4.
Title plate (origin at the centre of its bottom face)
- Sketch a 110 × 14 rectangle centred on the origin. Extrude 3.
- Emboss the title in a bold sans-serif, cap height 7, 1.0 high, centred. Default text: MOUNT FUJI. Strokes at least 1.2 wide.
- Chamfer the bottom perimeter edge 0.3.
Print settings
| Setting | Value |
|---|---|
| Material | PLA (matte; silk white for the top bands) |
| Nozzle | 0.4 mm |
| Layer height | 0.2 mm |
| Walls / perimeters | 3 |
| Infill | 15% gyroid |
| Supports | None |
| Brim / adhesion | Brim 5 mm |
| Notes | Colour changes at z = 8.2, 13.0, 17.8 mm; the rim shows the same stripes. Print the plate separately in dark green. |
Assembly
- Press the plate into the bottom pocket.
- Set two screws 80 mm apart, level.
- Slide the frame down onto the screws through the keyholes.
Variants and upsells
- Same recipe for other peaks: swap the window and the plate text (Matterhorn, Kilimanjaro, Denali on its own data).
- Personalised plate with a climb date or coordinates.
- A six-colour edition at the same 1.6 mm steps.
- A 1 mm = 100 m close-up of the crater rim and summit.
Selling and distribution
Etsy and craft markets suit the finished print; MakerWorld and Printables suit the file, with the DEM recipe as the selling point. Price from material (about 136 g PLA), machine time (about 11.5 h) and margin, which is how the $45–$85 estimate was set. Sell both. Use a commercial-use licence on the file if you charge for it. Keep the Copernicus credit line on the listing and the back of the frame.
Keywords: Mount Fuji wall art, Fuji relief map, topographic map art, 3D printed map, stepped relief, layered map, Japan gift, mountain decor, hiking gift, volcano art.
Risks and IP notes
- Thin step walls can snap. Mitigation: 1.2 mm island minimum and 0.4 mm simplification.
- Hand filament changes cost time. Mitigation: only three, at fixed heights.
- The DEM includes forest canopy. Mitigation: median filter; the cone is large enough that this barely shows at 0.2 mm resolution.
- Many map sellers exist. Mitigation: portrait format, Copernicus sourcing, swap-in plate.
- The licence needs a credit and a liability disclaimer for public redistribution. Mitigation: put both on the listing and back of the frame; no ESA or Copernicus logos.
Resource links
- Copernicus DEM: Global and European Digital Elevation Model (Copernicus Data Space Ecosystem) — Publisher page: GLO-30 is free worldwide, 30 m grid, EGM2008 heights, credit wording for adapted data
- License COPDEM 30 (PDF) — The licence text for GLO-30
- Copernicus DEM GLO-30 (Google Earth Engine catalog) — Dataset description and a second access route for the same tiles
- Copernicus DEM (EMD help wiki) — Credit line for adapted data: Produced using Copernicus WorldDEM-30 © DLR e.V.
- Hexagon wall art kit (MakerWorld, comparable multi-piece wall art) — Shows the wall-art genre; the relief map here is a different kind of object
More from 3D Print Designs