Rail-Mount Adjustable Tool Gripper System
A snap-together wall rail with sliding grippers that clamp anything from a broom handle to a vacuum wand, so you can space your tools however your closet actually needs them instead of wherever a…
Rail-Mount Adjustable Tool Gripper System
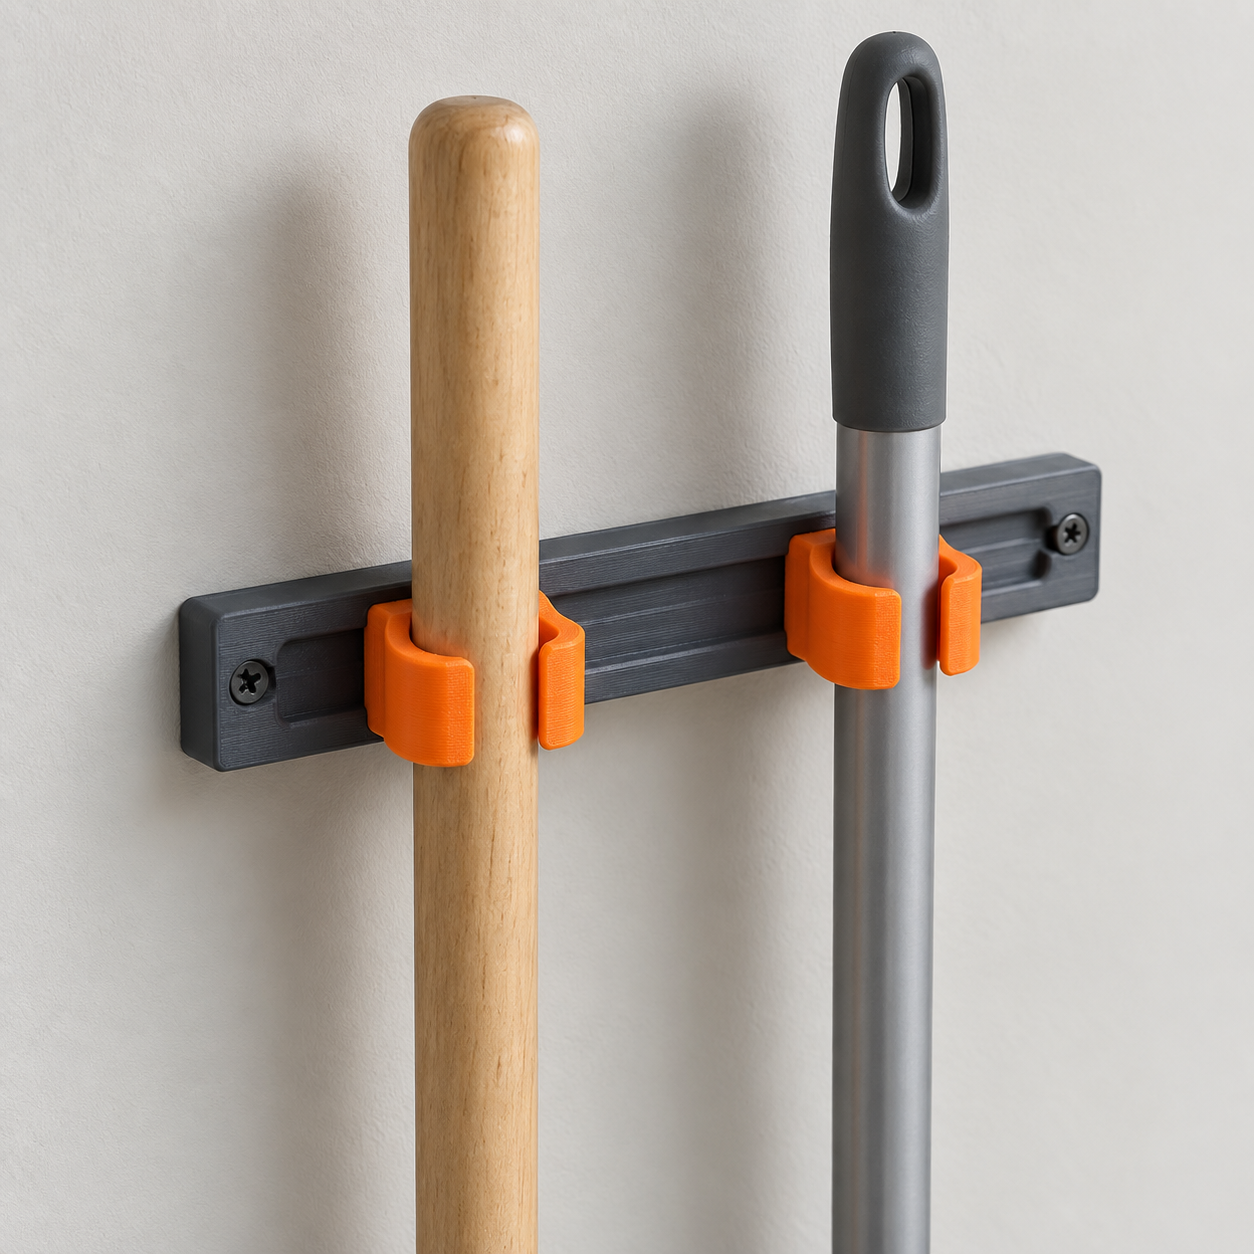
A snap-together wall rail with sliding grippers that clamp anything from a broom handle to a vacuum wand, so you can space your tools however your closet actually needs them instead of wherever a fixed hook happens to be.
Date: 2026-09-26 Category: Household Modeling difficulty: Beginner Estimated print: ~6 h total · ~140 g PETG + TPU (estimate) Suggested price: $14–$22 printed (2 rails + 3 grippers) · $6 digital file (estimate) Status: Concept
Description
This is a two-part storage system: a rigid PETG wall rail with a T-slot channel running its length, and flexible TPU gripper clips that slide into that channel and clamp a tool handle by friction. Rails connect end to end with a tongue-and-groove joint, so one 200 mm segment becomes a 400 mm or 600 mm run depending on how many closets you're outfitting.
Each gripper is a slotted C-clamp that flexes open to swallow a handle and springs back down to hold it. Because the clamp material does the gripping, one gripper shape covers everything from a slim mop handle to a fat vacuum wand, and you can pull it out and reposition it along the rail in seconds — no re-drilling.
The look is plain on purpose: a matte grey rail disappears against most closet walls, and the grippers come in a color that makes them easy to find in a dark pantry.
Why it sells
Functional household organizers — cable clips, drawer dividers, replacement brackets — are called out as one of the strongest-selling categories of 3D-printed goods on Etsy going into 2026, alongside kitchen and desk gadgets (Insight Agent, "Best-Selling 3D Printed Products on Etsy 2026"). Broom and mop holders specifically have real Etsy traction: a "Gravity Broom Holder" digital file listing sells specifically as a wall-mounted clamp for cleaning tools (Etsy listing, Gravity Broom Holder), and the free-file version on Printables has been downloaded enough to earn its own "gravity clamp" category of imitators (Printables, Gravity Broom Holder).
Every one of those designs is a single fixed clamp sized for one handle diameter, mounted at one fixed spot on the wall — including the adjustable-diameter "Customisable Latching Broom Holder," which still locks each clamp to a single print-time size choice rather than a size range you set by hand at install time (Thingiverse, Customisable Latching Broom Holder). Nobody's closet has tools that considerate. This design's gap-filler is the rail: buy the grippers once, and when the vacuum gets replaced with a skinnier one next year, you slide the existing gripper to a new spot instead of printing a new holder.
Who buys it
Renters and homeowners setting up a closet, laundry room, or garage who are tired of a broom sliding down the wall or a mop head dripping on the floor. It's a practical gift for someone moving into a first apartment, and it sells well through the same channels as other closet organizers: Etsy shop listings and local maker-market tables, priced as a small multi-piece kit rather than a single item.
Design overview
- Modular rail: 200 mm segments join end to end via a tongue-and-groove joint, so buyers scale the system to their wall.
- T-slot channel runs the full length of each rail, open on the front face, closed on three sides internally.
- Grippers slide in from either open rail end and reposition anywhere along the length — no tools, no re-drilling.
- C-clamp gripper geometry flexes to grip handles from 16 mm to 34 mm in diameter, which covers mop handles, broom handles, and vacuum wands with one part.
- Self-locking friction fit between gripper tab and rail channel — no screws, springs, or clips needed to hold a gripper in place.
- Two countersunk screw holes per rail segment for a flush wall mount.
- The one feature the fixed-clamp competitors don't have: reposition a gripper along the rail in seconds instead of drilling a new hole.
Dimensions
| Measurement | Value (mm) | Notes |
|---|---|---|
| Rail overall length (X) | 200 | per segment; segments chain end to end |
| Rail width (Y) | 30 | |
| Rail thickness (Z) | 12 | |
| Rail channel opening width | 6 | front-face slot |
| Rail channel internal width | 14 | at 4 mm depth, forms the T |
| Rail channel depth | 8 | measured from front face |
| Gripper overall width (X) | 40 | |
| Gripper overall depth (Y) | 42 | including rear tab |
| Gripper overall height (Z) | 46 | |
| Gripper wall thickness | 3 | C-clamp arm |
| Gripper inner radius (at rest) | 14 | 28 mm effective clamp diameter |
| Gripper insertion gap | 8 | width of the C-clamp opening slit |
Parts list
| Part | Qty | Material | Size X×Y×Z (mm) | Print orientation | Supports |
|---|---|---|---|---|---|
| Rail segment | 2 | PETG | 200 × 30 × 12 | Flat, channel opening face up | none |
| Gripper clip | 3 | TPU 95A | 40 × 42 × 46 | Standing on flat back face, tab up | none |
Hardware and non-printed parts
2 × #8 wood screw per rail segment (not included) — 4.5 mm shank, 9 mm head, seats flush in the countersunk mounting holes. No other hardware; the rail-to-gripper joint is fully printed.
Fits and tolerances
- Rail-to-rail tongue and groove: sliding fit, 0.15 mm clearance per side. Tongue is 5 mm (X) × 8 mm (Y) × 10 mm (Z); groove matches with the stated clearance so segments slide together snug but removable.
- Gripper tab to rail channel: sliding/friction fit, 0.1 mm interference per side (tab head 13.8 mm nominal against a 14 mm internal channel). The TPU tab compresses slightly on insertion, which is what holds the gripper's position without hardware.
- Gripper C-clamp to tool handle: this is a flex fit, not a fixed clearance — the clamp's 28 mm at-rest diameter flexes open to accept handles up to 34 mm and closes down to grip handles as slim as 16 mm, relying on the TPU's elasticity rather than a machined tolerance.
Modeling guide
Origin at the rail's bottom-left-front corner; +X runs along the rail's length, +Y into the wall, +Z up.
Rail segment:
- Sketch on the XZ plane at Y=0: rectangle 200 (X) × 12 (Z), corner at origin. Extrude 30 in +Y to form the solid block.
- On the front face (Y=30), sketch the T-slot profile: a 6 mm wide slot centered on Z=6, cut 4 mm deep into +Y (from Y=30 to Y=26), then a wider 14 mm slot from Y=26 to Y=22 (4 mm deep), forming the T undercut. Extrude-cut both profiles along the full 200 mm X length.
- At the X=200 end face, sketch the tongue profile: 5 mm (X) protrusion, centered on Y (Y=11 to Y=19), centered on Z (Z=1 to Z=11). Extrude 5 mm in +X.
- At the X=0 end face, cut the matching groove: 5.3 mm deep (X), 8.3 mm wide (Y=10.85 to Y=19.15), 10.3 mm tall (Z=0.85 to Z=11.15) — 0.15 mm clearance per side versus the tongue.
- Add two through-holes for mounting: 4.5 mm diameter, centered at Y=15, at X=15 and X=185, through the full 12 mm Z thickness. Add a 9 mm diameter, 90° countersink on the back face (Z=0 side) of each hole.
- Fillet all external long edges 1 mm.
Gripper clip:
- Sketch on the XY plane at Z=0 (this becomes the clip's back/tab end once oriented): the C-clamp cross-section is drawn in the XZ plane instead — sketch on XZ at Y=0: a circle of outer radius 17 mm (14 mm inner + 3 mm wall) centered at X=20, Z=26, then cut it back to an open C by removing an 8 mm wide wedge (the insertion gap) centered on the -Y-facing side of the circle.
- Extrude the C profile 20 mm in +Y to form the clamp body (this is the clamp's "depth" along the handle axis, giving it enough length to grip without racking).
- On the back face (Y=0), sketch the T-tab: a 6 mm wide neck (X=17 to X=23) extruded -4 mm in -Y, then a 14 mm wide head (X=13 to X=27) extruded a further -4 mm in -Y — reduce the head to 13.8 mm wide (X=13.1 to X=26.9) for the 0.1 mm per-side interference fit. Tab height (Z) is 20 mm, centered on the clamp's Z=26 centerline (Z=16 to Z=36).
- Fillet the two open ends of the C-clamp (the insertion gap edges) with a 1.5 mm radius so a handle doesn't catch on a sharp corner going in.
Print settings
| Setting | Value |
|---|---|
| Material | PETG (rail), TPU 95A (gripper) |
| Nozzle | 0.4 mm |
| Layer height | 0.2 mm |
| Walls / perimeters | 3 |
| Infill | 20% gyroid (rail), 25% gyroid (gripper) |
| Supports | none |
| Brim / adhesion | brim 5 mm on gripper (TPU bed adhesion) |
| Notes | Print grippers slow (≤35 mm/s) for clean TPU bridging across the insertion gap. |
Assembly
- Slide a gripper tab into either open end of a rail segment; it locks in place by friction once past the first 5 mm.
- Slide the gripper to the desired position along the rail.
- Screw the rail to the wall through the two countersunk holes.
- To extend the rail, push a second segment's groove end onto the first segment's tongue end before mounting.
- Flex a gripper's clamp open and press a tool handle in; it holds by spring-back grip.
Variants and upsells
Parametric variables let a buyer choose rail length (multiples of 200 mm) and gripper inner radius (for oversized handles like patio-umbrella poles or hockey sticks). Sell as a starter kit (2 rails + 3 grippers) with add-on gripper packs, and offer the rail in a wood-tone PETG for buyers who don't want to hide it. A garage variant with a wider 24 mm-radius gripper for shovels and rakes is a natural add-on line.
Selling and distribution
Best sold on Etsy and at local maker markets as a printed kit, since the appeal is largely about not having to model or slice anything. Price the printed kit against material + machine time (roughly 6 print-hours at typical FDM operating cost) plus a margin that lands it near comparable Etsy organizer listings. Also list the STL/3MF bundle as a digital file for makers who want to print their own rail lengths, under a commercial-use license (not CC BY-NC) since kit resale is the whole point. Listing keywords: broom holder, mop holder, adjustable tool rack, closet organizer, garage tool storage, wall mount gripper, modular tool rail, no-drill tool hanger.
Risks and IP notes
- Design risk: TPU grippers can creep (slowly loosen) under a heavy, off-balance tool over months. Mitigation: cap recommended load at handle tools under ~1 kg and note that in the listing.
- Design risk: the tongue-and-groove rail joint is a horizontal shear point; a rail loaded right at the joint could flex. Mitigation: recommend mounting screws within 30 mm of any joint.
- Market risk: broom/mop holders are a crowded niche on Etsy and Printables. Mitigation: lead marketing with the reposition-anywhere rail feature, since every competing listing found in research is a fixed single-point clamp.
- IP check: no existing gravity-clamp or latching-holder patent claims were reviewed in depth; the friction T-slot mechanism here is a distinct approach (no rolling gear, no latch) from the designs cited above, but a formal patent search is recommended before high-volume commercial sale.
Resource links
- Best-Selling 3D Printed Products on Etsy 2026 — Insight Agent — functional household organizers as a top-selling category
- Gravity Broom Holder — Etsy listing — comparable product, sold as a digital file
- Gravity Broom Holder — Printables — free-file comparable with strong community uptake
- Broom holder (print in place) — Printables — alternative hinge-based approach to the same problem
- Customisable Latching Broom Holder — Thingiverse — shows demand for adjustable-diameter clamps, but fixed at print time
- 23 Best Selling 3D Printed Items to Make Money in 2026 — Eufy Make — replacement parts and household organizers named as reliable sellers
More from 3D Print Designs