Lighthouse Keeper's Puzzle Box
A tabletop lighthouse that looks purely decorative until you discover its lantern room secretly unlocks the whole thing — push, twist ninety degrees, then lift the roof off to reach the hidden…
Lighthouse Keeper's Puzzle Box
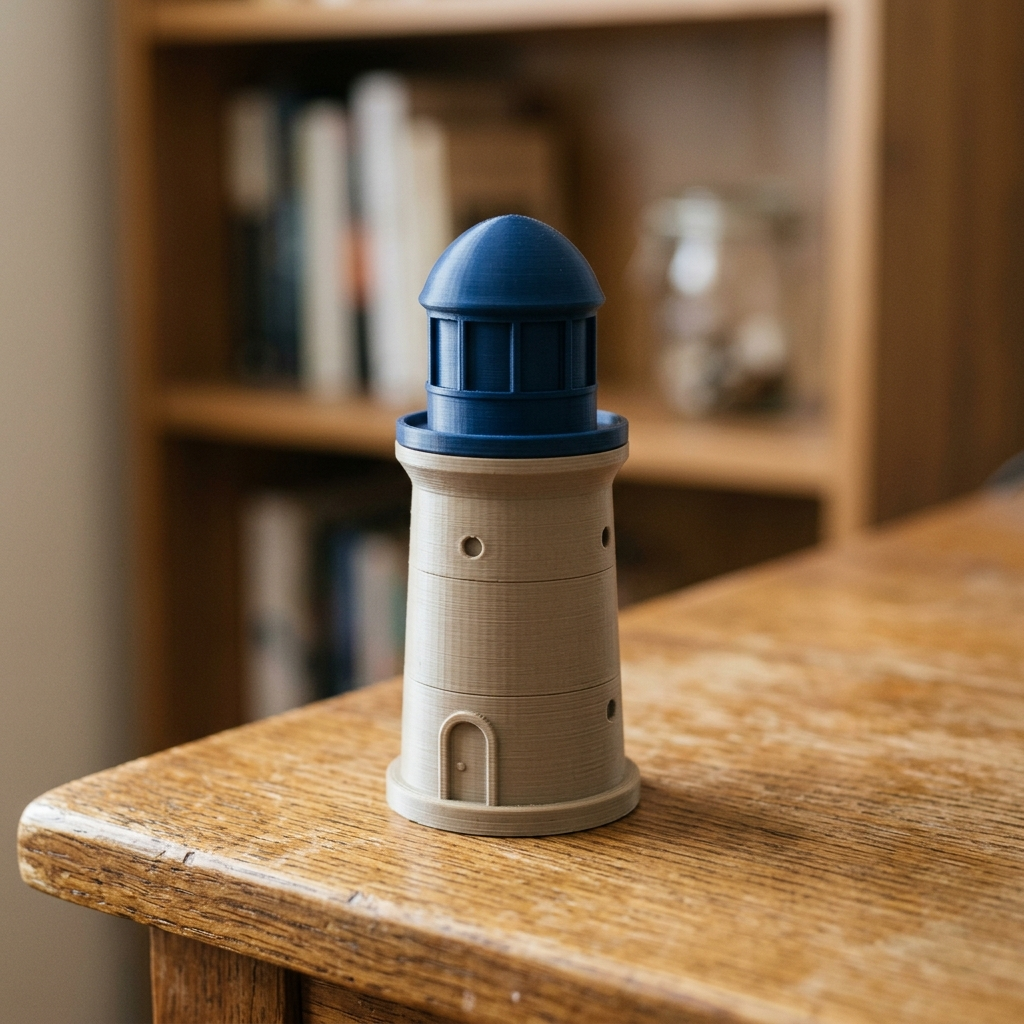
A tabletop lighthouse that looks purely decorative until you discover its lantern room secretly unlocks the whole thing — push, twist ninety degrees, then lift the roof off to reach the hidden storage cavity below.
Date: 2026-09-26 Category: Puzzles and Games Modeling difficulty: Advanced Estimated print: ~7 h total · ~95 g PLA (estimate) Suggested price: $28–$42 printed · $9 digital file (estimate) Status: Concept
Description
From the outside this is a squat little lighthouse: a cylindrical tower with a domed lantern room on top. Nothing about it looks like a mechanism — no visible seams, latches, or buttons. The trick is that the lantern room is the lid, and it's locked onto the tower by a hidden push-and-twist bayonet, the same basic mechanism as a childproof medicine cap, dressed up as architecture.
To open it, you press down on the lantern room about 2 mm, which is just enough to slip two internal lugs past a pair of detent bumps hidden inside the rim. Once past, you turn the lantern room a quarter turn, and it rides down a pair of helical ramps molded into the tower's own wall. At the bottom of that turn, the ramps run out of collar to hold onto, and the whole lantern room lifts straight off, revealing a 46 mm-deep cavity inside the tower for a ring, a folded note, or a small keepsake.
Two magnets set into the lugs and two more in the detent bumps give a soft click right at the moment your push finds the entry point — the only external hint that anything below the surface moves at all.
Why it sells
Puzzle boxes are one of the most consistently downloaded categories on maker platforms: Cults3D alone lists roughly 200 free puzzle-box files under that tag (Cults3D, "Puzzle Box" tag), and sequential-discovery boxes specifically have their own established Etsy market with listings from multiple independent puzzle sellers (Etsy, "Sequential Discovery Puzzle Box" search). SelfCAD's own roundups of the category point to hidden-mechanism boxes with combination levers and magnetic catches as the designs that keep getting recommended year over year (SelfCAD, "12 Best 3D Printed Puzzles to Try in 2026"; SelfCAD, "3D Printed Puzzle Box: 9 Designs to Download and 3D Print").
Nearly every puzzle box in that research — sliding-panel boxes, lever-and-button boxes, magnetic-catch boxes — telegraphs that it's a mechanism: visible seams, obvious buttons, a lid that clearly doesn't sit flush. This design's gap-filler is disguise: the entire lock lives inside a shape (a lighthouse) that gives no visual clue it opens at all, so the "aha" moment is realizing the lantern room moves in the first place, not just solving a visible puzzle once you know where to look.
Who buys it
Puzzle-box collectors and gift shoppers looking for something more novel than a Rubik's Cube or a burr puzzle — birthdays, anniversaries, "proposal ring box" novelty buyers, and escape-room hobbyists who build or run their own puzzle rooms and want a small physical prop. Sold through the same channels as other sequential-discovery boxes: Etsy puzzle shops, puzzle-specific subreddits, and craft-fair tables where people can pick it up and try it.
Design overview
- Squat lighthouse silhouette: 70 mm diameter tower, domed lantern-room lid, no visible seams or hardware at rest.
- Push-then-twist bayonet lock hidden entirely inside the rim — no external buttons, latches, or levers.
- Two helical ramp grooves molded into the tower's outer wall guide the lid down and around in one continuous quarter turn.
- Two embedded magnets give a tactile click at the exact moment the lid's lugs find the hidden entry point.
- 46 mm-deep internal cavity, big enough for a ring, folded bill, or small charm.
- Only two printed parts and four small magnets — no loose internal pins or springs to lose during assembly or play.
- The one feature that beats the researched competitors: the lock is invisible until found, instead of being a visible mechanism you're simply asked to operate.
Dimensions
| Measurement | Value (mm) | Notes |
|---|---|---|
| Overall width (X) | 70 | tower diameter |
| Overall depth (Y) | 70 | tower diameter |
| Overall height (Z), assembled | 82 | base 50 + cap rise above rim 32 |
| Base height | 50 | floor to top rim |
| Base wall thickness | 3 | |
| Base floor thickness | 4 | |
| Internal cavity diameter | 64 | matches base ID |
| Internal cavity depth | 46 | floor top (Z4) to rim (Z50) |
| Cap total height | 46 | skirt 14 + dome/taper 32 |
| Cap skirt depth (overlap with base) | 14 | |
| Cap skirt inner diameter | 70.3 | 0.15 mm/side clearance over base OD |
| Helical ramp width | 6 | |
| Helical ramp depth | 3 | |
| Lug size (W × radial × tall) | 6 × 3 × 4 | two per cap, inside skirt |
| Detent nub size (W × radial × tall) | 6 × 2 × 3 | two per base, outside rim |
Parts list
| Part | Qty | Material | Size X×Y×Z (mm) | Print orientation | Supports |
|---|---|---|---|---|---|
| Base (tower) | 1 | PLA | 70 × 70 × 50 | Standing on floor, open top up | none |
| Cap (lantern room) | 1 | PLA | 70 × 70 × 46 | Standing on skirt edge, dome up | minimal: dome apex |
Hardware and non-printed parts
4 × 4 mm diameter × 2 mm thick N42 disc magnet — 2 press-fit into pockets in the cap's lugs, 2 press-fit into pockets in the base's detent nubs, oriented to attract when the lug meets the nub.
Fits and tolerances
- Cap skirt to base OD: rotating/sliding fit, 0.15 mm clearance per side (tighter than a standard sliding fit because a decorative skirt that wobbles gives away that it's a mechanism).
- Cap lug to helical ramp groove: sliding fit, 0.2 mm clearance per side.
- Cap lug past base detent nub: a deliberate light interference (~0.3 mm total), relying on the cap's thin skirt wall flexing a fraction of a millimeter as the lug rides over the rounded nub — firm and purposeful under finger pressure, not a snap that could crack PLA.
- Magnet pockets: press fit, 0.1 mm clearance per side (magnet 4.0 mm nominal into a 4.2 mm pocket).
Modeling guide
Origin at the base's floor center; +X and +Y run across the floor, +Z runs up through the tower's axis.
Base (tower):
- Sketch on the XY plane at Z=0: circle, 70 mm diameter, centered on origin. Extrude 4 mm in +Z to form the floor.
- On the same circle, sketch a 64 mm diameter circle at Z=4. Extrude 46 mm in +Z (to Z=50), then shell the resulting cylinder to leave the outer 70 mm wall at 3 mm thickness and the 64 mm bore open above the floor (this forms the cavity).
- On the outer wall between Z=48 and Z=50, at angle 0° and 180°, sketch a detent nub: 6 mm wide (arc) × 2 mm tall along Z, protruding radially outward from the OD (radius 35 mm) to radius 37 mm, rounded profile on the leading edge.
- Starting just past each nub (angle 5° and 185°) at Z=48, sketch a helical sweep path: 6 mm wide × 3 mm deep groove (cut inward from radius 35 mm to radius 32 mm), sweeping 90° of arc while dropping linearly from Z=48 to Z=38.
- At the ramp's end (angle 95° and 275°), remove the outer collar material entirely from Z=38 to Z=50 across a 20° arc (95°–115° and 275°–295°) — this is the exit notch where the collar simply isn't present, so nothing blocks the cap lifting off once a lug reaches this angle.
- Add a 4.2 mm diameter × 2.2 mm deep magnet pocket centered in each detent nub.
- Fillet the top rim edge (Z=50, both inner and outer) 1 mm.
Cap (lantern room):
- Sketch on the XY plane at Z=0 (this Z=0 is the cap's own local origin, its bottom skirt edge): circle, 70.3 mm diameter. Extrude 14 mm in +Z to form the skirt, then shell to a 3 mm wall (skirt ID becomes 64.3 mm).
- On the skirt's inner wall, between Z=12 and Z=14 (near the skirt's open bottom edge), add two lugs at angle 0° and 180°: 6 mm wide (arc) × 4 mm tall along Z, protruding inward 3 mm from the skirt ID (radius 35.15 mm down to radius 32.15 mm), rounded leading edge to ride into the ramp grooves.
- Add a 4.2 mm diameter × 2.2 mm deep magnet pocket centered in each lug.
- Above Z=14, taper the profile from 70.3 mm diameter down to 30 mm diameter over the next 26 mm (to Z=40), following a smooth curve (not a straight cone) for the lantern-room silhouette. From Z=40 to Z=46, cap it with a shallow dome, 30 mm diameter at the base, 6 mm rise, blending smoothly at the top.
- Shell the taper and dome to a 2.5 mm wall thickness, leaving the skirt at its 3 mm wall.
- Fillet the skirt's bottom edge (Z=0) 1 mm so it doesn't catch on the base's rim during the push-down motion.
Print settings
| Setting | Value |
|---|---|
| Material | PLA |
| Nozzle | 0.4 mm |
| Layer height | 0.16 mm |
| Walls / perimeters | 4 |
| Infill | 15% gyroid |
| Supports | minimal — cap dome apex only |
| Brim / adhesion | none |
| Notes | Pause after the base's collar layers (~Z=50) to confirm ramp geometry printed cleanly before continuing; test-fit the cap dry before gluing magnets in. |
Assembly
- Press a 4 mm × 2 mm disc magnet into each of the base's two detent-nub pockets, polarity facing outward (matching orientation on both).
- Press a 4 mm × 2 mm disc magnet into each of the cap's two lug pockets, polarity facing inward so it attracts the base's magnets on contact.
- Dry-fit the cap onto the base: align the lugs with the entry points just past the detent nubs, push down ~2 mm, then turn 90° until the lugs reach the exit notches.
- Lift the cap straight off to confirm clean release, then reseat it in the locked position for delivery.
Variants and upsells
Parametric variables cover overall scale (a 90 mm-diameter "keeper's cottage" version for a larger cavity) and ramp turn angle (60°, 90°, or 120° for an easier or harder solve). This is a natural first entry in an Art & Decor-adjacent "coastal keepsakes" collectible series — a lightship, a rowboat, and a lobster-pot buoy box could follow as separate weekly releases, each with its own hidden lock geometry.
Selling and distribution
List on Etsy and Cults3D as a printed puzzle box, priced above generic sliding-panel boxes on the strength of the hidden-lock gimmick, and mention "no visible seams" directly in the title since that's the searchable differentiator. Sell both the finished print and the STL/3MF file; license the file under CC BY-NC for hobbyist reprints, with a separate commercial license available for sellers who want to print and resell it themselves. Listing keywords: puzzle box, sequential discovery, hidden compartment box, secret lock box, lighthouse gift, ring box puzzle, brain teaser, escape room prop.
Risks and IP notes
- Design risk: the helical ramp and detent nub are the tightest-tolerance features in the design; a warped first layer on the base's collar can jam the mechanism. Mitigation: print a test collar section first if scaling the design, and specify a well-calibrated printer in the listing.
- Design risk: PLA is rigid, so the "light interference" at the detent nub depends on consistent print quality; too much interference cracks the skirt, too little gives no click. Mitigation: the 0.3 mm total interference target has margin either way, and the listing should recommend a single test-open before regular use.
- Market risk: puzzle boxes are a saturated Etsy category. Mitigation: lead marketing with the "no visible mechanism" angle, since the sliding-panel and lever-and-button boxes surfaced in research all show their hand externally.
- IP check: push-and-turn bayonet locks are a long-established, unpatentable mechanical principle (childproof caps have used it for decades); no specific puzzle-box design found in research uses this exact disguised-lighthouse application, but a listing search before commercial sale is still worthwhile.
Resource links
- Cults3D, "Puzzle Box" tag — roughly 200 free puzzle box files, showing category depth and buyer interest
- Etsy, "Sequential Discovery Puzzle Box" search — active seller market for this specific puzzle sub-genre
- SelfCAD, "12 Best 3D Printed Puzzles to Try in 2026" — roundup of what keeps getting recommended in this category
- SelfCAD, "3D Printed Puzzle Box: 9 Designs to Download and 3D Print" — comparable hidden-mechanism boxes with levers and magnetic catches
- Cults3D, "Puzzle Box - Easy Print" listing — example of a combination-lever box that visibly shows its mechanism
- Printables, Puzzles & Brain-teasers category, sorted by all-time downloads — shows sustained demand for this model category
More from 3D Print Designs