Any-Width Ratchet Drawer Divider Kit
Tool-free drawer dividers that lock anywhere along a toothed rail instead of a fixed slot, so one kit fits a kitchen drawer today and a different drawer next year.
Any-Width Ratchet Drawer Divider Kit
Tool-free drawer dividers that lock anywhere along a toothed rail instead of a fixed slot, so one kit fits a kitchen drawer today and a different drawer next year.
Date: 2026-10-24 Category: Organization and Storage Modeling difficulty: Intermediate Estimated print: ~7 h total · ~120 g PETG (estimate) Suggested price: $18–$28 printed · $6 digital file (estimate) Status: Concept
Description
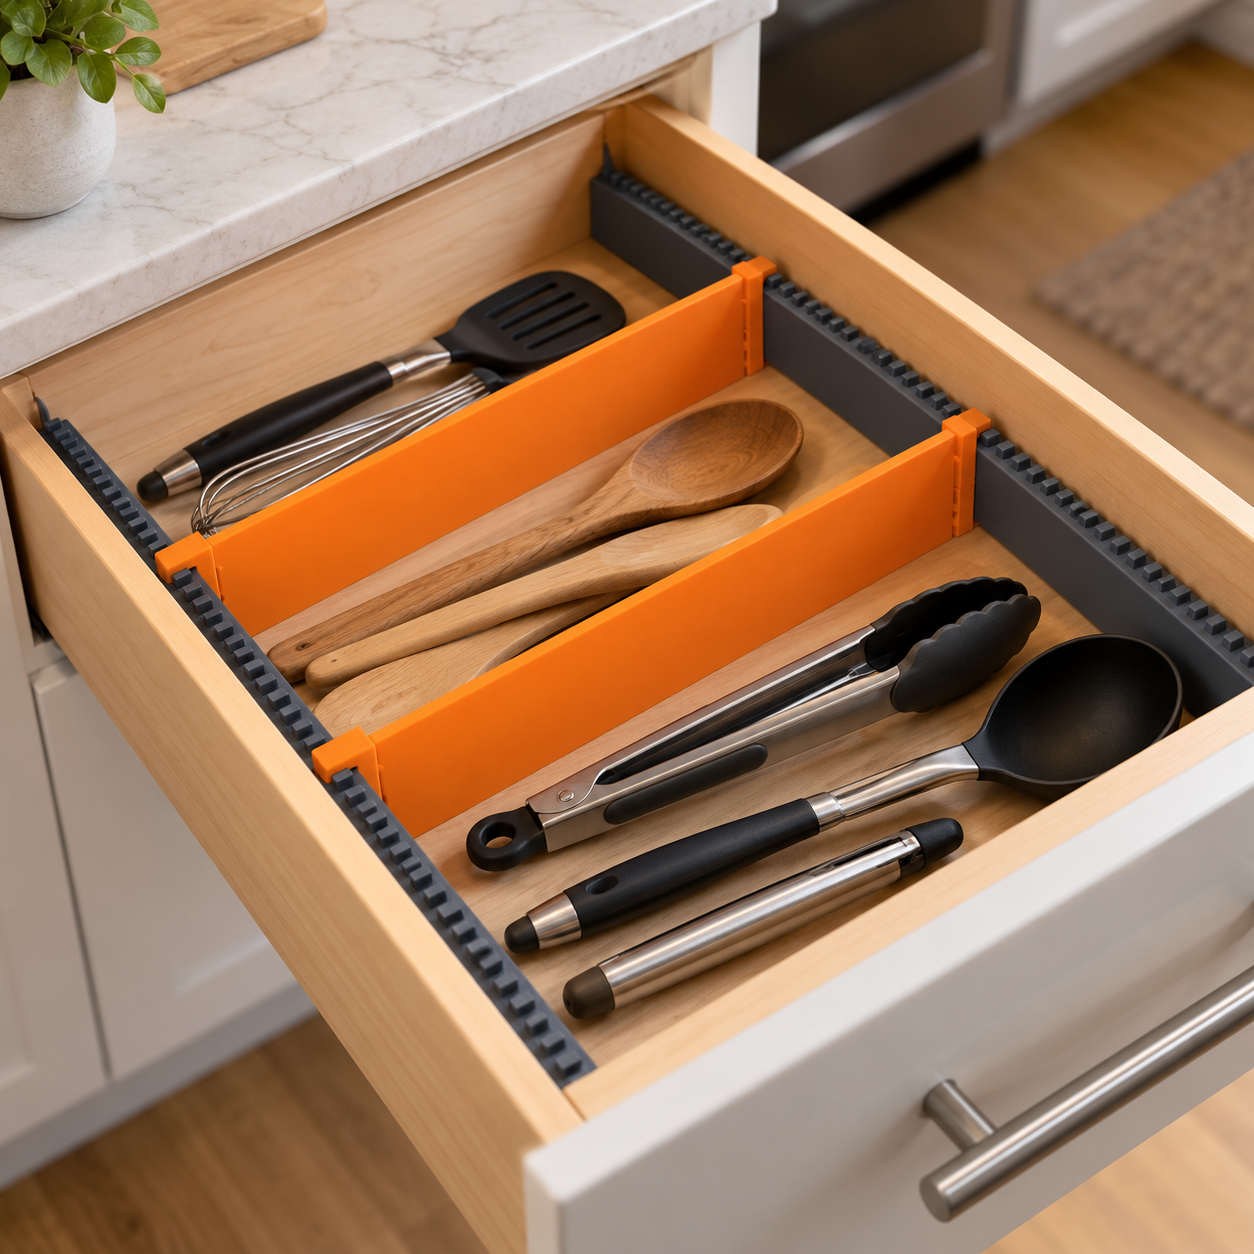
This kit is two rails and a set of blades. Each rail screws or sticks to a drawer's side wall and carries a continuous row of small teeth along its top edge. Each divider blade has a spring-loaded foot that straddles the rail and catches on whichever tooth it lands on, so the blade locks at roughly 2 mm resolution along the full rail length rather than snapping into one of three or four pre-molded slots.
A finger squeezes the foot to release it, slides the blade, and lets go to relock. Two rail segments join end to end with a dovetail splice and a thumbscrew, so the same kit covers a short utensil drawer or a deep linen drawer by adding a segment. Wall-anchor brackets cap the front end of each rail and give the screws (or tape) something solid to bite into.
Why it sells
3D-printed drawer dividers are an active Etsy category with sellers running made-to-order shops around them — one customizable listing draws reviews calling it "an excellent solution for an age old problem," with buyers reporting a perfect fit and no wasted space (Etsy listing). The IKEA Alex insert niche alone supports multiple sellers (Etsy listing), and kitchen-drawer-specific organizers sell on the same made-to-measure model (Etsy listing). A parametric OpenSCAD generator for custom dividers is itself a paid listing, which says buyers will pay just for the ability to size their own (Etsy listing).
Nearly every one of those listings is made-to-order: the buyer sends drawer measurements and waits for a custom print. This kit skips that step. The ratchet rail is continuously adjustable, so the same stocked kit works in a range of drawer widths and depths without a custom order or a second print run.
Who buys it
Home cooks organizing a kitchen junk drawer, renters who can't drill custom inserts into a built-in cabinet, and anyone who just moved and doesn't yet know next year's drawer sizes. It sells on Etsy and Printables next to the existing custom-divider shops, and works as a one-off at a maker fair or local market table where a buyer can test the click-lock by hand before buying.
Design overview
- Continuous 2 mm-pitch ratchet rail instead of 3–4 fixed slot positions — repositioning in small steps, not big jumps
- Squeeze-to-release pawl foot, no tools, no screws per blade
- Two rail segments splice together with a dovetail and thumbscrew for drawers deeper than 200 mm
- Wall-anchor brackets take either small screws or double-sided foam tape, so a renter has a no-drill option
- Divider blades print flat with no supports; rails print on their long edge
- PETG throughout for a pawl that flexes thousands of times without snapping like PLA would
Dimensions
| Measurement | Value (mm) | Notes |
|---|---|---|
| Rail segment length (X) | 200 | two segments splice to 396 (4 mm lost to dovetail overlap) |
| Rail cross-section (Y × Z) | 18 × 14 | tooth row runs along the top 14 mm face |
| Ratchet tooth pitch | 2 | triangular tooth, 1 mm tall |
| Divider blade span (X) | 180 | default; parametric 100–200 |
| Divider blade height (Z) | 80 | |
| Divider blade web thickness | 3 | at the center; feet thicken to 16 |
| Saddle foot channel (Y) | 18.6 | rail width 18 + 0.3 clearance per side |
| Wall anchor bracket (X × Y × Z) | 25 × 20 × 30 |
Parts list
| Part | Qty | Material | Size X×Y×Z (mm) | Print orientation | Supports |
|---|---|---|---|---|---|
| Rail segment | 2 | PETG | 200 × 18 × 14 | On its side, tooth row facing up | none |
| Divider blade | 3 | PETG | 180 × 16 × 80 | Flat, wide face down | none |
| Wall anchor bracket | 2 | PETG | 25 × 20 × 30 | Flat, L-face down | none |
Hardware and non-printed parts
- M3 × 10 mm thumbscrew ×2 — through aligned holes in the dovetail splice, only needed when joining two rail segments
- #4 × 12 mm self-tapping screw ×4 (2 per bracket) — through the bracket's mounting ears into the drawer wall
- 3M outdoor double-sided foam pad, 20 × 20 mm ×2 — no-drill alternative to the screws, one per bracket
Fits and tolerances
| Mating parts | Fit type | Clearance per side |
|---|---|---|
| Divider blade foot ↔ rail | Snap / ratchet | 0.3 mm — the pawl needs room to flex past each tooth without binding |
| Rail segment ↔ rail segment (dovetail splice) | Sliding, then bolted | 0.15 mm — snug enough to hold alignment before the thumbscrew goes in |
| Rail end ↔ wall anchor bracket socket | Press | 0.1 mm — permanent, glued or press-fit only |
Modeling guide
Origin at the rail segment's left-bottom-front corner; +X along the rail's length, +Y into its depth, +Z up.
Rail segment
- Sketch on XZ at X=0: rectangle 18 (Y) × 14 (Z), corner radius 1.
- Extrude +X by 200.
- On the top face (Z=14), sketch a repeating triangular tooth profile: 2 mm pitch, 1 mm tall, running from X=4 to X=196 (leaves 4 mm flats at each end for the dovetail).
- Cut the tooth profile into the top face, depth 1 mm.
- At X=196–200: cut a dovetail socket, 8 mm deep (into +X), trapezoid cross-section 10 mm wide at the base narrowing to 8 mm at the mouth.
- At X=0–4 (mirror end, only on segment 2 of the kit): extrude a matching male dovetail tab, 8 mm long, same trapezoid profile minus 0.15 mm per side.
- Drill a 3.2 mm through-hole at X=198, centered on Y and Z, for the splice thumbscrew (both segments, aligned when mated).
Divider blade
- Sketch on XZ, centered on X=0: rectangle 180 (X) × 80 (Z).
- Extrude the center 148 mm (X=-74 to 74) by 3 mm (Y) — the web.
- At each end (X=-90 to -74, and X=74 to 90), extrude a thicker foot block, 16 mm (Y) × 20 mm (Z, bottom-aligned) — the saddle.
- In each foot, cut a channel on the bottom face: 18.6 (Y) × 14.3 (Z), open at the bottom, running the 16 mm foot depth — this is the rail saddle.
- On the inner wall of each channel, add a cantilever pawl: 12 mm long (along X, anchored at the foot's outer edge), 4 mm wide, 1 mm thick, angled 15° into the channel so its tip catches the rail teeth.
- Fillet all outer edges 1.5 mm; fillet the pawl root 0.5 mm to reduce fatigue cracking.
Wall anchor bracket
- Sketch an L-profile on XZ: 25 (X) × 30 (Z) outer leg, 8 mm wall thickness, 20 mm deep (Y).
- Extrude the L-profile by 20 (Y).
- On the vertical leg's inside face, cut a socket matching the rail's end cross-section (18 × 14, 0.1 mm undersize), 10 mm deep, centered at Z=14.
- On the horizontal leg, drill two 3.5 mm mounting holes at X=6 and X=19, centered on Y.
- Fillet the outer L corner 2 mm.
Print settings
| Setting | Value |
|---|---|
| Material | PETG |
| Nozzle | 0.4 mm |
| Layer height | 0.2 mm |
| Walls / perimeters | 3 |
| Infill | 20% gyroid |
| Supports | none |
| Brim / adhesion | none |
| Notes | Print the pawl feature at 100% infill locally if your slicer supports a modifier mesh — a hollow pawl snaps off early |
Assembly
- If the drawer is deeper than 200 mm, slide a second rail's male dovetail into the first rail's socket and drive the M3 thumbscrew through the aligned holes.
- Press each rail's front end into a wall anchor bracket's socket.
- Position the brackets against the drawer's side walls at the desired height and either screw or tape them in place, one rail per side, teeth facing each other.
- Squeeze a divider blade's foot pawls, set the blade across the two rails at the chosen position, and release to lock.
- Repeat for each additional blade.
Variants and upsells
- Taller blade (100–120 mm) for deep drawers, same rail
- A 3-blade starter kit versus a 6-blade "full drawer" kit at a higher price point
- Color-matched kits (white/wood-tone PETG) for visible drawers versus utility black for garages and workshops
- A short, single-segment "junk drawer" version sized for drawers under 200 mm, sold cheaper
Selling and distribution
Etsy and Printables both carry active made-to-order divider shops, so a stocked (not custom) kit can undercut their turnaround time and compete on the "no measuring, no waiting" angle. Price the physical kit by rail/blade count: a 2-rail + 3-blade kit at $18–$28 covers material, ~7 hours of machine time at a modest per-hour rate, and margin; sell the STL set separately for makers who already own a printer. License the files under a commercial-use-permitted license (not CC BY-NC) since the made-to-order Etsy shops researched here are themselves commercial sellers — a restrictive license would just hand the market to someone else's free knockoff.
Listing keywords: drawer divider, adjustable drawer organizer, no measuring drawer insert, kitchen drawer organizer, ratchet drawer divider, tool-free organizer, renter friendly storage, 3D printed drawer kit, modular drawer divider, no drill organizer.
Risks and IP notes
- The pawl is a thin repeated-flex part; PLA will fatigue-crack faster than PETG — spec PETG explicitly and say so in the listing.
- Drawer divider kits are a crowded category with made-to-order competition on price; the adjustable-rail angle is the differentiator, so lead with it in the title, not buried in the description.
- Standard gridded/slotted divider mechanisms are common prior art; the continuous-ratchet pawl is the novel element here, not the overall divider-kit concept — don't claim the category as original, just the mechanism.
- Self-tapping screws into thin drawer-wall veneer can split it; the foam-tape alternative avoids that failure mode for renters and thin laminate drawers.
Resource links
- Customizable Drawer Dividers, Etsy — made-to-order divider shop, review language used to size demand
- 3D Printed Drawer Organizer Insert for IKEA Alex, Etsy — niche-specific divider seller
- Custom 3D Printed Kitchen Drawer Organizer, Etsy — kitchen-specific divider seller
- Custom 3d-printed Drawer Organizers, Etsy — comparable made-to-order listing
- Drawer Organizer Generator (OpenSCAD & STL), Etsy — buyers paying for parametric/custom sizing specifically
- 3D Printed Drawer Divider, Etsy market page — category breadth, many active sellers
More from 3D Print Designs