Lorenz Ribbon: Chaos Sculpture on a Plinth
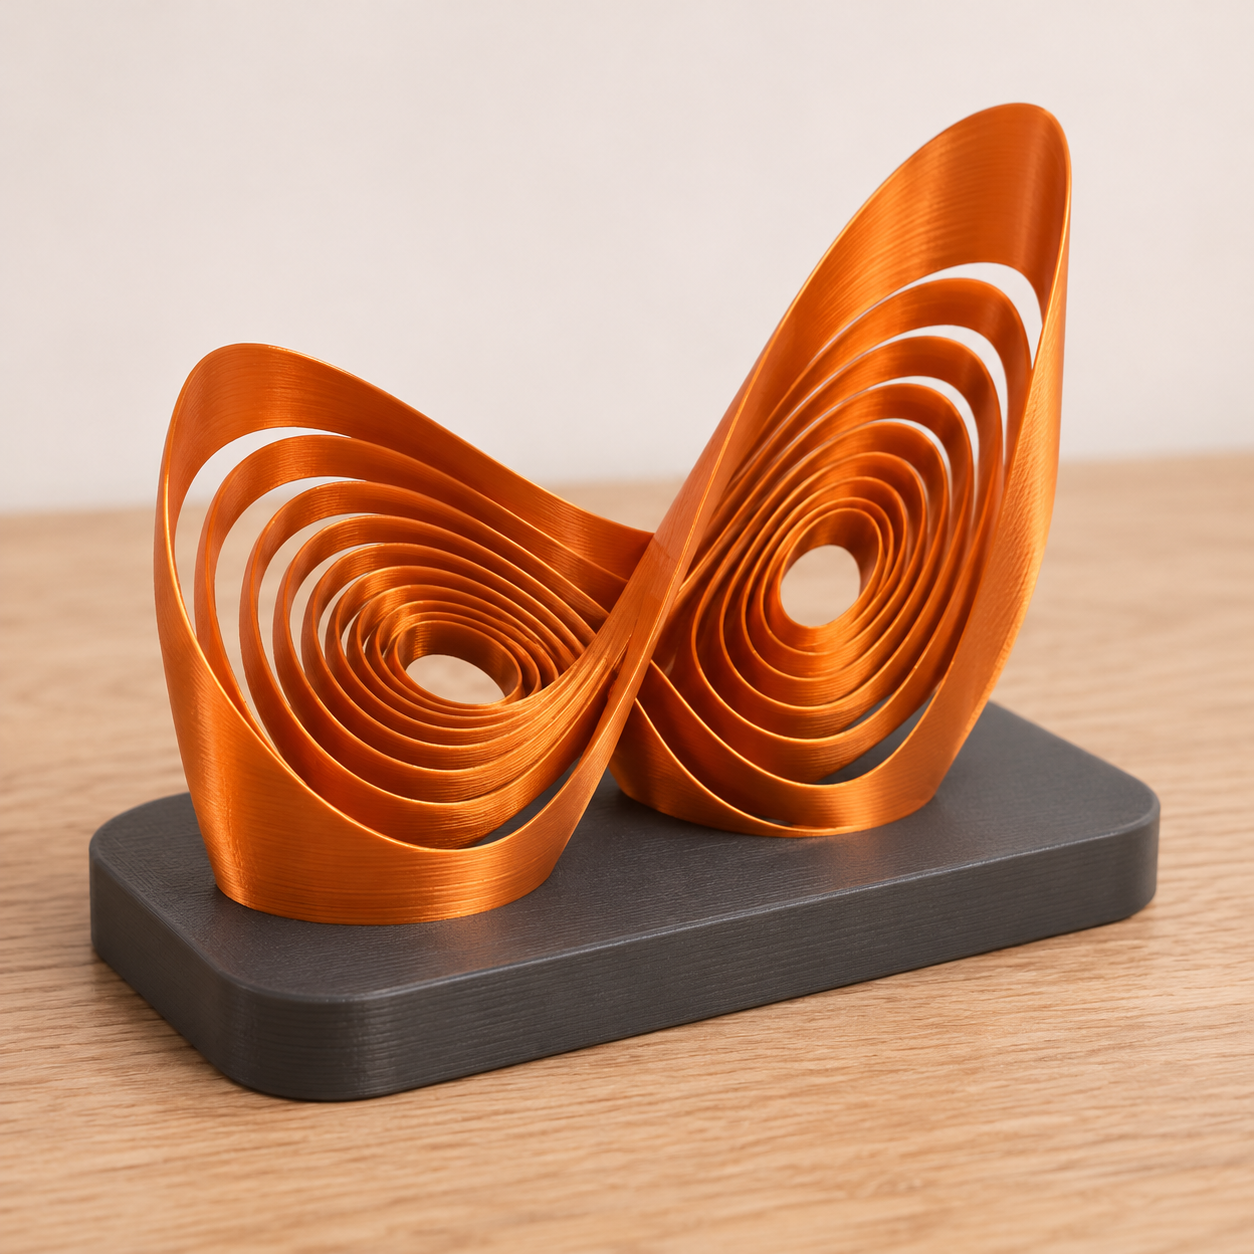
A thin standing ribbon that traces the Lorenz attractor's butterfly path, with its height set by the third coordinate, so one equation becomes a desk sculpture that changes shape as you walk around…
Lorenz Ribbon: Chaos Sculpture on a Plinth
A thin standing ribbon that traces the Lorenz attractor's butterfly path, with its height set by the third coordinate, so one equation becomes a desk sculpture that changes shape as you walk around it.
Date: 2026-11-12 Category: Art and Decor Modeling difficulty: Advanced Estimated print: ~17 h total · ~250 g PLA (estimate) Suggested price: $38–$65 printed · $8 digital file (estimate) Status: Concept
Description
The Lorenz system is three coupled equations that Edward Lorenz wrote in 1963 as a simplified model of atmospheric convection. With the classic constants it never settles and never repeats, and its trajectory draws two lobes that look like butterfly wings. This piece turns about fifteen loops of that trajectory into a physical object.
The path seen from above is the (x, z) projection of the trajectory, scaled to fit a 150 × 120 mm plinth. The ribbon is a 1.6 mm thick wall standing on that path. The third coordinate, y, sets how tall the wall is at each point, between 6 and 40 mm. From above you see the familiar butterfly. From the side the top edge becomes a rolling skyline, and the crossings where the trajectory passes over itself turn into walls of different heights meeting each other.
Print the plinth in a dark colour and change filament at 8.0 mm so the ribbon is a contrasting copper or orange. It sits on a shelf or desk with four felt feet.
Why it sells
This is an art piece, so it is chosen on taste, not on sales rankings. The inspiration is the long tradition of making chaos visible: the Lorenz attractor appears on Wikipedia's Lorenz system page, in climate-model teaching notebooks, and in many screen visualisations (Wikipedia, linked.earth Lorenz63 demo). It is nearly always shown as a thin glowing line on a screen. I did not look for a printed version that varies wall height with the third coordinate; the gap this fills is a physical, shelf-sized piece where all three coordinates are readable at once.
Who buys it
People who like maths, physics or climate science and want an object that is more than a poster: teachers, engineers, data people, and anyone who has seen the butterfly picture and liked it. Typical occasions are a desk upgrade, a gift for a physics or maths graduate, or a shelf piece. Sales channels are Etsy and craft markets for the print, MakerWorld and Printables for the file.
Design overview
- One part: a 150 × 120 × 8 mm plinth with a ribbon standing on it, printed in one go with a single colour change.
- The ribbon spine is the Lorenz trajectory (σ = 10, ρ = 28, β = 8/3), integrated with fourth-order Runge-Kutta, projected onto (x, z) and scaled by 3.2 and 2.4.
- Ribbon wall thickness 1.6 mm (four 0.4 mm lines), height 6 to 40 mm mapped from y.
- What sets it apart: the wall height encodes the third coordinate, so it is a true 3D reading of the attractor instead of a flat line drawing.
- No supports, no assembly. Four felt pads on the underside.
- The parametric variables let you change the number of loops, the scale, and the height range.
Dimensions
| Measurement | Value (mm) | Notes |
|---|---|---|
| Overall width (X) | 150 | plinth |
| Overall depth (Y) | 120 | plinth |
| Overall height (Z) | 48 | 8 plinth + 40 max ribbon |
| Plinth thickness | 8 | corner radius 6, bottom edge chamfer 1 |
| Ribbon wall thickness | 1.6 | four 0.4 mm perimeters |
| Ribbon height range | 6–40 | above the plinth top |
| Ribbon footprint X | about 122 | 3.2 × x range of about ±19 |
| Ribbon footprint Y | about 100 | 2.4 × z range of about 5–46 |
| Time span integrated | 2 to 14 | Lorenz time units, about 15 loops (estimate) |
Parts list
| Part | Qty | Material | Size X×Y×Z (mm) | Print orientation | Supports |
|---|---|---|---|---|---|
| Sculpture (plinth + ribbon) | 1 | PLA | 150 × 120 × 48 | plinth bottom face down | none |
Hardware and non-printed parts
- Self-adhesive felt pad, 10 mm diameter × 2 mm, ×4 (one per plinth corner, 12 mm in from each edge).
Fits and tolerances
None. It is a single printed body. The felt pads sit in four shallow 10.2 × 0.5 mm recesses, a press fit with 0.1 mm per side, and are held by their adhesive.
Modeling guide
Origin: centre of the plinth top face, +X to the right, +Y to the back, +Z up. A script is the practical route (OpenSCAD with a list of points, or Python writing an STL); the numbers are fixed so the result is repeatable.
- Integrate. Lorenz equations dx/dt = 10(y − x), dy/dt = x(28 − z) − y, dz/dt = xy − (8/3)z. Start at (0, 1, 1.05). Use RK4 with step dt = 0.005. Discard t < 2. Keep samples for 2 ≤ t ≤ 14 at every 0.02 time units (600 points).
- Find y_min and y_max over the kept samples.
- Plinth: sketch on XY a rounded rectangle 150 × 120, corner radius 6, centred on the origin, then extrude down 8 (Z from −8 to 0). Chamfer the bottom edge 1 mm.
- Ribbon spine: map each sample to X = 3.2·x and Y = 2.4·(z − 25). Join the points as a polyline.
- Ribbon height per point: h = 6 + 34·(y − y_min)/(y_max − y_min).
- Build the wall: offset the spine by ±0.8 mm to give a 1.6 mm strip. Between each pair of adjacent points make a prism with the strip footprint and height linearly interpolated from the two h values, sloped on top. Union all prisms. Union with the plinth, with the ribbon starting at Z = 0.
- Check the minimum thickness is 1.6 mm everywhere; where neighbouring loops are closer than 0.8 mm let them fuse (the slicer treats it as one wall).
- Felt-pad recesses: four circles of 10.2 mm diameter, 0.5 mm deep, centres at (±63, ±48) on the bottom face.
- Export STL, check the bounding box is 150 × 120 × 48 or less.
Print settings
| Setting | Value |
|---|---|
| Material | PLA (two colours) |
| Nozzle | 0.4 mm |
| Layer height | 0.2 mm |
| Walls / perimeters | 4 (ribbon is walls only) |
| Infill | 15% gyroid (plinth only) |
| Supports | none |
| Brim / adhesion | none; 3 mm brim if the plinth lifts |
| Notes | Insert a colour change at Z = 8.0 mm. Use the Arachne wall generator so 1.6 mm walls print as four continuous lines. Estimated time and weight are rough and depend on how many loops you keep. |
Assembly
No assembly. Stick the four felt pads into the recesses on the underside.
Variants and upsells
- Time span: a short version (t to 9, about 8 loops) as a $20–$30 desk piece; a long version on a bigger plinth for a shelf.
- Other attractors with the same method: Rössler, Thomas, Halvorsen. Sold as a set of three, they make a collection of chaotic systems.
- A backlit variant in white PLA with a 4 mm LED strip groove in the plinth.
Selling and distribution
Sell the print on Etsy or at craft and science markets, and the parametric script and STL on MakerWorld and Printables. Pricing: about 250 g PLA plus 17 h of machine time plus margin, which supports the $38–$65 range (estimate). Licence the file CC BY-NC for personal use, with a separate commercial licence for sellers. Keywords: Lorenz attractor, chaos theory gift, butterfly effect sculpture, maths art, physics desk decor, data sculpture, strange attractor, generative art 3D print, science gift, desk sculpture.
Risks and IP notes
- Ribbon fusing: tight loops near the centres of the two lobes can come within 0.8 mm of each other. Mitigation: the model lets walls merge, and
scale_xcan be raised to 3.6. - Thin tall walls can wobble during printing. Mitigation: 1.6 mm walls at most 40 mm tall are well within PLA's limits; slow the outer wall to 40 mm/s if you see ringing.
- The long print has a failure risk. Mitigation: print the short variant first.
- The Lorenz equations are public mathematics, with no IP restriction.
Resource links
- Lorenz system (Wikipedia) — the equations, the classic constants and the butterfly shape
- Lorenz63 strange attractor demo (linked.earth) — the same equations in a runnable notebook, with the standard parameters
- The Lorenz attractor (CellML tutorial) — another worked integration to check your numbers against
More from 3D Print Designs