Stack-Lock Modular Filament Dry Rack
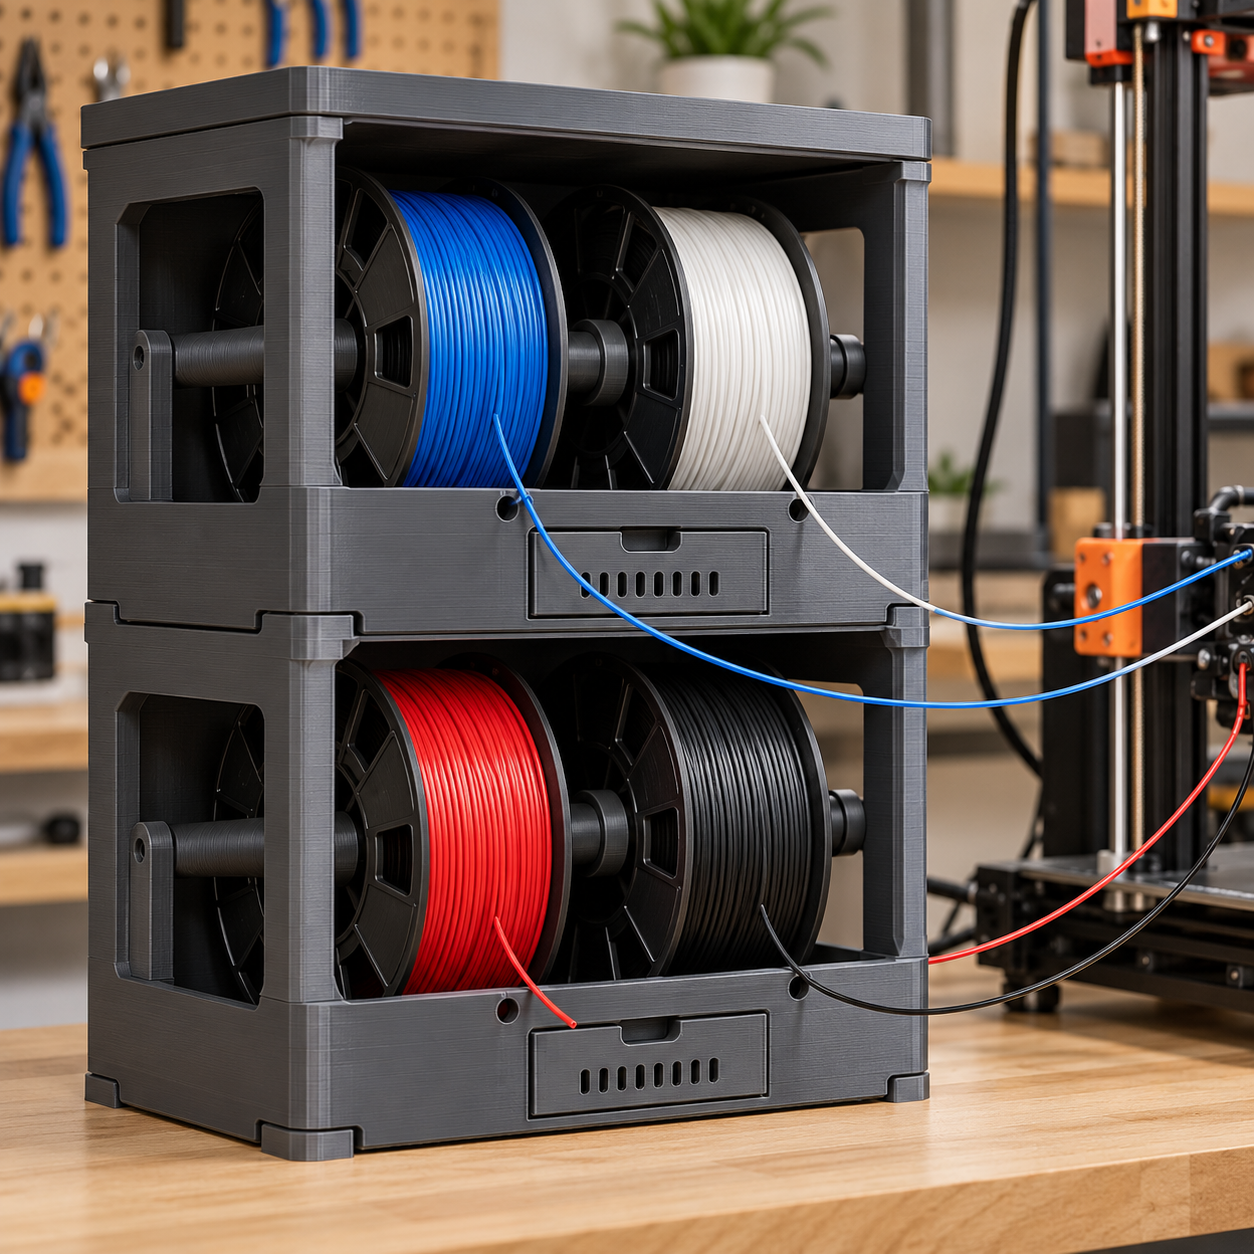
A stacking tray system for 3D-printer filament spools, with a sliding desiccant cartridge in every tray, that grows one tray at a time as a spool collection grows.
Stack-Lock Modular Filament Dry Rack
A stacking tray system for 3D-printer filament spools, with a sliding desiccant cartridge in every tray, that grows one tray at a time as a spool collection grows.
Date: 2026-10-24 Category: Tools and Workshop Modeling difficulty: Intermediate Estimated print: ~12 h total · ~200 g PETG (estimate) Suggested price: $35–$55 printed · $8 digital file (estimate) Status: Concept
Description
Each tray holds two spools on fixed printed rods that rest in open forked notches, so loading a spool is a drop-in, not a thread-through. A corner peg on every tray's top rim presses into a socket on the tray above, so trays stack square without hardware, and the stack grows by printing one more tray rather than buying a bigger box. A flat cap with a gasket groove tops the stack.
A small sliding drawer at the front of each tray holds loose desiccant beads behind a slotted vent, with a finger-pull to swap the beads out once they're spent. Two feed holes per tray let filament run straight out to the printer without opening the box.
Why it sells
Filament dry storage is a proven paid category, not just a hobby print. Commercial dry boxes on Etsy run from a $20 basic kit to a "603" box at $55 and a multi-spool humidity-and-temperature-controlled box at $71.31 (Etsy listing, Etsy listing). A simpler airtight storage system with a hygrometer sells at $14.99, and a drying box from one small seller has 48 reviews at 5 stars (Etsy listing).
On the free side, MakerWorld's modular filament spool rack is explicitly built to extend "horizontally or vertically" as a collection grows, and separate free designs cover drybox spool holders and desiccant-holder inserts on their own (MakerWorld, MakerWorld, MakerWorld). That split between "holds the spool" and "dries the spool" is the gap: this design folds both into one tray, and the free MakerWorld designs show that the modular/stacking framing specifically is what makers already search for and build.
Who buys it
Anyone running one 3D printer who has started buying filament in more than one color and has noticed a cardboard box is not keeping the PETG dry. Sold on Printables and MakerWorld where print-farm owners and hobbyists already browse for exactly this, and on Etsy as a printed kit for buyers who don't have their own printer yet but want their spools organized before the first one arrives.
Design overview
- Two spools per tray, each resting in an open fork — drop a spool in, no threading a rod through by hand first
- Corner peg-and-socket stacking, no clips, no magnets, no separate connector parts
- A sliding desiccant drawer per tray instead of one shared chamber, so each tray's humidity is independent
- Feed holes let filament run to the printer without lifting the lid
- Gasket groove in the lid for an added foam or silicone seal, called out explicitly rather than assumed airtight
- One tray design scales to a 2-spool starter or an N-tray column by printing more of the same part
Dimensions
| Measurement | Value (mm) | Notes |
|---|---|---|
| Tray overall (X × Y × Z) | 200 × 180 × 60 | |
| Floor thickness | 4 | |
| Wall thickness | 3 | |
| Spool axle rod diameter × length | 15 × 170 | spans tray depth, rests in forks |
| Fork notch width / depth | 15.6 / 16 | opens at the top for drop-in loading |
| Feed hole diameter | 4 | one per spool position |
| Desiccant drawer (X × Y × Z) | 70 × 45 × 15 | slides into front-wall channel |
| Corner peg diameter × height | 6 × 8 | ×4 per tray |
| Lid (X × Y × Z) | 200 × 180 × 10 | gasket groove on underside |
Parts list
| Part | Qty | Material | Size X×Y×Z (mm) | Print orientation | Supports |
|---|---|---|---|---|---|
| Tray frame | 2 | PETG | 200 × 180 × 60 | Floor down, open top up | minimal (fork notch underside bridge) |
| Spool axle rod | 4 | PETG | 15 × 170 × 15 | On its side | none |
| Desiccant drawer | 2 | PETG | 70 × 45 × 15 | Flat, open top up | none |
| Lid | 1 | PETG | 200 × 180 × 10 | Flat | none |
Hardware and non-printed parts
- Desiccant beads or silica gel, loose-fill, ~50 g per tray — user-supplied, refilled through the drawer
- Adhesive-backed analog hygrometer card — user-supplied, stuck inside the front wall, visible through the drawer's vent slots
- 3 mm silicone or foam weatherstrip cord, ~760 mm — user-supplied, pressed into the lid's gasket groove for extra sealing
Fits and tolerances
| Mating parts | Fit type | Clearance per side |
|---|---|---|
| Tray corner peg ↔ tray/lid socket | Press | 0.15 mm — firm enough to keep the stack square, removable by hand |
| Axle rod ↔ fork notch | Sliding | 0.3 mm — the rod needs to lift straight out and spin freely under the seated spool |
| Desiccant drawer ↔ front-wall channel | Sliding | 0.2 mm — a standard sliding-drawer clearance |
Modeling guide
Origin at the tray's floor, front-left-bottom corner; +X along the tray width, +Y into the tray depth, +Z up.
Tray frame
- Sketch base on XY: rectangle 200 × 180, corner radius 4. Extrude +Z by 4 (floor).
- From the base perimeter, extrude side walls, 3 mm thick, from Z=4 to Z=60, leaving the top fully open.
- On the front wall (Y=0) inner face, cut two open-top forked notches at X=45 and X=155: width 15.6, from the top edge (Z=60) down to Z=44, with a semicircular seat of radius 7.8 at the bottom.
- Mirror the same forked notches on the back wall (Y=180) at the same X positions.
- On the front wall, drill two 4 mm feed holes at X=45 and X=155, Z=30.
- Cut a drawer channel into the front wall: 72 × 16 mm opening centered at X=100, Z=8, extending 45 mm into the tray depth, with 0.2 mm clearance guide rails along the channel.
- Add four corner peg bosses on the top rim, 6 mm diameter × 8 mm tall, at (X,Y) = (6,6), (194,6), (6,174), (194,174).
- On the bottom face, cut four matching sockets, 6.15 mm diameter × 9 mm deep, at the same (X,Y) positions.
- Fillet all exterior edges 2 mm.
Spool axle rod
- Sketch a 15 mm-diameter circle on the YZ plane at Y=0.
- Extrude along Y by 170.
- Chamfer both ends 2 mm × 45°.
Desiccant drawer
- Sketch on XZ: rectangle 70 × 15. Extrude along Y by 45.
- Shell the box, wall thickness 1.5 mm, leaving the top face open.
- Cut five ventilation slots in the top face, 2 mm × 10 mm, spaced 10 mm apart.
- Add a finger-pull notch on the outward face, 20 mm wide × 5 mm deep half-moon.
Lid
- Sketch on XY: rectangle 200 × 180, corner radius 4. Extrude Z by 10.
- On the bottom face, cut four sockets matching the tray's peg layout, 6.15 mm diameter × 9 mm deep.
- Cut a gasket groove 3 mm wide × 2 mm deep, offset 5 mm inward from the outer edge, running the full perimeter.
- Fillet top exterior edges 2 mm.
Print settings
| Setting | Value |
|---|---|
| Material | PETG |
| Nozzle | 0.4 mm |
| Layer height | 0.2 mm |
| Walls / perimeters | 3 |
| Infill | 15% gyroid |
| Supports | minimal, auto-generated under the fork notch seats only |
| Brim / adhesion | none |
| Notes | PETG resists moisture better than PLA, which matters for a box whose job is keeping filament dry |
Assembly
- Drop an axle rod into each pair of forked notches in a tray.
- Load a spool onto each rod from the open top.
- Slide a desiccant drawer, filled with beads, into the front-wall channel.
- Stack a second tray on top by pressing its bottom sockets onto the first tray's corner pegs; repeat for additional trays.
- Press the lid onto the top tray's pegs.
- Feed filament from each spool through its front feed hole to the printer.
Variants and upsells
- Single-spool-wide tray for narrow shelf spaces, same peg-and-socket stacking
- A starter bundle of 2 trays + lid versus a 4-tray "print farm" column at a higher price
- A clear-front drawer variant for sellers who want the desiccant visibly checked without opening anything
- Wheeled base plate accessory for rolling the whole stack under a bench
Selling and distribution
Printables and MakerWorld fit the free-STL side of this category, where the hook is "modular, stacks as your spool wall grows" — list it there to build download count and reviews before charging for anything. Sell the physical kit on Etsy against the $20–$71 commercial dry boxes already on the market, priced by tray count: a 2-tray starter at $35–$55 covers PETG, roughly 12 hours of machine time, and margin. Offer the STL set on a commercial-use license, since the comparable Etsy sellers researched here are themselves running commercial print businesses off similar files.
Listing keywords: filament dry box, modular spool rack, 3D printer filament storage, stackable spool holder, desiccant filament box, PETG dry storage, print farm spool organizer, filament humidity control, spool rack upgrade.
Risks and IP notes
- The fork-notch bridge over each seat is a short unsupported span; print it with minimal auto-supports rather than skipping supports entirely, or it will sag on some printers.
- Modular/stackable spool racks already exist as free designs on MakerWorld; the sliding desiccant drawer per tray is this design's distinct addition, not the stacking concept itself — lead listings with that detail.
- PLA trays will absorb and re-release humidity over time in a box meant to stay dry; spec PETG and say so, since a buyer substituting PLA undermines the product's whole purpose.
- The category has real commercial competitors at a range of price points; position on tray-level desiccant control and stackability rather than trying to win on price against the $14.99 basic boxes.
Resource links
- Sturdy Modular Filament Spool Rack, MakerWorld — modular, horizontally/vertically extensible design, the closest free comparable
- Filament Spool Holder for Drybox, MakerWorld — free spool-holder-only design
- Filament Spool Dry Box (w/ desiccant holder), MakerWorld — shows desiccant handling as its own feature class
- Cereal box dry filament storage, MakerWorld — DIY dry-storage demand signal
- 3D Printer Filament Dry Box Kit, Etsy — commercial dry box at $20
- The "603" 3D Printer Filament Dry Box, Etsy — commercial dry box at $55
- Filament Box, Filament Dryer, Etsy — 5 reviews, 5.0 stars, small-seller comparable
More from 3D Print Designs