Slope Deck: 16-Switch Tester with a Magnetic Lift-Off Plate
A 4 × 4 keyboard switch tester that holds sixteen MX-style switches at a typing slope and lifts off its base on magnets, so you can keep one pre-loaded plate per switch family and swap them in…
Slope Deck: 16-Switch Tester with a Magnetic Lift-Off Plate
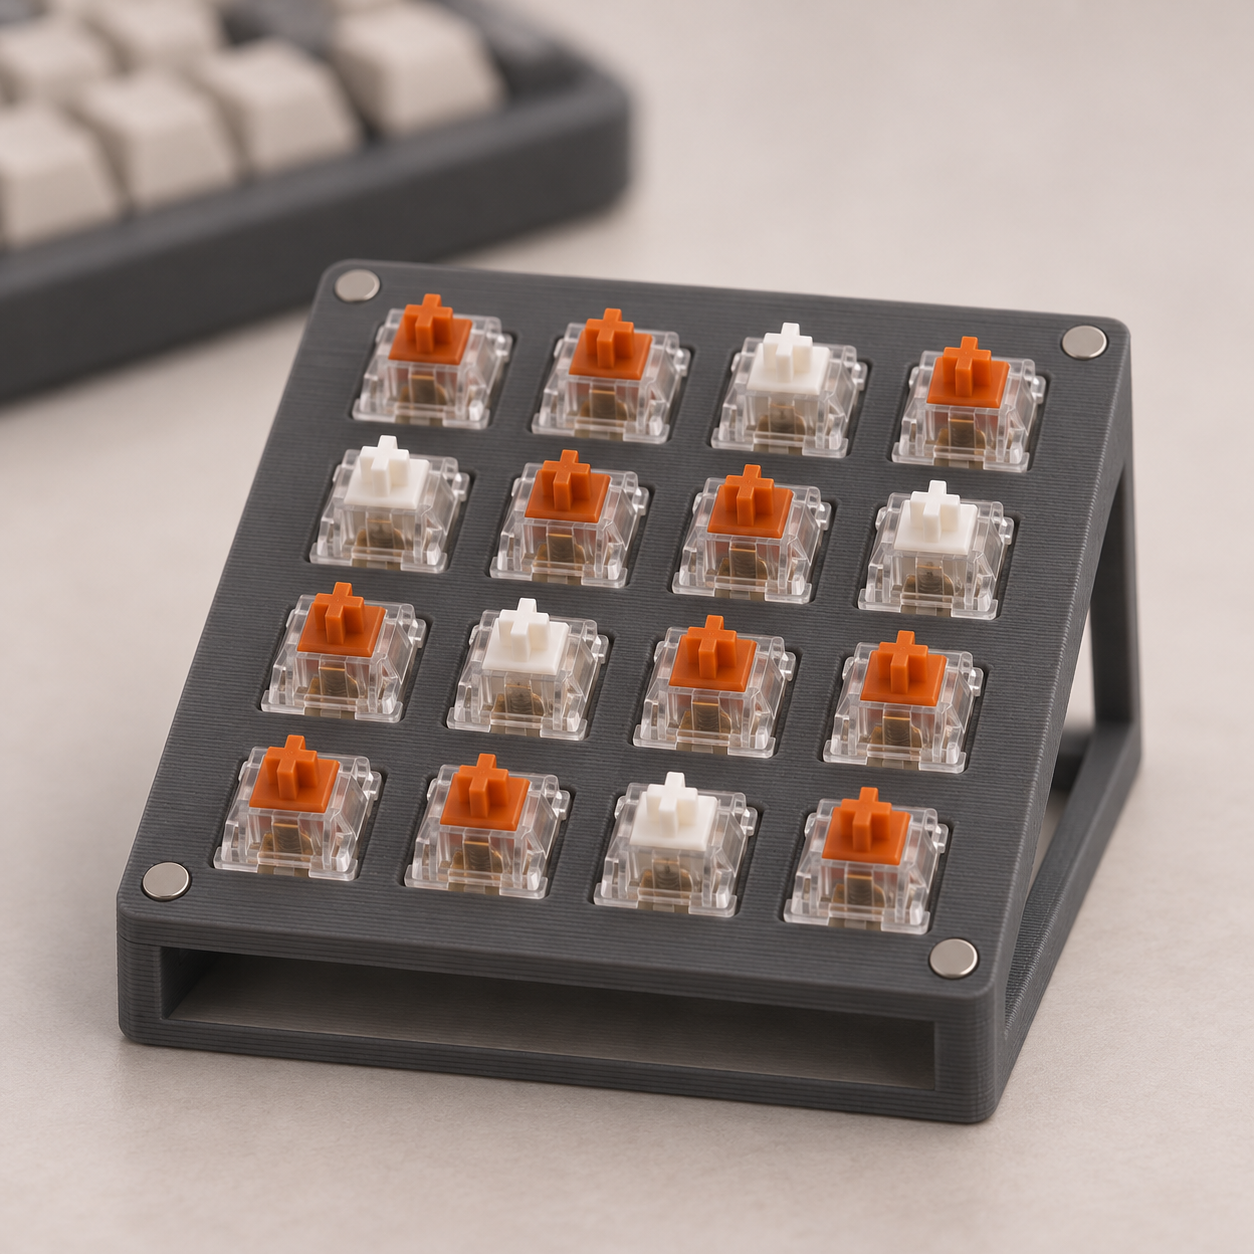
A 4 × 4 keyboard switch tester that holds sixteen MX-style switches at a typing slope and lifts off its base on magnets, so you can keep one pre-loaded plate per switch family and swap them in seconds.
Date: 2026-11-12 Category: Desk and Tech Modeling difficulty: Beginner Estimated print: ~5 h total · ~50 g PLA (estimate) Suggested price: $14–$24 printed · $4 digital file (estimate) Status: Concept
Description
Switch testers let you press different mechanical keyboard switches back to back before you buy a set. This one is a square plate with sixteen 14 mm square cut-outs on the standard 19.05 mm key pitch. You snap in switches, and since a printed plate has no PCB, the switches sit loose in their holes and are held by their normal plate clips. The plate rests on a low open frame that tilts it 8 degrees toward you, so your fingers meet the switches at a typing angle instead of straight down.
The plate is a separate part held on by four 6 × 2 mm magnets at its corners. Print two or three plates and load each with a different group (linear, tactile, clicky). The frame stays on the desk and a plate swaps in a few seconds. You supply the switches; none are included.
Colour: charcoal grey plate and frame, with the switches giving the colour.
Why it sells
Switch testers are a normal product for keyboard hobbyists. Keeb.io lists an MX/Choc Keyboard Switch Tester (price in a search snippet on 2026-11-12: $23.99; I could not open the page to confirm it), Keychron lists a Kailh switch tester (snippet price $16.00, also not opened), and a keyboard forum thread announces a switch holder as a shop's first product. Free printable versions exist on MakerWorld, among them a version with 1, 4 and 24 positions and a 4-slot tester. I did not check download counts, because those pages returned a 403 error when fetched. Most listings I saw are flat plates or small trays. The gap here is the slope and the swappable plate.
Who buys it
People building or buying a custom mechanical keyboard, and gift givers for them. They usually shop on keyboard vendor sites, Etsy, MakerWorld and Printables. A gift buyer would pair it with a bag of switches.
Design overview
- Two printed parts: a 92.2 × 92.2 mm plate with 16 holes, and an open frame with two rails and two crossbars.
- Holes 14.1 mm square at 19.05 mm pitch (centres ±9.525 and ±28.575 mm), in a plate 1.5 mm thick, so standard clip-in switches latch.
- Frame top surface slopes 8°: 14 mm high at the front, about 27 mm at the back.
- Four corner magnets, 6 × 2 mm, glued into plate corner pads and frame rails.
- What sets it apart: the lift-off plate: one frame, many plates.
- Plate prints face down for a smooth top; frame prints flat. No supports.
Dimensions
| Measurement | Value (mm) | Notes |
|---|---|---|
| Plate width (X) | 92.2 | 4 × 19.05 pitch + 2 × 8 margin |
| Plate depth (Y) | 92.2 | |
| Plate height (Z) | 6.5 | 1.5 plate + 5 skirt |
| Plate thickness at holes | 1.5 | MX clips latch at 1.5 mm |
| Hole size | 14.1 × 14.1 | nominal 14.0 plus 0.1 for printing |
| Hole pitch | 19.05 | both axes |
| Skirt wall thickness | 2.0 | |
| Corner pad | 9 × 9 × 5 | each of four corners |
| Frame width (X) | 92.2 | |
| Frame depth (Y) | 92.2 | |
| Frame height front / back | 14 / 27 | slope 8° |
| Rail / crossbar width | 8 | |
| Magnet pocket | 6.2 dia × 2.2 deep |
Parts list
| Part | Qty | Material | Size X×Y×Z (mm) | Print orientation | Supports |
|---|---|---|---|---|---|
| Switch plate | 1 | PLA | 92.2 × 92.2 × 6.5 | plate face down | none |
| Slope frame | 1 | PLA | 92.2 × 92.2 × 27 | bottom face down | none |
Hardware and non-printed parts
- 6 × 2 mm N52 disc magnet ×8 (four in the plate, four in the frame; set poles so they attract, test with a spare before gluing)
- Cyanoacrylate gel, a small drop per magnet
- Up to 16 MX-style plate-mount switches (user supplied)
- Optional: 4 self-adhesive rubber feet, 8 mm diameter, under the frame
Fits and tolerances
| Interface | Fit | Clearance per side |
|---|---|---|
| Switch in plate hole (14.1 mm) | clip / press | 0.05 |
| Magnet in pocket (6.2 mm) | press, glued | 0.1 |
| Plate skirt on frame rails | seated, held by magnets | 0 |
The hole clearance is smaller than the 0.2 mm sliding standard because the switch's clips do the holding; print a 2 × 2 hole test first and adjust to 14.0–14.2 if your printer runs tight or loose.
Modeling guide
Origin: centre of the plate in XY, Z = 0 at the underside of the plate (plate) or at the table (frame). +X right, +Y back.
Plate:
- Sketch a 92.2 × 92.2 square, corner radius 3, extrude 1.5.
- Cut 16 square holes 14.1 × 14.1 through the plate, centres at X, Y ∈ {−28.575, −9.525, 9.525, 28.575}.
- Add a skirt: offset the outline inward 2.0 and extrude the ring 5 down from the plate underside.
- Add four corner pads 9 × 9 × 5 at the inside corners of the skirt.
- In each pad bottom face cut a pocket 6.2 diameter × 2.2 deep, centred 4.5 mm in from the plate's outer edges.
Frame:
- Sketch a 92.2 × 92.2 rounded square, corner radius 3.
- Cut out the inside, leaving 8 mm rails on the left and right and 8 mm crossbars front and back. Extrude to 27.
- Cut the top at 8° so the height is 14 mm at the front edge and about 27 mm at the back.
- On the sloped top of each rail, at 4 mm in from the outside and 4.5 mm in from the front and back ends, cut four pockets 6.2 diameter × 2.2 deep, axis perpendicular to the slope.
- Chamfer the bottom outer edge 1 mm.
Print settings
| Setting | Value |
|---|---|
| Material | PLA (PETG if your desk gets warm) |
| Nozzle | 0.4 mm |
| Layer height | 0.25 mm plate (6 layers = 1.5 mm); 0.2 mm frame |
| Walls / perimeters | 3 |
| Infill | 20% gyroid (frame); 100% (plate) |
| Supports | none |
| Brim / adhesion | none |
| Notes | Print a 2 × 2 hole test first. The plate magnet pockets open on the pad bottoms, which face up when the plate prints face down, so nothing bridges. |
Assembly
- Glue magnets into the four plate pockets and four frame pockets; check that each pair attracts before the glue sets.
- Press the switches into the plate from above until the clips click.
- Set the plate on the frame; the magnets pull it into place.
Variants and upsells
- Extra plates ($6–$8 each) as a bundle: linear, tactile and clicky.
- Other layouts (3 × 5, 2 × 8) need their own frame, so sell them as separate decks.
- Choc-profile and Alps variants, with hole sizes changed in the parametric file.
- A card-slot front lip for labels, as a paid add-on.
Selling and distribution
Etsy and keyboard-hobby communities suit the printed deck; Printables and MakerWorld suit the file. Pricing: about 50 g of PLA at roughly $0.025 per gram plus a few hours of machine time plus margin (estimate); sell the plates as separate add-ons. Licence the file CC BY-NC with an optional commercial licence. Keywords: switch tester, mechanical keyboard, keyboard switch tester, MX switch tester, keyboard gift, switch sampler, custom keyboard, desk accessory, keycap, tactile switches, linear switches, gift for keyboard enthusiasts.
Risks and IP notes
- Plate holes can print a little small. Mitigation: print the 2 × 2 test and adjust.
- A thin 1.5 mm plate can flex. Mitigation: 100% infill and the skirt; keep it flat on cooling.
- Market saturation from free files and cheap kits. Mitigation: sell the swap-plate system, not the plate.
- Avoid switch brand names in listings. Mitigation: use "MX-style" and "plate-mount switch".
Resource links
- MX/Choc Keyboard Switch Tester (Keeb.io) — an existing printed tester for sale
- Kailh switch tester (Keychron) — a vendor tester listing
- Switches.mx shop thread (KeebTalk) — a shop whose first product was a switch holder
- Simple switch tester, 1/4/24 positions (MakerWorld) — free version with 14 mm holes
- 4-slot switch tester (MakerWorld) — compact free tester
- switch tester (CGTrader) — paid-model listings for comparison
More from 3D Print Designs