Strata Chess Set with Four-Quadrant Board
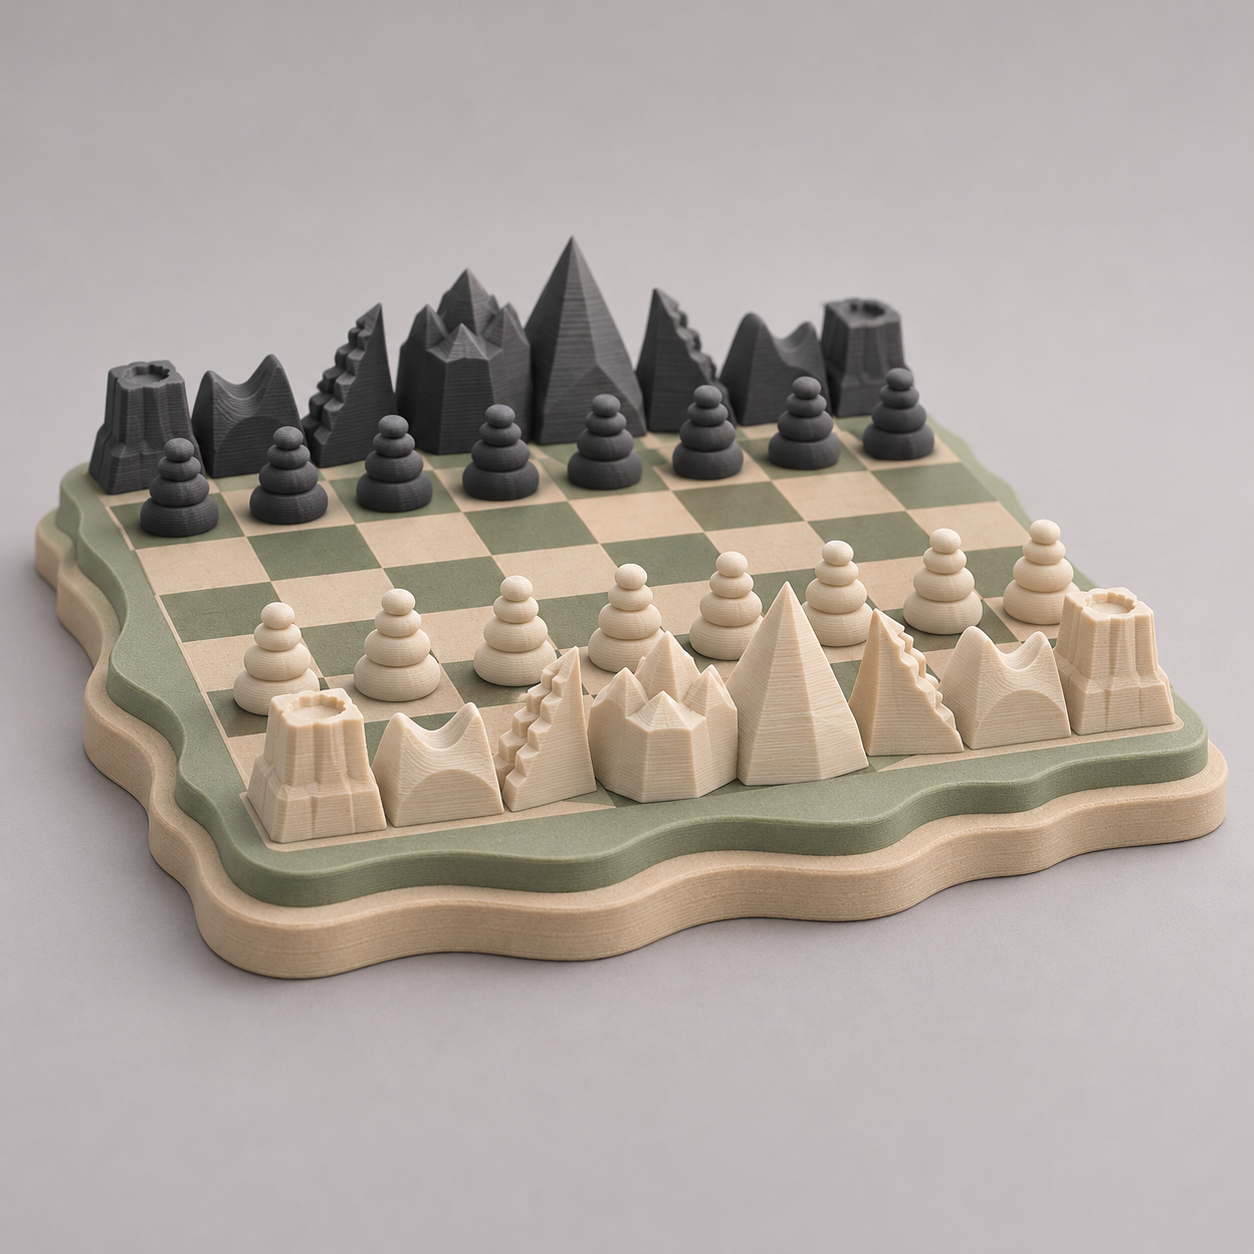
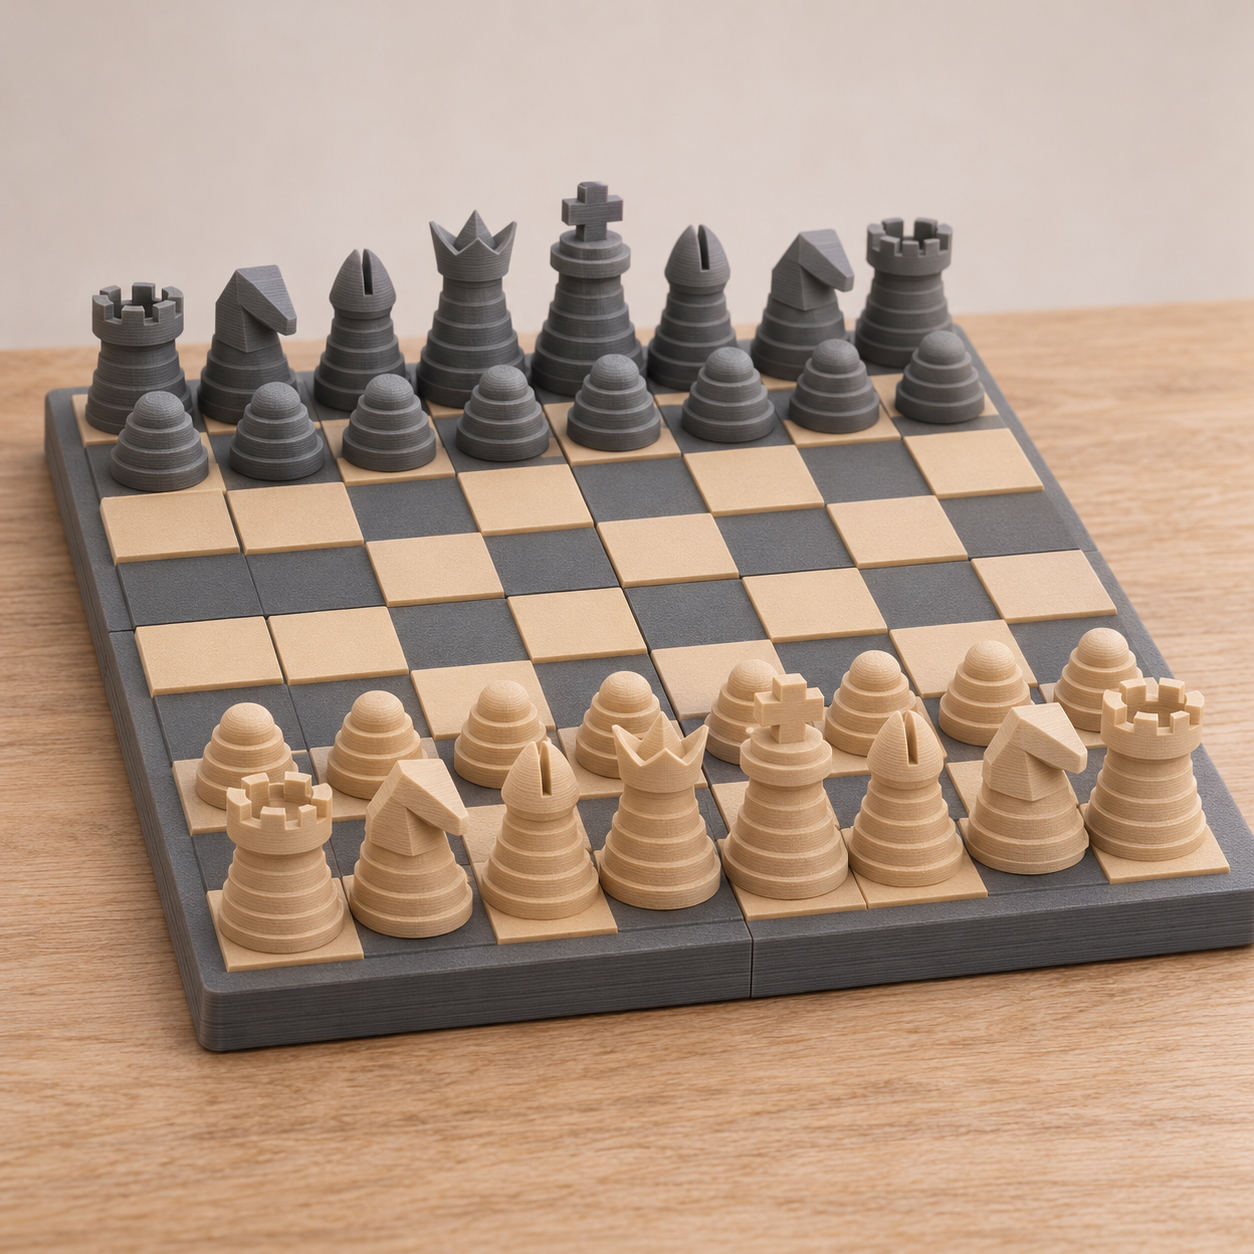
An original full-size chess set whose pieces are stacks of stepped discs, like rock strata, on a 200 mm board that prints as four quadrants and locks together with bow-tie keys.
Strata Chess Set with Four-Quadrant Board
An original full-size chess set whose pieces are stacks of stepped discs, like rock strata, on a 200 mm board that prints as four quadrants and locks together with bow-tie keys.
Date: 2026-11-09 Category: Puzzles and Games Modeling difficulty: Advanced Estimated print: ~35 h total · ~275 g PLA (estimate) Suggested price: $55–$95 printed · $8 digital file (estimate) Status: Concept
Description
A complete 32-piece chess set. Every piece stands on the same 18 mm base and is built from stacked 2 mm discs that shrink as they rise, so the set reads as one family. The pieces differ by their tops: a ball on the pawn, crenels on the rook, a faceted wedge head on the knight, a slit dome on the bishop, five prongs on the queen and a block cross on the king.
The board is 200 × 200 mm with 24 mm squares. It prints as four 100 × 100 mm quadrants, so any printer with a 220 mm bed can make it, and the quadrants join on the underside with four printed bow-tie keys. In two colours, the light squares are raised 0.8 mm, so the board needs only one filament change per quadrant.
Nothing about the set refers to a game franchise, a character or a team. The theme is geology, and it needs no support material or magnets.
Why it sells
Chess sets are an established category on the model sites. MakerWorld carries a flat magnetic chess set, a full-size modular set split into four quadrants, and a foldable set called Chess Prestige that a third-party mirror lists at 10.6k downloads (a mirror, so the count may be out of date). Themed sets are mostly built on someone else's IP, for example the Star Wars and Minecraft sets, which carry someone else's IP and make a poor base for a commercial listing. This is an art idea, so I did not look for sales numbers. The gap is an original, legally clean theme with a board that needs no magnets and no print pauses.
Who buys it
Chess players who want a display piece, gift buyers (birthday, graduation, retirement), and people who like geology or minimalist desk objects. Sold as a printed set on Etsy and at craft markets, and as a file on MakerWorld and Printables.
Design overview
- 32 pieces on a shared 18 mm base, heights 26 (pawn) to 52 mm (king), built from 2 mm stepped discs.
- Six distinct tops, each readable from across the board; the knight head is a flat-faced wedge that prints without support.
- Board 200 × 200 × 5 mm in four 100 × 100 mm quadrants, 24 mm squares, 4 mm border.
- Two board colours with a single colour change: dark floor to z = 4.2, light squares raised from 4.2 to 5.0.
- Four bow-tie keys (30 × 14 mm, 1.9 thick) lock the quadrants through underside pockets. The board lies flat with no visible hardware.
- No magnets, so there are no print pauses on the pieces and the set prints on any machine.
Dimensions
| Measurement | Value (mm) | Notes |
|---|---|---|
| Board width (X) | 200 | assembled; four quadrants of 100 |
| Board depth (Y) | 200 | |
| Board thickness (Z) | 5 | dark squares at 4.2, light squares at 5.0 |
| Square size | 24 | 8 × 8 = 192, plus 4 mm border each side |
| Border | 4 | all four outer edges |
| Piece base diameter | 18 | 3 mm clear of each square edge |
| Disc step height | 2.0 | every piece |
| Piece heights | 26 / 32 / 36 / 40 / 46 / 52 | pawn / rook / knight / bishop / queen / king |
| Key | 30 × 14 × 1.9 | waist 8 wide |
| Key pocket depth | 2.0 | from the underside; 2.2 of floor left above it |
Parts list
| Part | Qty | Material | Size X×Y×Z (mm) | Print orientation | Supports |
|---|---|---|---|---|---|
| Board quadrant A (a1 corner, border left and bottom) | 2 | PLA | 100 × 100 × 5 | underside (z = 0) face down | none (key pocket roofs bridge 15 mm) |
| Board quadrant B (h1 corner, border right and bottom) | 2 | PLA | 100 × 100 × 5 | underside (z = 0) face down | none (key pocket roofs bridge 15 mm) |
| Bow-tie board key | 4 | PLA | 30 × 14 × 1.9 | flat | none |
| Pawn | 16 | PLA | 18 × 18 × 26 | base face down | none |
| Rook | 4 | PLA | 18 × 18 × 32 | base face down | none |
| Knight | 4 | PLA | 18.5 × 18 × 36 | base face down | none |
| Bishop | 4 | PLA | 18 × 18 × 40 | base face down | none |
| Queen | 2 | PLA | 18 × 18 × 46 | base face down | none |
| King | 2 | PLA | 18 × 18 × 52 | base face down | none |
Hardware and non-printed parts
None — fully printed.
Fits and tolerances
Bow-tie keys in underside pockets: sliding fit, 0.15 mm per side in plan and 0.1 mm in depth (key 1.9 thick in a pocket 2.0 deep). Quadrant to quadrant along the seam: butt joint with no clearance, 0.3 mm chamfer on the bottom outer edge only. Pieces on squares: loose, 3 mm clearance per side between the base and the square edge. If the keys bind on a particular printer, scale the key to 99.5% in X and Y.
Modeling guide
Board quadrants: origin at the bottom-left corner of the quadrant's underside, +X right, +Y up the board, +Z toward the playing surface. Pieces: origin at the centre of the base underside, +Z up. All numbers are mm.
1. Board quadrant A (a1 corner, border left and bottom) (×2)
- Sketch on XY: square 100 × 100 with the corner at the origin. Extrude 4.2 (dark squares level).
- On the top face lay out a 4 × 4 grid of 24 × 24 squares occupying X 4 to 100 and Y 4 to 100 (the 4 mm border runs along the left and bottom edges). Square (i,j) starts at X = 4 + 24i, Y = 4 + 24j, with i and j from 0 to 3.
- Extrude the light squares, those where i + j is odd, a further 0.8 (top at z = 5.0). Dark squares, where i + j is even, stay at z = 4.2. The square at the outer corner (i = 0, j = 0) is dark.
- Raise the left and bottom borders (X 0 to 4 and Y 0 to 4) to z = 5.0 as well, so the board has an even frame once the quadrants are joined.
- Pocket the underside (z = 0 face): two half bow-tie pockets, each the key outline offset 0.15 per side (bow-tie polygon with vertices (-15,-7), (-15,7), (0,4), (15,7), (15,-7), (0,-4)), cut 2.0 deep. Half-length 15.15 into the quadrant, so each pocket ends 15.15 from the seam edge. Place them at the middle of the two interior edges: one spans X 84.85 to 100 at Y = 50 (long axis along X), the other spans Y 84.85 to 100 at X = 50 (long axis along Y).
- Chamfer the bottom outer perimeter edge 0.3. Do not chamfer the seam edges.
2. Board quadrant B (h1 corner, border right and bottom) (×2)
- Sketch on XY: square 100 × 100 with the corner at the origin. Extrude 4.2.
- On the top face lay out a 4 × 4 grid of 24 × 24 squares occupying X 0 to 96 and Y 4 to 100 (the border runs along the right and bottom edges). Square (i,j) starts at X = 24i, Y = 4 + 24j.
- Extrude the light squares, those where i + j is odd, a further 0.8 (top at z = 5.0). Dark squares, where i + j is even, stay at 4.2. The outer corner square (i = 3, j = 0) has i + j = 3, so it is light, as h1 should be.
- Raise the right and bottom borders (X 96 to 100 and Y 0 to 4) to z = 5.0.
- Pocket the underside (z = 0 face): two half bow-tie pockets, each the key outline offset 0.15 per side (bow-tie polygon with vertices (-15,-7), (-15,7), (0,4), (15,7), (15,-7), (0,-4)), cut 2.0 deep. Half-length 15.15 into the quadrant, so each pocket ends 15.15 from the seam edge. Place them at the middle of the two interior edges: one spans X 0 to 15.15 at Y = 50 (long axis along X), the other spans Y 84.85 to 100 at X = 50 (long axis along Y).
- Chamfer the bottom outer perimeter edge 0.3. Do not chamfer the seam edges.
3. Bow-tie board key (×4)
- Sketch on XY: bow-tie polygon with vertices (-15,-7), (-15,7), (0,4), (15,7), (15,-7), (0,-4), all dimensions mm.
- Extrude 1.9. Fillet the six vertical edges 0.5 so the key slides into the pocket without catching.
4. Pawn (×16)
- Origin at the centre of the base underside, +Z up. Revolve about Z a stack of 5 discs, each 2.0 tall, with radii 9, 8, 7, 6 and 5 mm (z 0 to 10).
- Add a neck: cylinder radius 4.5, z 10 to 18.
- Add a head: sphere radius 6 centred at z = 20, so the top is at z = 26.
- Fillet the bottom disc's lower edge 0.4 (elephant-foot relief).
5. Rook (×4)
- Origin at the centre of the base underside, +Z up. Revolve about Z a stack of 12 discs, each 2.0 tall, radius 9 mm at the bottom disc and 0.25 mm smaller on each disc above (z 0 to 24). (radii 9.00 down to 6.25).
- Add the crown: cylinder radius 6.5, z 24 to 32.
- Cut four crenel notches in the crown, each 3.5 wide (tangential) × 3 deep, from z 29 to 32, at 0°, 90°, 180° and 270° around Z.
- Fillet the bottom disc's lower edge 0.4.
6. Knight (×4)
- Origin at the centre of the base underside, +Z up, +X pointing the way the knight faces. Revolve a stack of 9 discs, each 2.0 tall, radius 9 mm at the bottom and 0.5 mm smaller each disc up (radii 9 down to 5, z 0 to 18).
- Sketch the head on the XZ plane as a closed polygon: (-5,18), (5,18), (9,27), (9.5,30), (9.5,32), (2,36), (-4,36), (-6,28), back to (-5,18). Extrude symmetrically 10 (Y -5 to +5).
- Cut a 3 × 3 × 3 notch for the mouth: a box at X 8.5 to 9.5, Z 28 to 30, Y -5 to 5, depth 1 into the snout.
- Fillet the head's vertical edges 0.8 and the bottom disc's lower edge 0.4. Every face slopes within 45° of vertical, so the head prints without support.
7. Bishop (×4)
- Origin at the centre of the base underside, +Z up. Revolve a stack of 12 discs, each 2.0 tall, radius 9 mm at the bottom and 0.4 mm smaller each disc up (radii 9.0 down to 4.6, z 0 to 24).
- Add a cone from radius 4.6 at z = 24 to radius 5.5 at z = 25, then a cylinder radius 5.5 from z = 25 to 28.
- Revolve a three-point arc from (r 5.5, z 28) through (3.6, 34) to (0, 38) to form the pointed head. Add a finial sphere radius 2 centred at z = 38 (top at z = 40).
- Cut a slit 1.2 wide through the head, in a plane tilted 45° from vertical about the Y axis, running from z = 30 on the axis to the head surface.
- Fillet the bottom disc's lower edge 0.4.
8. Queen (×2)
- Origin at the centre of the base underside, +Z up. Revolve a stack of 14 discs, each 2.0 tall, radius 9 mm at the bottom and 0.4 mm smaller each disc up (radii 9.0 down to 3.8, z 0 to 28).
- Add a flare: cone from radius 3.8 at z = 28 to radius 7 at z = 36, then a collar cylinder radius 7, z 36 to 40.
- Add five prongs on the collar top, each a triangular prism 4 wide at the base × 2 deep × 6 tall (z 40 to 46), centred on a 6 mm radius circle at 72° spacing.
- Fillet the bottom disc's lower edge 0.4.
9. King (×2)
- Origin at the centre of the base underside, +Z up. Revolve a stack of 15 discs, each 2.0 tall, radius 9 mm at the bottom and 0.4 mm smaller each disc up (radii 9.0 down to 3.4, z 0 to 30).
- Add a flare: cone from radius 3.4 at z = 30 to radius 6.5 at z = 38, then a collar cylinder radius 6.5, z 38 to 42.
- Add the cross: a post 4 × 4 × 10 (z 42 to 52) centred on Z, and an arm 10 × 4 × 4 at z 46 to 50 centred on the post, long axis along X.
- Fillet the bottom disc's lower edge 0.4. The arm cantilevers 3 mm each side, which prints without support.
Assembled board, for reference: quadrant A at the bottom left (a1 corner), quadrant B at the bottom right, quadrant A rotated 180° at the top right, quadrant B rotated 180° at the top left. Check that a1 and h8 are dark and h1 and a8 light. Lay a quadrant A down with the border on the left and bottom to see the layout.
Print settings
| Setting | Value |
|---|---|
| Material | PLA, two colours (warm sand and slate grey) |
| Nozzle | 0.4 mm |
| Layer height | 0.2 mm for the board, 0.16 mm for the pieces |
| Walls / perimeters | 3 (board), 3 (pieces) |
| Infill | 15% gyroid (board), 20% gyroid (pieces) |
| Supports | None |
| Brim / adhesion | None; 5 mm brim on the king and queen if they lift |
| Notes | Board: change colour at layer 22 (z = 4.2) so light squares print in sand over a slate floor. Pieces: print 8 at once per colour, spaced 22 mm apart. Print every quadrant at the same orientation to keep the keys fitting. |
Assembly
- Dry-fit each key into a half pocket on one quadrant, bow-tie wide end first.
- Slide the neighbouring quadrant onto the key, seam edges flush, working from the underside.
- Repeat for the four seams (two on each axis), then turn the board over and check that it lies flat.
- Set the pieces: sand on ranks 1 and 2, slate on ranks 7 and 8, queens on their own colour.
Variants and upsells
Parametric: square size 20 to 26 mm and base diameter scale with it. Variants: a dark-only monochrome board, a travel-size set at 70% scale, glossy silk filament for the pieces, and a magnet version with a 6 × 2 mm disc under each base. Bundles: a rules card and a drawstring bag. Next sets in the collection: the same system with a different top vocabulary, such as a tide set with wave crests, or a contour set with rounded terraces.
Selling and distribution
Etsy and craft markets suit the printed set. Sell the file on MakerWorld and Printables, since chess is already an established category there. The material cost is about 275 g of PLA at roughly $18 to $25 per kg, or $5 to $7. Machine time is 35 hours, so the $55 to $95 estimate is mostly time. License the file CC BY-NC and offer the commercial licence separately. Listing keywords: 3D printed chess set, modern chess set, minimalist chess, geometric chess pieces, strata chess, modular chess board, chess gift, desk chess, full size chess, PLA chess set.
Risks and IP notes
- Time: 35 hours of printing and four quadrants with matched colours. Mitigation: sell sets in batches, print pieces eight at a time.
- Tall pieces wobbling on the bed: the king is 52 mm tall on an 18 mm base. Mitigation: 0.16 mm layers, 5 mm brim if needed, slow outer walls.
- Saturation: chess is a crowded category. Mitigation: the original strata theme and tool-free board are the hook; do not compete on price.
- IP: the stepped-disc style is generic, and chess piece shapes are traditional. Keep franchise names out of listings.
- Board warp: a 100 mm PLA quadrant can still curl at the corners. Mitigation: join the quadrants with keys only and no glue, so a warped one can be reprinted alone.
Resource links
- Magnetic flat chess set (MakerWorld) — A flat magnetic chess set on MakerWorld, an example of the category
- Full-size modular magnetic chess set (model-site mirror) — Full-size set split into quadrants, the same board strategy used here
- Chess Prestige (3dsearch mirror) — All-in-one foldable set listed at 10.6k downloads on a mirror site; the count may be dated
- Star Wars chess set (MakerWorld) — Example of franchise-themed sets, which this design avoids
- Minecraft chess set, magnetic (MakerWorld) — Second franchise-themed example, showing the original-theme gap
More from 3D Print Designs