Two-in-One Shelf-Pin & Dowel Drilling Jig
A metal-bushed drilling jig that handles both shelf-pin holes and face-frame dowel joints from one body, with a snap-shut depth collar included, instead of making a woodworker buy two single-purpose…
Two-in-One Shelf-Pin & Dowel Drilling Jig
A metal-bushed drilling jig that handles both shelf-pin holes and face-frame dowel joints from one body, with a snap-shut depth collar included, instead of making a woodworker buy two single-purpose jigs.
Date: 2026-09-27 Category: Tools and Workshop Modeling difficulty: Advanced Estimated print: ~6 h total · ~120 g PLA + TPU (estimate) Suggested price: $24–$34 printed (with bushings) · $8 digital file (estimate) Status: Concept
Description
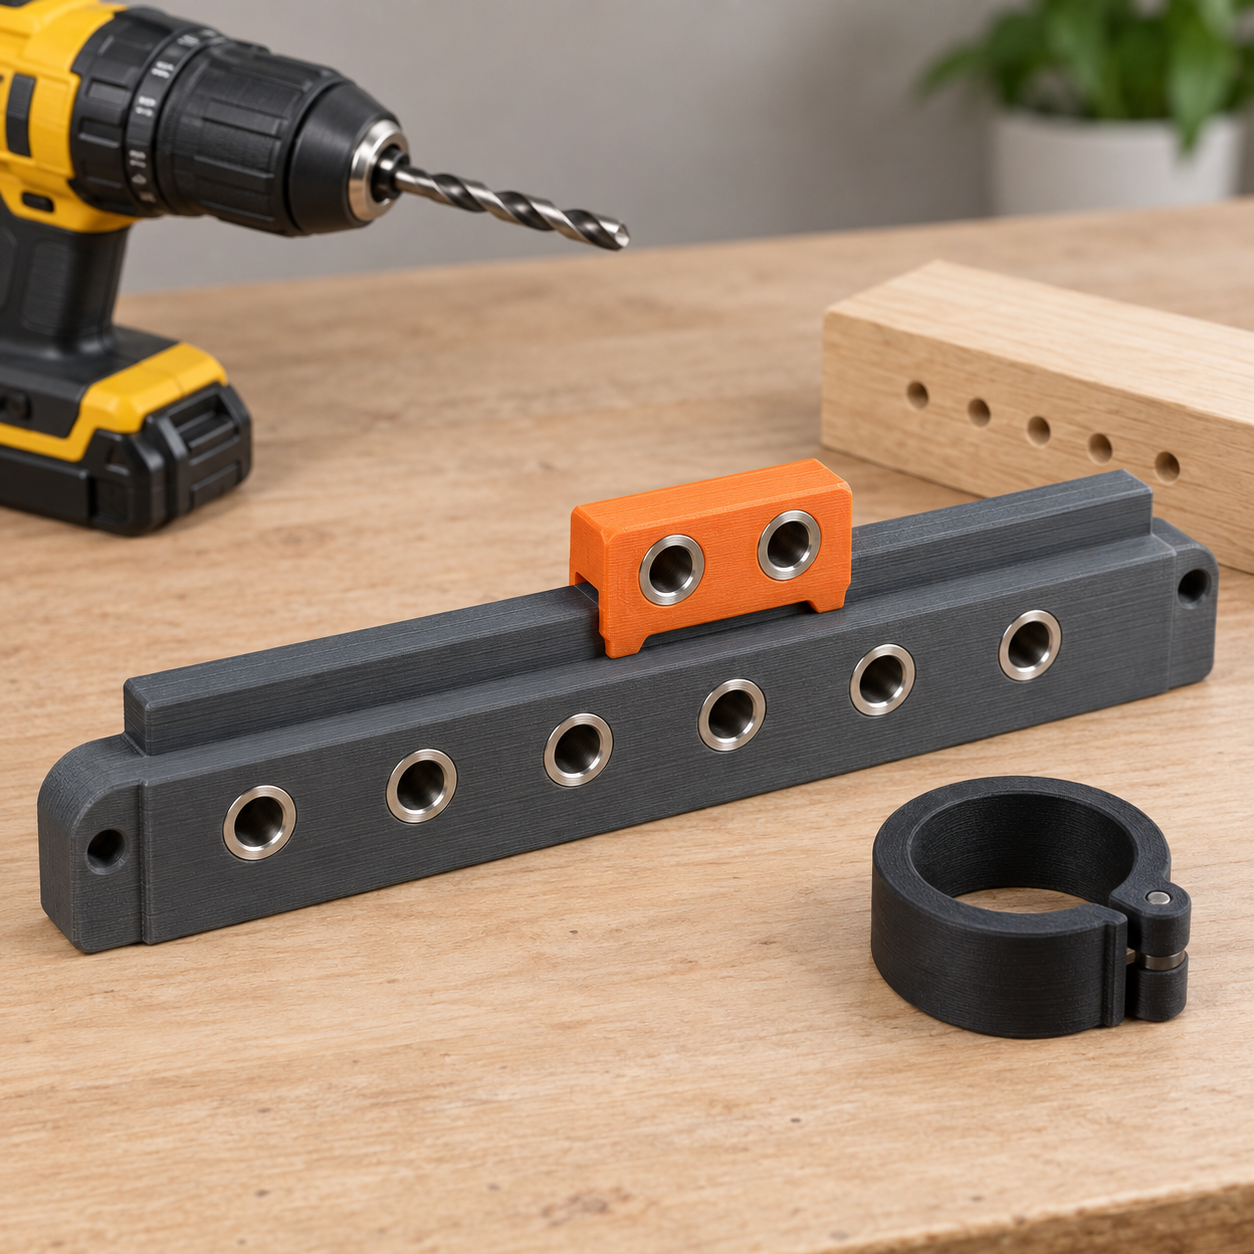
The jig is a 184 mm rail body with six holes on the 32 mm shelf-pin spacing that's standard across cabinet hardware, each hole lined with a steel bushing so repeated 5 mm drilling doesn't wear out the plastic. A separate dowel guide block slides onto a dovetail rail along the jig's top edge and carries two more bushed holes — 6 mm and 8 mm — for drilling dowel joints in cabinet face frames and shelves. A registration flange along the jig's bottom edge hooks over the workpiece edge so every hole lines up the same distance in, every time.
A third part, a depth-stop collar, clamps around a drill bit shank with a printed living hinge and snaps shut with no screws or hardware. Three snap-in reducer sleeves adapt the same collar to 5 mm, 6 mm, and 8 mm bit shanks, so one collar covers every bit the jig uses.
Between the two guide holes on one body and a depth stop that needs no tools to adjust, this replaces what's usually two or three separate jig purchases.
Why it sells
3D-printed shelf-pin and dowel jigs already sell on Etsy as standalone products — one listing sells an adjustable shelf-pin jig with hardened steel drill guides and metal threaded inserts, another sells a router-based dowel jig system, and a third sells hinge-specific router templates (Etsy: adjustable shelf pin drilling jig, Etsy: DowlMate dowel jig system, Etsy: hinge jig router template). Analysis of the 3D-print-farm business circuit points at exactly this category as the profitable one: products that "solve a specific problem for a niche audience," specifically calling out "specialized jigs or fixtures" as more defensible than generic organizers, which are largely given away free on MakerWorld and Printables (23 Best Things to 3D Print and Sell in 2026, eufymake). That free-organizer glut is visible directly — dozens of near-identical free nozzle and tool organizers exist on MakerWorld and Printables with no path to a paid sale (MakerWorld: Nozzle Storage collection), which is the evidence against building another organizer and the reason this design is a jig instead.
Every jig listing found in this research does one job. None combine shelf-pin and dowel drilling with a shared depth-stop accessory in a single purchase.
Who buys it
Hobbyist and semi-pro woodworkers building cabinets, shelving, or face-frame furniture — the kind of buyer who already owns a drill press or router but wants repeatable, screw-free hole spacing without hand-marking every hole. Sold on Etsy alongside the existing jig listings, at woodworking-tool booths, and through maker-community classifieds (Bambu Lab and Prusa forums skew toward exactly this buyer).
Design overview
- Six 5 mm shelf-pin guide holes on the 32 mm industry-standard pitch, each lined with a press-fit steel bushing
- A bottom-edge registration flange that hooks over the workpiece so hole spacing from the edge is identical every time, no clamping needed
- A separate dowel guide block that slides onto a dovetail rail and can be repositioned anywhere along the jig or removed entirely
- Two bushed dowel guide holes (6 mm and 8 mm) on the dowel block, covering the two most common dowel sizes without swapping bushings
- A tool-free depth-stop collar with a living-hinge clasp and three snap-in reducer sleeves (5/6/8 mm), so one collar fits every bit the jig uses
- All wear surfaces (the holes that actually contact spinning steel) are metal-bushed, not bare plastic — the printed body only carries structure and alignment
- The one feature no comparable listing offers: shelf-pin drilling, dowel drilling, and depth control in one purchase instead of three
Dimensions
| Measurement | Value (mm) | Notes |
|---|---|---|
| Rail body length (X) | 184 | |
| Rail body width (Y) | 30 | |
| Rail body height (Z) | 12 | |
| Shelf-pin hole spacing | 32 | industry-standard cabinet pitch |
| Shelf-pin hole positions (from left edge) | 12, 44, 76, 108, 140, 172 | 6 holes |
| Shelf-pin bore diameter (printed, before bushing) | 7.9 | for 8 mm OD bushing, press fit |
| Registration flange | 184 × 15 × 5 | along the bottom edge |
| Dovetail rail (top edge) | 184 × 6 × 4 | male dovetail the block slides on |
| Dowel guide block | 40 × 40 × 30 | |
| Dowel bore diameter, 6 mm bit | 9.9 | for 10 mm OD bushing, press fit |
| Dowel bore diameter, 8 mm bit | 11.9 | for 12 mm OD bushing, press fit |
| Depth collar outer diameter × height | 22 × 22 | |
| Depth collar bore (largest, before sleeve) | 8.4 | fits 8 mm shank directly, or with a reducer sleeve |
Parts list
| Part | Qty | Material | Size X×Y×Z (mm) | Print orientation | Supports |
|---|---|---|---|---|---|
| Rail body | 1 | PLA | 184 × 30 × 12 | Flat, flange side down | none |
| Dowel guide block | 1 | PLA | 40 × 40 × 30 | Flat on its base | none |
| Depth-stop collar (with living hinge) | 1 | TPU | 22 × 22 × 22 | Hinge axis vertical | none |
| Reducer sleeve, 5 mm | 1 | TPU | 8.6 × 8.6 × 10 | Flat, either end down | none |
| Reducer sleeve, 6 mm | 1 | TPU | 8.6 × 8.6 × 10 | Flat, either end down | none |
Hardware and non-printed parts
- 6 × steel drill guide bushing, 8 mm OD × 5 mm ID × 10 mm long — press-fit into the rail body's six shelf-pin holes
- 1 × steel drill guide bushing, 10 mm OD × 6 mm ID × 12 mm long — press-fit into the dowel block's 6 mm hole
- 1 × steel drill guide bushing, 12 mm OD × 8 mm ID × 12 mm long — press-fit into the dowel block's 8 mm hole
- No hardware in the depth-stop collar — it closes with a printed living hinge and a printed snap tab
Fits and tolerances
- Steel bushing to printed bore (all three bushing sizes): press fit, 0.1 mm interference per side (bore printed 0.1 mm undersized versus the bushing OD, then reamed lightly if the print runs tight)
- Dowel block to dovetail rail: sliding fit, 0.2 mm clearance per side, loose enough to slide by hand along the full 184 mm rail but snug enough to stay put while drilling
- Depth collar to drill bit shank (direct, 8 mm bit): snap/clamp fit via the living hinge, 0.2 mm clearance before clamping, closed by hand pressure
- Reducer sleeve to collar bore: snap fit — the sleeve's 8.0 mm OD body gives 0.2 mm clearance per side for insertion, while its three ribs at 8.6 mm OD interfere by 0.1 mm per side to hold it in place until pulled out
- Reducer sleeve bore to bit shank (5 mm or 6 mm): snap/clamp fit, 0.2 mm clearance before clamping
Modeling guide
Origin at the left-front-bottom corner of the rail body, base at Z = 0, +X along the rail's length, +Y across its width, +Z up.
Rail body
- Sketch a 184 × 30 mm rectangle at Z = 0, corner radius 3 mm. Extrude 12 mm in +Z.
- On the top face, at Y = 15 (centerline), cut six through-holes 7.9 mm diameter at X = 12, 44, 76, 108, 140, 172.
- On the front face (Y = 0), sketch the registration flange: a rectangle 184 mm long × 5 mm tall, extruded 15 mm in −Y from Y = 0, positioned so its top surface sits flush with the rail body's bottom face (Z = 0), forming an L-shaped hook profile in cross-section.
- On the top edge (Y = 30), sketch the dovetail rail profile: a trapezoid 4 mm tall, 6 mm wide at the base narrowing to 8 mm wide at the top (a reverse dovetail, wider at the top so a socket locks over it), running the full 184 mm length. Extrude/sweep along X.
- Fillet all external edges of the rail body at 1.5 mm radius, except the dovetail and flange, which stay sharp for a positive mechanical lock.
Dowel guide block
- Sketch a 40 × 40 mm square at Z = 0, corner radius 4 mm. Extrude 30 mm in +Z.
- On the bottom face, cut a dovetail socket matching the rail's dovetail profile (0.2 mm larger per side for clearance), running the full 40 mm depth of the block so it slides on from either end.
- On the top face, drill two vertical through-holes: 9.9 mm diameter at (12, 20), and 11.9 mm diameter at (28, 20), each running the full 30 mm height.
- Fillet the block's top outer edges at 3 mm radius.
Depth-stop collar
- Sketch a 22 mm diameter circle centered at the origin at Z = 0. Extrude 22 mm in +Z to form a cylinder.
- Cut an 8.4 mm diameter through-bore along the cylinder's axis.
- Slice the cylinder in half along a plane through its axis. On one cut face, model a living hinge: a 0.6 mm thick flexible web, 15 mm long, connecting the two halves at that seam.
- On the opposite seam, model a snap tab: a 2 mm tall hook on one half that catches a matching lip on the other half, so the collar closes and stays shut under hand pressure.
Reducer sleeves (5 mm and 6 mm; the 8 mm size uses the collar's bore directly with no sleeve)
- Sketch an 8.0 mm outer diameter circle, extrude 10 mm.
- Cut a through-bore sized to the target bit shank (5.2 mm for the 5 mm sleeve, 6.2 mm for the 6 mm sleeve).
- Add three 0.3 mm tall snap ribs around the outer diameter (reaching 8.6 mm OD at the rib tips), spaced 120 degrees apart, so the sleeve clicks into the collar's 8.4 mm bore and stays put until pulled out.
Print settings
| Setting | Value |
|---|---|
| Material | PLA (rail body, dowel block), TPU 95A (collar and sleeves) |
| Nozzle | 0.4 mm |
| Layer height | 0.2 mm |
| Walls / perimeters | 4 (rail body and dowel block, for bushing press-fit strength) |
| Infill | 25% gyroid (rail body, dowel block); 100% (TPU collar and sleeves) |
| Supports | none |
| Brim / adhesion | brim 5 mm on the rail body |
| Notes | Print the rail body and dowel block at 4 perimeters minimum so the bushing press-fit bores don't crack; print TPU parts at reduced speed (≤30 mm/s) for clean living-hinge flex |
Assembly
- Press the six 8 mm OD steel bushings into the rail body's six shelf-pin holes.
- Press the 10 mm OD and 12 mm OD bushings into the dowel block's two holes.
- Slide the dowel block onto the rail body's dovetail from either end; reposition as needed for each job.
- To set drilling depth, snap the depth-stop collar around the bit shank at the desired depth (use a reducer sleeve for 5 mm or 6 mm shanks), then drill until the collar contacts the workpiece surface.
Variants and upsells
- A longer 12-hole rail variant (368 mm, printed as two 184 mm segments joined by a printed tongue-and-groove splice) for full-height cabinet sides
- A metric/imperial dowel size swap (8 mm and 10 mm bores instead of 6 mm and 8 mm) for buyers working in different dowel standards
- Bundle upsell: sell the jig with a pre-selected 5-piece brad-point drill bit set
- A pegboard-mount clip accessory so the whole kit hangs on a shop wall between uses
Selling and distribution
List on Etsy next to the existing shelf-pin and dowel jig listings, since both categories show active sales activity there already (Etsy: adjustable shelf pin drilling jig, Etsy: DowlMate dowel jig system). Price the printed jig with bushings included at $24–$34 (material and machine time are low; the steel bushings are the main input cost), and the digital file alone at $8 for buyers who source their own bushings, under a CC BY-NC license. A woodworking-tool-focused Etsy shop or a maker-market table both suit this better than a general 3D-print storefront, since the buyer is shopping for a tool, not decor.
Listing keywords: shelf pin jig, dowel jig, cabinet drilling jig, 32mm system jig, face frame joinery, drill guide bushing jig, woodworking jig, adjustable drilling jig, cabinet hardware jig, depth stop collar.
Risks and IP notes
- Printed bores that receive press-fit steel bushings can split if wall thickness around the bore is too thin — keep at least 4 mm of solid plastic around every bushing bore, which the 4-perimeter wall setting mostly guarantees, but verify in slicer preview
- The shelf-pin and dowel jig category already has direct sellers; differentiate on the combined jig plus tool-free depth collar, not on price alone
- TPU living hinges fatigue with repeated flexing — spec a hinge web thickness of 0.6 mm (thicker than a typical 0.4 mm snap-fit hinge) for extra cycle life, and note in the listing that heavy daily shop use may need a replacement collar after extended use
- Standard 32 mm shelf-pin spacing and generic dowel joinery are established woodworking methods with no design-patent risk from using them; avoid copying any specific competitor's jig silhouette or branding in photos and listing copy
Resource links
- Etsy: adjustable shelf pin drilling jig — comparable single-purpose shelf-pin jig with steel guides
- Etsy: DowlMate dowel jig system — comparable dowel jig sold as a 13-part system
- Etsy: hinge jig router template — shows the jig-for-a-specific-joint category is an active Etsy niche
- Printables: Shelf Pin Drilling Jig — a free comparable design, showing the baseline feature set to beat
- 23 Best Things to 3D Print and Sell in 2026, eufymake — names specialized jigs and fixtures as a more defensible category than generic organizers
- MakerWorld: Nozzle Storage collection — evidence of the free-organizer glut that argues against building another organizer
More from 3D Print Designs